
Linux 部署 Kong云原生API网关
摘要: 本文介绍了Kong网关的部署与配置过程。Kong是一款轻量级、灵活的云原生API网关,支持微服务架构和混合云部署。环境采用两台Ubuntu24.04服务器(Kong网关节点和用户服务节点),通过PostgreSQL16作为数据存储。安装步骤包括:配置PostgreSQL数据库(创建用户/库)、设置Kong官方APT源、安装社区版3.9.1,并进行基本配置(数据库连接参数)。最后通过kong
Kong网关介绍
Kong Gateway 是一款轻量级、快速且灵活的云原生 API 网关。API 网关是一种反向代理,允许您管理、配置并路由到您的 API 的请求。
Kong Gateway 运行在任何 RESTful API 之前,并且可以通过模块和插件进行扩展。它设计用于运行在分散式架构中,包括混合云和多云部署。
使用 Kong Gateway,用户可以:
- 利用工作流自动化和现代 GitOps 实践
- 实现应用程序/服务的去中心化,向微服务转型
- 创建一个繁荣的 API 开发者生态系统
- 主动识别与 API 相关的异常和威胁
- 保护和管理 API/服务,提升整个组织的 API 可见性。
环境规划
准备两台Ubuntu服务器作为部署环境:
| 主机名 | IP地址 | OS |
|---|---|---|
| kong-gateway | 192.168.73.12 | Ubuntu24.04 |
| user-service | 192.168.73.11 | Ubuntu24.04 |
分别配置主机名
root@ubuntu:~# hostnamectl set-hostname kong-gateway
root@ubuntu:~# hostnamectl set-hostname user-service
安装PostgreSQL数据库
使用Ubuntu默认APT源安装PostgreSQL数据库,查看可安装版本
root@kong-gateway:~# apt-cache madison postgresql
postgresql | 16+257build1.1 | http://mirrors.tuna.tsinghua.edu.cn/ubuntu noble-updates/main amd64 Packages
postgresql | 16+257build1 | http://mirrors.tuna.tsinghua.edu.cn/ubuntu noble/main amd64 Packages
安装PostgreSQL
sudo apt install -y postgresql postgresql-contrib
配置服务随系统启动
sudo systemctl enable postgresql
查看服务运行状态
root@ubuntu:~# systemctl status postgresql@16-main.service
● postgresql@16-main.service - PostgreSQL Cluster 16-main
     Loaded: loaded (/usr/lib/systemd/system/postgresql@.service; enabled-runtime; preset: enabled)
     Active: active (running) since Sat 2025-06-21 17:00:25 CST; 51s ago
    Process: 3692 ExecStart=/usr/bin/pg_ctlcluster --skip-systemctl-redirect 16-main start (code=exited, status=0/SUCCESS)
   Main PID: 3697 (postgres)
      Tasks: 6 (limit: 4547)
     Memory: 18.4M (peak: 27.2M)
        CPU: 96ms
     CGroup: /system.slice/system-postgresql.slice/postgresql@16-main.service
             ├─3697 /usr/lib/postgresql/16/bin/postgres -D /var/lib/postgresql/16/main -c config_file=/etc/postgresql/16/main/postgresql.conf
             ├─3698 "postgres: 16/main: checkpointer "
             ├─3699 "postgres: 16/main: background writer "
             ├─3701 "postgres: 16/main: walwriter "
             ├─3702 "postgres: 16/main: autovacuum launcher "
             └─3703 "postgres: 16/main: logical replication launcher "

Jun 21 17:00:23 ubuntu systemd[1]: Starting postgresql@16-main.service - PostgreSQL Cluster 16-main...
Jun 21 17:00:25 ubuntu systemd[1]: Started postgresql@16-main.service - PostgreSQL Cluster 16-main.
切换到默认的 PostgreSQL 用户:
sudo -i -u postgres
启动 PostgreSQL shell:
psql
创建一个 kong 用户和密码:
CREATE USER kong WITH PASSWORD 'kong';
创建一个名为 kong 的数据库,并将该用户设为所有者:
CREATE DATABASE kong OWNER kong;
退出 PostgreSQL,退出 PostgreSQL 命令行:
exit
安装kong-gateway
设置 Kong APT 仓库。参考:https://cloudsmith.io/~kong/repos/
curl -1sLf 'https://packages.konghq.com/public/gateway-39/setup.deb.sh' | sudo -E bash
更新仓库:
sudo apt-get update
查看可安装的版本,分社区版和企业版:
root@kong-gateway:~# apt-cache madison kong
      kong |      3.9.1 | https://packages.konghq.com/public/gateway-39/deb/ubuntu noble/main amd64 Packages
      kong |      3.9.0 | https://packages.konghq.com/public/gateway-39/deb/ubuntu noble/main amd64 Packages
root@kong-gateway:~#
root@kong-gateway:~# apt-cache madison kong-enterprise-edition
kong-enterprise-edition |    3.9.1.1 | https://packages.konghq.com/public/gateway-39/deb/ubuntu noble/main amd64 Packages
kong-enterprise-edition |    3.9.1.0 | https://packages.konghq.com/public/gateway-39/deb/ubuntu noble/main amd64 Packages
kong-enterprise-edition |    3.9.0.1 | https://packages.konghq.com/public/gateway-39/deb/ubuntu noble/main amd64 Packages
kong-enterprise-edition |    3.9.0.0 | https://packages.konghq.com/public/gateway-39/deb/ubuntu noble/main amd64 Packages
安装 Kong社区版本:
sudo apt-get install -y kong=3.9.1
可选:通过将软件包标记为 hold 来防止意外升级:
sudo apt-mark hold kong
配置kong
创建kong配置文件
root@kong-gateway:~# cd /etc/kong/
root@kong-gateway:/etc/kong# ll
total 156
drwxrwxr-x   2 kong kong     53 Jun 21 18:28 ./
drwxr-xr-x 113 root root   8192 Jun 21 18:28 ../
-rwxrwxr-x   1 kong kong 140224 Jun  4 17:30 kong.conf.default*
-rw-rw-r--   1 kong kong    265 Jun  4 17:22 kong.logrotate
root@kong-gateway:/etc/kong# cp kong.conf.default kong.conf
root@kong-gateway:/etc/kong#
修改数据库连接相关配置
root@kong-gateway:/etc/kong# cat /etc/kong/kong.conf
database = postgres           # 使用 PostgreSQL 数据库
pg_host = 127.0.0.1           # PostgreSQL 服务器的地址
pg_port = 5432                # PostgreSQL 的端口
pg_user = kong                # PostgreSQL 用户
pg_password = kong            # PostgreSQL 用户密码
pg_database = kong            # 要连接的数据库名
初始化数据库
root@kong-gateway:/etc/kong# kong migrations bootstrap
2025/06/21 18:33:24 [warn] ulimit is currently set to "1024". For better performance set it to at least "4096" using "ulimit -n"
2025/06/21 18:33:24 [warn] ulimit is currently set to "1024". For better performance set it to at least "4096" using "ulimit -n"
Bootstrapping database...
migrating core on database 'kong'...
core migrated up to: 000_base (executed)
core migrated up to: 003_100_to_110 (executed)
core migrated up to: 004_110_to_120 (executed)
core migrated up to: 005_120_to_130 (executed)
core migrated up to: 006_130_to_140 (executed)
core migrated up to: 007_140_to_150 (executed)
core migrated up to: 008_150_to_200 (executed)
core migrated up to: 009_200_to_210 (executed)
core migrated up to: 010_210_to_211 (executed)
core migrated up to: 011_212_to_213 (executed)
core migrated up to: 012_213_to_220 (executed)
core migrated up to: 013_220_to_230 (executed)
core migrated up to: 014_230_to_270 (executed)
core migrated up to: 015_270_to_280 (executed)
core migrated up to: 016_280_to_300 (executed)
core migrated up to: 017_300_to_310 (executed)
core migrated up to: 018_310_to_320 (executed)
core migrated up to: 019_320_to_330 (executed)
core migrated up to: 020_330_to_340 (executed)
core migrated up to: 021_340_to_350 (executed)
core migrated up to: 022_350_to_360 (executed)
core migrated up to: 023_360_to_370 (executed)
core migrated up to: 024_380_to_390 (executed)
migrating acl on database 'kong'...
acl migrated up to: 000_base_acl (executed)
acl migrated up to: 002_130_to_140 (executed)
acl migrated up to: 003_200_to_210 (executed)
acl migrated up to: 004_212_to_213 (executed)
migrating acme on database 'kong'...
acme migrated up to: 000_base_acme (executed)
acme migrated up to: 001_280_to_300 (executed)
acme migrated up to: 002_320_to_330 (executed)
acme migrated up to: 003_350_to_360 (executed)
migrating ai-proxy on database 'kong'...
ai-proxy migrated up to: 001_360_to_370 (executed)
migrating basic-auth on database 'kong'...
basic-auth migrated up to: 000_base_basic_auth (executed)
basic-auth migrated up to: 002_130_to_140 (executed)
basic-auth migrated up to: 003_200_to_210 (executed)
migrating bot-detection on database 'kong'...
bot-detection migrated up to: 001_200_to_210 (executed)
migrating hmac-auth on database 'kong'...
hmac-auth migrated up to: 000_base_hmac_auth (executed)
hmac-auth migrated up to: 002_130_to_140 (executed)
hmac-auth migrated up to: 003_200_to_210 (executed)
migrating http-log on database 'kong'...
http-log migrated up to: 001_280_to_300 (executed)
migrating ip-restriction on database 'kong'...
ip-restriction migrated up to: 001_200_to_210 (executed)
migrating jwt on database 'kong'...
jwt migrated up to: 000_base_jwt (executed)
jwt migrated up to: 002_130_to_140 (executed)
jwt migrated up to: 003_200_to_210 (executed)
migrating key-auth on database 'kong'...
key-auth migrated up to: 000_base_key_auth (executed)
key-auth migrated up to: 002_130_to_140 (executed)
key-auth migrated up to: 003_200_to_210 (executed)
key-auth migrated up to: 004_320_to_330 (executed)
migrating oauth2 on database 'kong'...
oauth2 migrated up to: 000_base_oauth2 (executed)
oauth2 migrated up to: 003_130_to_140 (executed)
oauth2 migrated up to: 004_200_to_210 (executed)
oauth2 migrated up to: 005_210_to_211 (executed)
oauth2 migrated up to: 006_320_to_330 (executed)
oauth2 migrated up to: 007_320_to_330 (executed)
migrating opentelemetry on database 'kong'...
opentelemetry migrated up to: 001_331_to_332 (executed)
migrating post-function on database 'kong'...
post-function migrated up to: 001_280_to_300 (executed)
migrating pre-function on database 'kong'...
pre-function migrated up to: 001_280_to_300 (executed)
migrating rate-limiting on database 'kong'...
rate-limiting migrated up to: 000_base_rate_limiting (executed)
rate-limiting migrated up to: 003_10_to_112 (executed)
rate-limiting migrated up to: 004_200_to_210 (executed)
rate-limiting migrated up to: 005_320_to_330 (executed)
rate-limiting migrated up to: 006_350_to_360 (executed)
migrating response-ratelimiting on database 'kong'...
response-ratelimiting migrated up to: 000_base_response_rate_limiting (executed)
response-ratelimiting migrated up to: 001_350_to_360 (executed)
migrating session on database 'kong'...
session migrated up to: 000_base_session (executed)
session migrated up to: 001_add_ttl_index (executed)
session migrated up to: 002_320_to_330 (executed)
67 migrations processed
67 executed
Database is up-to-date
启动kong服务
systemctl start kong.service
systemctl enable kong.service
查看服务运行状态
root@kong-gateway01:/etc/kong# systemctl status kong.service
● kong.service - Kong
     Loaded: loaded (/usr/lib/systemd/system/kong.service; disabled; preset: enabled)
     Active: active (running) since Tue 2025-06-17 22:41:09 CST; 4s ago
       Docs: https://docs.konghq.com/
    Process: 4908 ExecStartPre=/usr/local/bin/kong prepare -p /usr/local/kong (code=exited, status=0/SUCCESS)
   Main PID: 4927 (nginx)
      Tasks: 3 (limit: 4547)
     Memory: 153.3M (peak: 153.7M)
        CPU: 817ms
     CGroup: /system.slice/kong.service
             ├─4927 "nginx: master process /usr/local/openresty/nginx/sbin/nginx -p /usr/local/kong -c nginx.conf"
             ├─4935 "nginx: worker process"
             └─4936 "nginx: worker process"

Jun 17 22:41:09 kong-gateway01 systemd[1]: Starting kong.service - Kong...
Jun 17 22:41:09 kong-gateway01 systemd[1]: Started kong.service - Kong.
启用Kong Manager
Kong Manager是Kong Gateway 管理界面(官方),Kong Manager OSS是 Kong 的免费开源用户界面。
开源项目地址:https://github.com/Kong/kong-manager
Kong Manager OSS 允许您使用管理 API 查看和编辑所有 Kong Gateway 对象。它直接与 Kong 管理 API 交互,无需单独的数据库。
要从远程机器访问 Kong Manager OSS,请确保在 kong.conf 中将 admin_listen 和 admin_gui_listen 绑定到 0.0.0.0 而不是 127.0.0.1 ,然后重启您的 Kong Gateway 实例。
root@kong-gateway:/etc/kong# cat /etc/kong/kong.conf
admin_listen = 0.0.0.0:8001 reuseport backlog=16384, 0.0.0.0:8444 http2 ssl reuseport backlog=16384
admin_gui_listen = 0.0.0.0:8002, 0.0.0.0:8445 ssl
admin_gui_url = http://192.168.73.12:8002
admin_gui_path = /
admin_gui_api_url = http://192.168.73.12:8001
重启kong服务,使配置生效
systemctl restart kong.service
浏览器访问Kong Manager
http://192.168.73.12:8002
示例: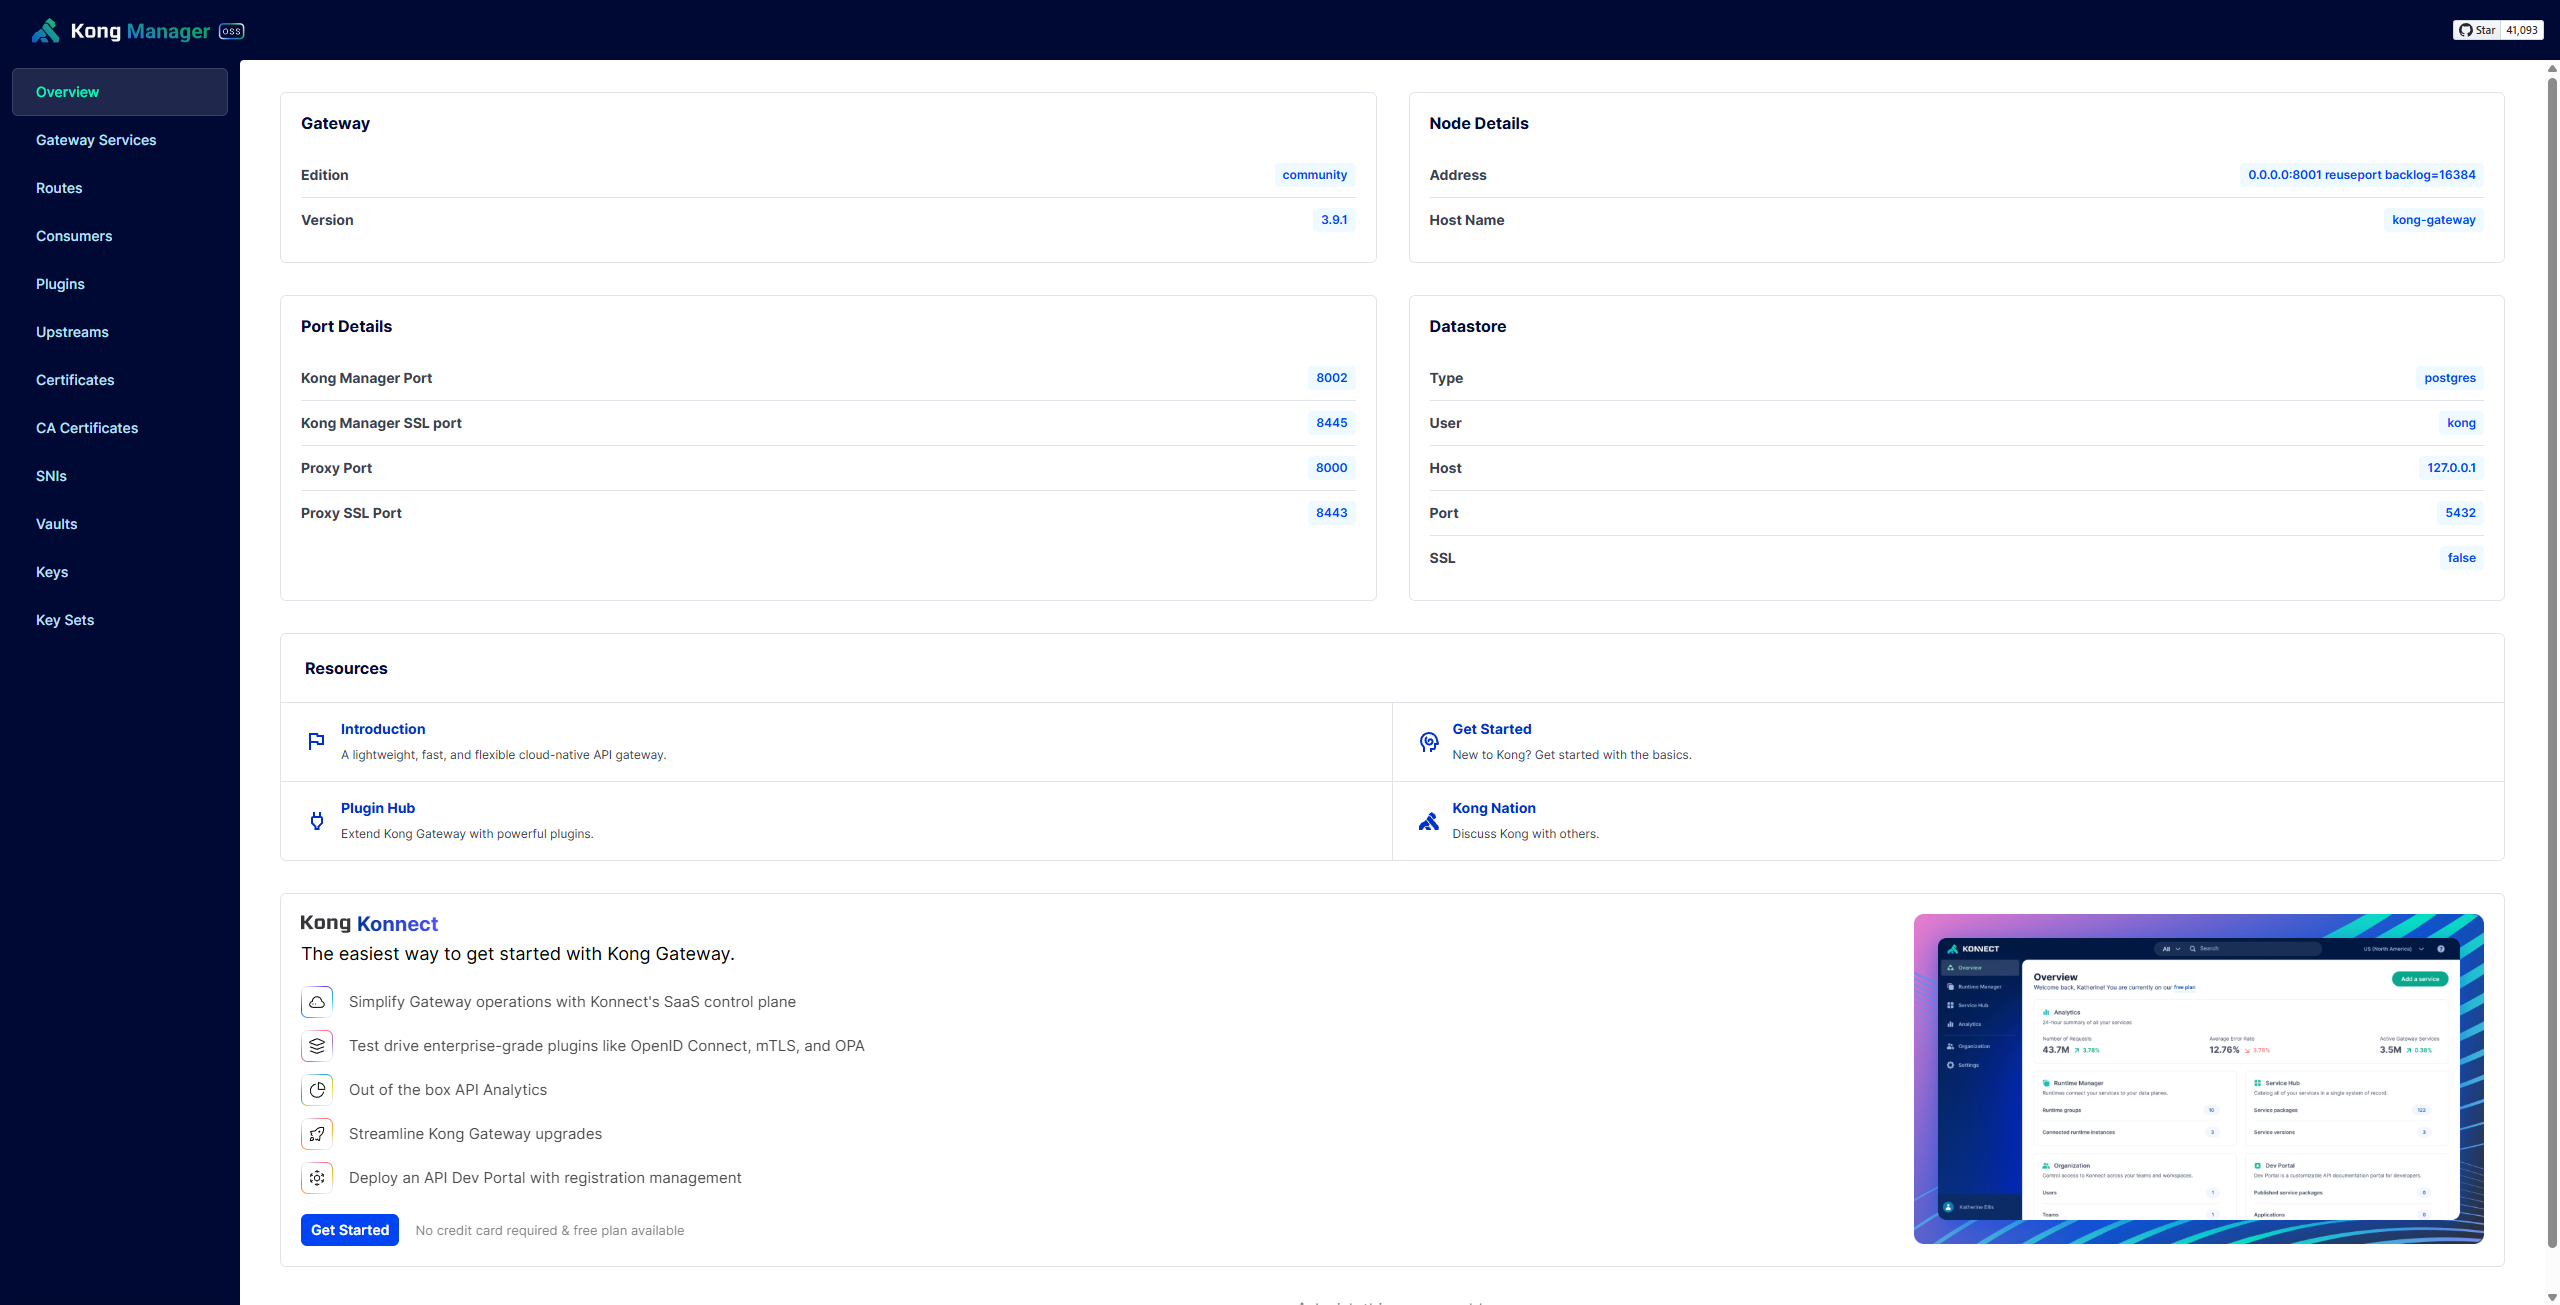
创建服务和路由
想象我们正在构建一个迷你的电商平台,它由两个微服务组成:
- 用户服务 (User Service): 一个后端 API 服务,负责提供用户信息。
- 订单服务 (Order Service): 另一个服务,在创建订单时,需要通过 Kong 网关查询用户信息来验证用户是否存在。
我们的目标: 订单服务不直接访问用户服务,而是所有流量都通过 Kong 网关进行统一管理、路由和保护。
整体架构如下图: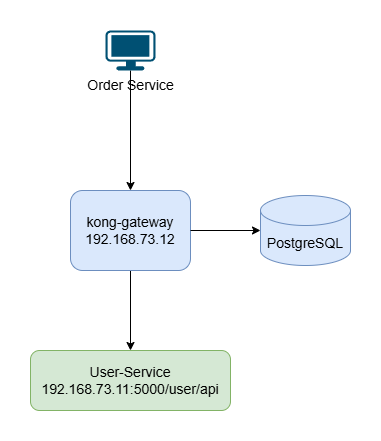
创建后端用户服务
创建后端用户服务(User Service),这是一个非常简单的 API 服务。我们用 Python + Flask 来快速实现。
- 创建一个名为 user-service 的子文件夹。
- 在 user-service 文件夹中,创建 app.py 文件:
root@user-service:~# mkdir -p /data/apps/user-service
root@user-service:~# cd /data/apps/user-service
root@user-service:/data/apps/user-service# cat app.py
from flask import Flask, jsonify

app = Flask(__name__)

# 模拟一些用户数据
users = {
    "1": {"name": "Alice", "email": "alice@example.com"},
    "2": {"name": "Bob", "email": "bob@example.com"},
}

# 用户信息查询接口
@app.route("/api/users/<user_id>", methods=["GET"])
def get_user(user_id):
    user = users.get(user_id)
    if user:
        return jsonify(user)
    return jsonify({"error": "User not found"}), 404

# 健康检查接口
@app.route("/health", methods=["GET"])
def health_check():
    return jsonify({"status": "ok"}), 200

if __name__ == "__main__":
    # 监听 0.0.0.0 确保容器中可访问
    app.run(host="0.0.0.0", port=5000)
该服务提供以下请求接口,请求方式为GET
http://192.168.73.11:5000/api/users/1
http://192.168.73.11:5000/api/users/2
http://192.168.73.11:5000/health
在 user-service 文件夹中,创建 Dockerfile 文件,用于将这个服务打包成 Docker 镜像:
root@user-service:/data/apps/user-service# cat Dockerfile
FROM python:3.9-slim
WORKDIR /app
COPY . .
RUN pip install Flask
CMD ["python", "app.py"]
构建镜像
docker build -t registry.cn-shenzhen.aliyuncs.com/cnmirror/user-service:v1.0 .
运行user-service后端应用
docker run -d --name user-service -p 5000:5000 \
--restart always \
registry.cn-shenzhen.aliyuncs.com/cnmirror/user-service:v1.0
查看服务运行状态
root@user-service:~# docker ps
CONTAINER ID   IMAGE     COMMAND           CREATED      STATUS      PORTS                                         NAMES
abd97e888cbe   test      "python app.py"   3 days ago   Up 3 days   0.0.0.0:5000->5000/tcp, [::]:5000->5000/tcp   user-service
测试后端接口连通性:
curl命令测试
root@user-service:~# curl -s http://192.168.73.11:5000/api/users/1 | jq
{
  "email": "alice@example.com",
  "name": "Alice"
}
浏览器测试: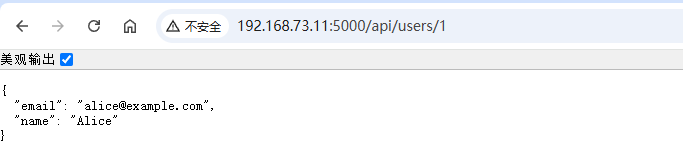
注册服务到kong
目标: 基于 Kong 的两个核心概念 Service 和 Route,并配置 Kong 将请求转发到我们的 用户服务。
- Service (服务): 在 Kong 里面,一个 Service 对象代表一个上游的后端服务(比如我们的 用户服务)。
- Route (路由): Route 定义了外部请求如何被匹配并转发到指定的 Service。一个 Service 可以有多个 Route。
我们将使用 Kong 的 Admin API (管理接口) (http://localhost:8001) 来进行配置。
1、在 Kong 中注册 用户服务
打开kong-gateway终端,执行以下 curl 命令,告诉 Kong 我们的 用户服务 在哪里。
curl -i -X POST http://localhost:8001/services \
  --data name=user-api \
  --data url='http://192.168.73.11:5000'
参数说明:
name=user-api: 我们给这个 Service 起个名字。url='http://192.168.73.11:5000': 这是关键!user-service 是 后端服务的地址,5000 是我们在 app.py 中定义的端口。
通过kong-manager查看创建的service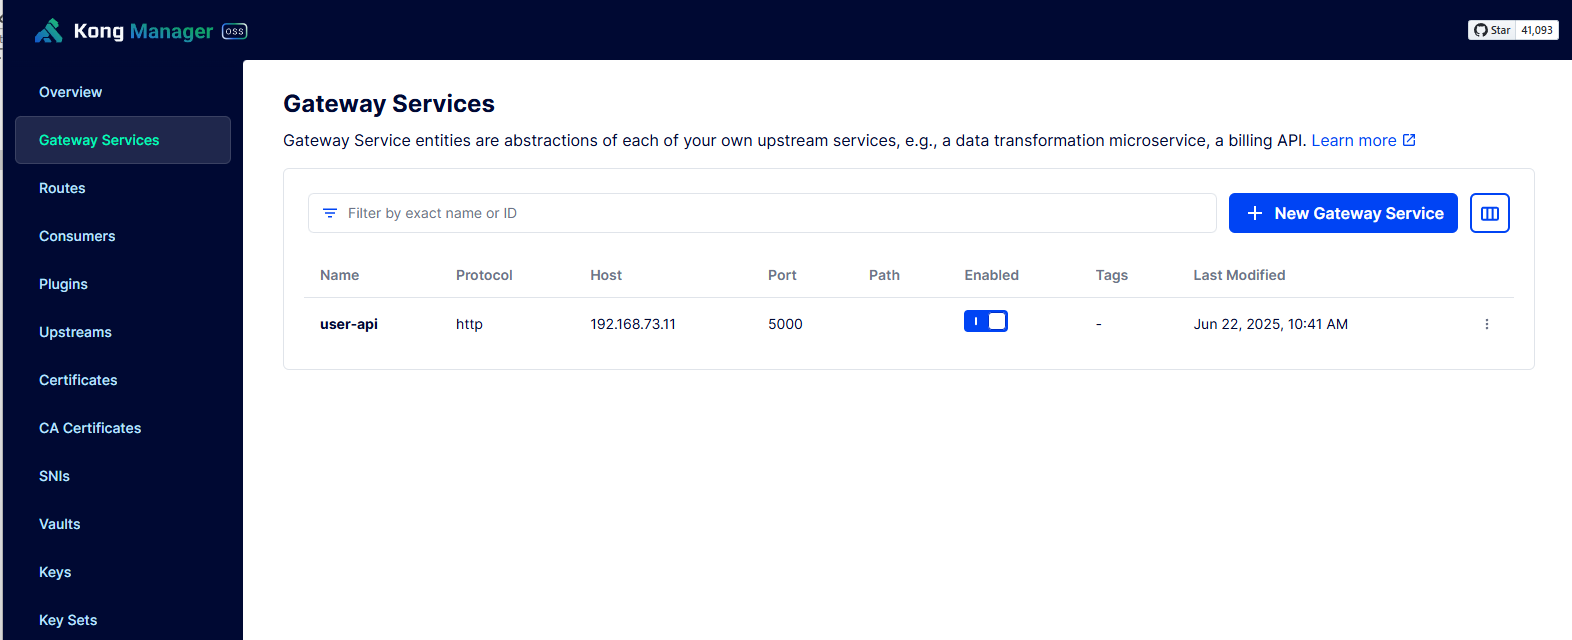
2、为 用户服务 创建路由
现在我们需要创建一个路由,让外部请求可以访问到这个 Service。我们定义一个规则:所有以 /api/users 开头的请求,都应该被转发到 user-api 这个 Service。
curl -i -X POST http://localhost:8001/services/user-api/routes \
  --data 'name=users-route' \
  --data 'paths[]=/api/users' \
  --data 'strip_path=false'
参数说明:
services/user-api/routes: 表示我们正在为名为 user-api 的 Service 创建路由。paths[]=/api/users: 这是路由的匹配规则,基于请求的路径。--data 'strip_path=false':表示转发请求时不要去掉路径前缀。例如请求/api/users/1保留 /api/users
通过kong-manager查看创建的routes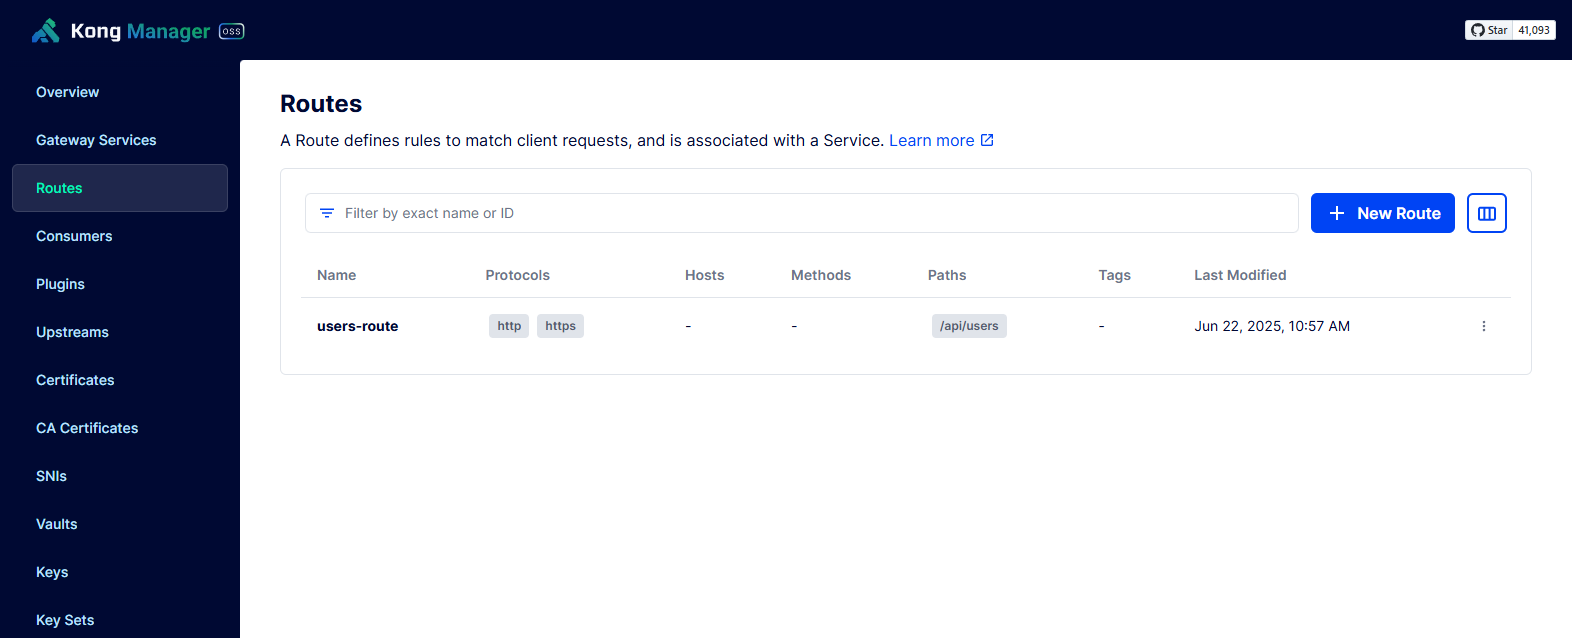
3、验证!
现在,最激动人心的时刻到了!我们不再直接访问 用户服务,而是通过 Kong 的代理端口 (:8000) 来访问。
# 模拟“订单服务”或其他任何客户端发起的请求
curl -s http://192.168.73.12:8000/api/users/1 | jq
如果一切正常,你应该会看到 用户服务 返回的 JSON 数据:
root@user-service:~# curl -s http://192.168.73.12:8000/api/users/1 | jq
{
  "email": "alice@example.com",
  "name": "Alice"
}
恭喜你! 你已经成功地通过 Kong 网关访问了你的后端服务。Kong 接收了你的请求,根据路由规则,将其转发给了正确的后端服务,并将结果返回给你。
使用Kong 插件
目标: 学会使用 Kong 的插件来增强我们的 API。插件是 Kong 的灵魂。
场景1:速率限制 (Rate Limiting) - 防止API被滥用
我们不希望任何客户端无限制地调用我们的用户接口。我们规定:每个客户端每分钟最多只能调用 5 次。
1、为路由启用 rate-limiting 插件
curl -i -X POST http://localhost:8001/routes/users-route/plugins \
  --data name=rate-limiting \
  --data config.minute=5 \
  --data config.policy=local
参数说明:
routes/users-route/plugins: 表示为名为 users-route 的路由启用插件。name=rate-limiting: 插件的名字。config.minute=5: 配置每分钟最多 5 次。
2、测试速率限制
在终端里快速连续执行以下命令 6 次:
curl -i http://192.168.73.12:8000/api/users/1
你会发现,前 5 次请求都成功返回 HTTP/1.1 200 OK,但第 6 次请求会返回 HTTP/1.1 429 Too Many Requests!这证明插件生效了。
root@kong-gateway:~# curl -i http://192.168.73.12:8000/api/users/1
HTTP/1.1 200 OK
Content-Type: application/json
Content-Length: 45
Connection: keep-alive
X-RateLimit-Remaining-Minute: 4
X-RateLimit-Limit-Minute: 5
RateLimit-Remaining: 4
RateLimit-Reset: 44
RateLimit-Limit: 5
Server: Werkzeug/3.1.3 Python/3.9.23
Date: Sun, 22 Jun 2025 03:07:16 GMT
X-Kong-Upstream-Latency: 3
X-Kong-Proxy-Latency: 0
Via: 1.1 kong/3.9.1
X-Kong-Request-Id: 3a99d75fedb9666aa29a7a4c206a503e

{"email":"alice@example.com","name":"Alice"}
root@kong-gateway:~# curl -i http://192.168.73.12:8000/api/users/1
HTTP/1.1 200 OK
Content-Type: application/json
Content-Length: 45
Connection: keep-alive
X-RateLimit-Remaining-Minute: 3
RateLimit-Limit: 5
RateLimit-Remaining: 3
RateLimit-Reset: 14
X-RateLimit-Limit-Minute: 5
Server: Werkzeug/3.1.3 Python/3.9.23
Date: Sun, 22 Jun 2025 03:06:46 GMT
X-Kong-Upstream-Latency: 2
X-Kong-Proxy-Latency: 1
Via: 1.1 kong/3.9.1
X-Kong-Request-Id: fb640b155612e70b2822de2044311d73

{"email":"alice@example.com","name":"Alice"}
root@kong-gateway:~# curl -i http://192.168.73.12:8000/api/users/1
HTTP/1.1 200 OK
Content-Type: application/json
Content-Length: 45
Connection: keep-alive
X-RateLimit-Remaining-Minute: 2
X-RateLimit-Limit-Minute: 5
RateLimit-Remaining: 2
RateLimit-Reset: 13
RateLimit-Limit: 5
Server: Werkzeug/3.1.3 Python/3.9.23
Date: Sun, 22 Jun 2025 03:06:47 GMT
X-Kong-Upstream-Latency: 2
X-Kong-Proxy-Latency: 1
Via: 1.1 kong/3.9.1
X-Kong-Request-Id: bb90c31b8982c1288f4d3f61ddb4d866

{"email":"alice@example.com","name":"Alice"}
root@kong-gateway:~# curl -i http://192.168.73.12:8000/api/users/1
HTTP/1.1 200 OK
Content-Type: application/json
Content-Length: 45
Connection: keep-alive
X-RateLimit-Remaining-Minute: 1
X-RateLimit-Limit-Minute: 5
RateLimit-Remaining: 1
RateLimit-Reset: 13
RateLimit-Limit: 5
Server: Werkzeug/3.1.3 Python/3.9.23
Date: Sun, 22 Jun 2025 03:06:47 GMT
X-Kong-Upstream-Latency: 2
X-Kong-Proxy-Latency: 1
Via: 1.1 kong/3.9.1
X-Kong-Request-Id: 47fe055c162219011fd7f455974fef66

{"email":"alice@example.com","name":"Alice"}
root@kong-gateway:~# curl -i http://192.168.73.12:8000/api/users/1
HTTP/1.1 200 OK
Content-Type: application/json
Content-Length: 45
Connection: keep-alive
X-RateLimit-Remaining-Minute: 0
X-RateLimit-Limit-Minute: 5
RateLimit-Remaining: 0
RateLimit-Reset: 12
RateLimit-Limit: 5
Server: Werkzeug/3.1.3 Python/3.9.23
Date: Sun, 22 Jun 2025 03:06:48 GMT
X-Kong-Upstream-Latency: 2
X-Kong-Proxy-Latency: 0
Via: 1.1 kong/3.9.1
X-Kong-Request-Id: 8952c90b26a2a817a6c9a21c1ff2b962

{"email":"alice@example.com","name":"Alice"}
root@kong-gateway:~# curl -i http://192.168.73.12:8000/api/users/1
HTTP/1.1 429 Too Many Requests
Date: Sun, 22 Jun 2025 03:06:48 GMT
Content-Type: application/json; charset=utf-8
Connection: keep-alive
Retry-After: 12
X-RateLimit-Remaining-Minute: 0
X-RateLimit-Limit-Minute: 5
RateLimit-Remaining: 0
RateLimit-Reset: 12
RateLimit-Limit: 5
Content-Length: 92
X-Kong-Response-Latency: 1
Server: kong/3.9.1
X-Kong-Request-Id: 264e3e0b3ec11f40dfc70a71834cb019

{
  "message":"API rate limit exceeded",
  "request_id":"264e3e0b3ec11f40dfc70a71834cb019"
}root@kong-gateway:~#
场景2:身份认证 (Authentication) - 保护我们的API
我们不希望任何人都能访问用户信息,只有合法的、持有 API 密钥的“订单服务”才能访问。
1、为路由启用 key-auth 插件
curl -i -X POST http://localhost:8001/routes/users-route/plugins \
  --data name=key-auth
2、创建一个消费者 (Consumer)
Consumer 代表一个使用我们 API 的客户端。在这里,它就代表“订单服务”。
curl -i -X POST http://localhost:8001/consumers \
  --data username=order-service
3、为消费者生成一个 API 密钥
curl -i -X POST http://localhost:8001/consumers/order-service/key-auth \
  --data key=my-super-secret-key
我们为 order-service 这个消费者创建了一个值为 my-super-secret-key 的密钥。
4、测试认证
尝试不带密钥访问 (应该会失败):
curl -i http://192.168.73.12:8000/api/users/1
你会收到 HTTP/1.1 401 Unauthorized 和 { “message”: “No API key found in request” }。API 被成功保护了!
root@kong-gateway:~# curl -i http://192.168.73.12:8000/api/users/1
HTTP/1.1 401 Unauthorized
Date: Sun, 22 Jun 2025 03:10:59 GMT
Content-Type: application/json; charset=utf-8
Connection: keep-alive
WWW-Authenticate: Key
Content-Length: 96
X-Kong-Response-Latency: 1
Server: kong/3.9.1
X-Kong-Request-Id: 465a44001f5e911663cdc3573d986d45

{
  "message":"No API key found in request",
  "request_id":"465a44001f5e911663cdc3573d986d45"
}root@kong-gateway:~#
带上正确的密钥访问 (应该会成功):
“订单服务”在发起请求时,需要在请求头里带上它的密钥。
curl -i http://192.168.73.12:8000/api/users/1 \
  --header "apikey: my-super-secret-key"
这次,请求成功了!返回了 HTTP/1.1 200 OK 和用户数据。
root@kong-gateway:~# curl -i http://192.168.73.12:8000/api/users/1 \
  --header "apikey: my-super-secret-key"
HTTP/1.1 200 OK
Content-Type: application/json
Content-Length: 45
Connection: keep-alive
X-RateLimit-Remaining-Minute: 4
X-RateLimit-Limit-Minute: 5
RateLimit-Remaining: 4
RateLimit-Reset: 45
RateLimit-Limit: 5
Server: Werkzeug/3.1.3 Python/3.9.23
Date: Sun, 22 Jun 2025 03:11:15 GMT
X-Kong-Upstream-Latency: 2
X-Kong-Proxy-Latency: 2
Via: 1.1 kong/3.9.1
X-Kong-Request-Id: 64e30768245a7937e1db9e1b84334452

{"email":"alice@example.com","name":"Alice"}
root@kong-gateway:~#
通过以上几个阶段,你已经亲手实践了 Kong 最核心、最常用的功能:
- 动态路由 (Dynamic Routing): 将外部请求映射到内部微服务。
- 集中管理 (Centralized Management): 通过 Admin API 统一配置所有 API 规则。
- 插件化架构 (Plugin Architecture): 通过插件轻松实现横切关注点,如安全、流量控制等,而无需修改后端代码。

一站式 AI 云服务平台
更多推荐


 18
18 0
0- 0


 已为社区贡献8条内容

所有评论(0)