
【Qt5 每帧图像读取,重写QAbstractVideoSurface类】
Qt5 每帧图像读取,重写QAbstractVideoSurface类
·
Qt5 每帧图像读取,重写QAbstractVideoSurface类
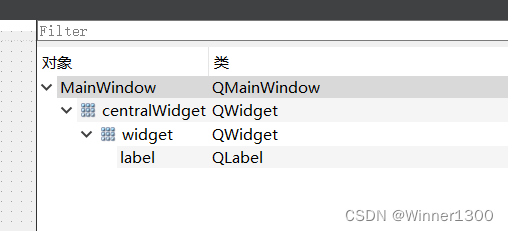
1.界面
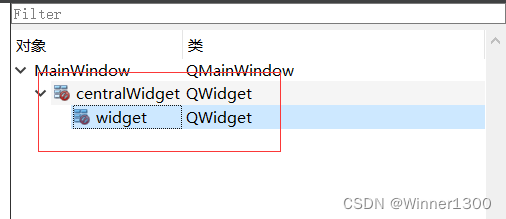
修改界面
2.界面对应程序
 camera->setViewfinder(surface);//将camera拍摄到的图片交给AbstractVideoSurface类对象里面的present函数进行处理
void QCamera::setViewfinder(QVideoWidget *viewfinder)
Sets the QVideoWidget based camera viewfinder. The previously set viewfinder is detached.
 ```

//测试在ui上能显示每帧图片
ui->label->setPixmap(QPixmap::fromImage(image).scaled(ui->label->size()));
显示函数
void MainWindow::rcvImage(QImage image)
{
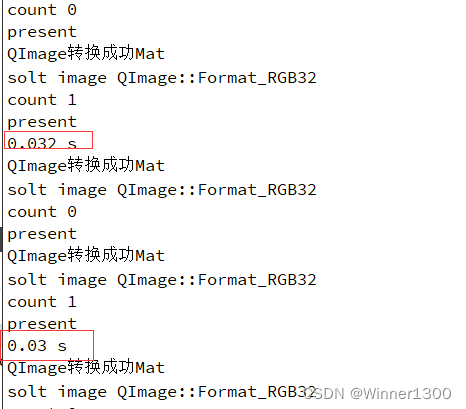
static int count=0;
if(count==0) {
time1.start();
}
count++;
if(count==2){
count=0;
qDebug()<<time1.elapsed()/1000.0<<"s";
}
// function(); 为图像处理做准备
// QPixmap pix1;
// 原图是反的,做镜像处理
image=image.mirrored(false, true);
if(image.format()==QImage::Format_RGB32){
Mat mat;
mat = cv::Mat(image.height(), image.width(), CV_8UC4, (void*)image.constBits(), image.bytesPerLine());
cv::cvtColor(mat,mat,cv::COLOR_BGRA2BGR); //转3通道
qDebug()<<"QImage转换成功Mat";
//imshow("opencv setup demo", mat); //显示图像
}
pix = QPixmap::fromImage(image);
// update();
//测试在ui上能显示每帧图片
ui->label->setPixmap(QPixmap::fromImage(image).scaled(ui->label->size()));
qDebug()<<"solt image"<<image.format();
qDebug()<<"count"<<count;
}
3. Qimage 在Label 显示镜像处理
//关于镜像旋转,QImage中有对应的接口,可以通过设定水平、垂直方向旋转
QImage image::mirrored(bool horizontal = false, bool vertical = true) const ;


//水平翻转
    image = image.mirrored(true, false);
    imageLabel->setPixmap(QPixmap::fromImage(image));
//垂直翻转
    image = image.mirrored(false, true);
    imageLabel->setPixmap(QPixmap::fromImage(image));


//顺时针旋转90度
    QMatrix matrix;
    matrix.rotate(90.0);//以90度为例
    image = image.transformed(matrix,Qt::FastTransformation);
    imageLabel->setPixmap(QPixmap::fromImage(image));
//逆时针旋转45度
    QMatrix matrix;
    matrix.rotate(-45.0);//以45度为例
    image = image.transformed(matrix,Qt::FastTransformation);
    imageLabel->setPixmap(QPixmap::fromImage(image));
4.获取Qimage的格式
image.format()
QImage 转 Mat
//Qt读入彩色图后一般为Format_RGB32格式(4通道),而OpenCV一般用3通道的,因此进行了转换。
cv::Mat QImage2Mat(QImage image)
{
    cv::Mat mat;
    switch (image.format())
    {
    case QImage::Format_RGB32:  //一般Qt读入彩色图后为此格式
        mat = cv::Mat(image.height(), image.width(), CV_8UC4, (void*)image.constBits(), image.bytesPerLine());
        cv::cvtColor(mat,mat,cv::COLOR_BGRA2BGR);   //转3通道
        break;
    case QImage::Format_RGB888:
        mat = cv::Mat(image.height(), image.width(), CV_8UC3, (void*)image.constBits(), image.bytesPerLine());
        cv::cvtColor(mat,mat,cv::COLOR_RGB2BGR);
        break;
    case QImage::Format_Indexed8:
        mat = cv::Mat(image.height(), image.width(), CV_8UC1, (void*)image.constBits(), image.bytesPerLine());
        break;
    }
    return mat;
}
Mat 转 QImage
QImage Mat2QImage(const cv::Mat &mat)
{
    if(mat.type()==CV_8UC1 || mat.type()==CV_8U)
    {
        QImage image((const uchar *)mat.data, mat.cols, mat.rows, mat.step, QImage::Format_Grayscale8);
        return image;
    }
    else if(mat.type()==CV_8UC3)
    {
        QImage image((const uchar *)mat.data, mat.cols, mat.rows, mat.step, QImage::Format_RGB888);
        return image.rgbSwapped();  //r与b调换
    }
}
5.测试结果

一站式 AI 云服务平台
更多推荐


 0
0 0
0- 0


 已为社区贡献2条内容

所有评论(0)