

尝试dify自定义知识库
根据官网教程,可以从知识库的右上角外部知识库进行添加外部知识库
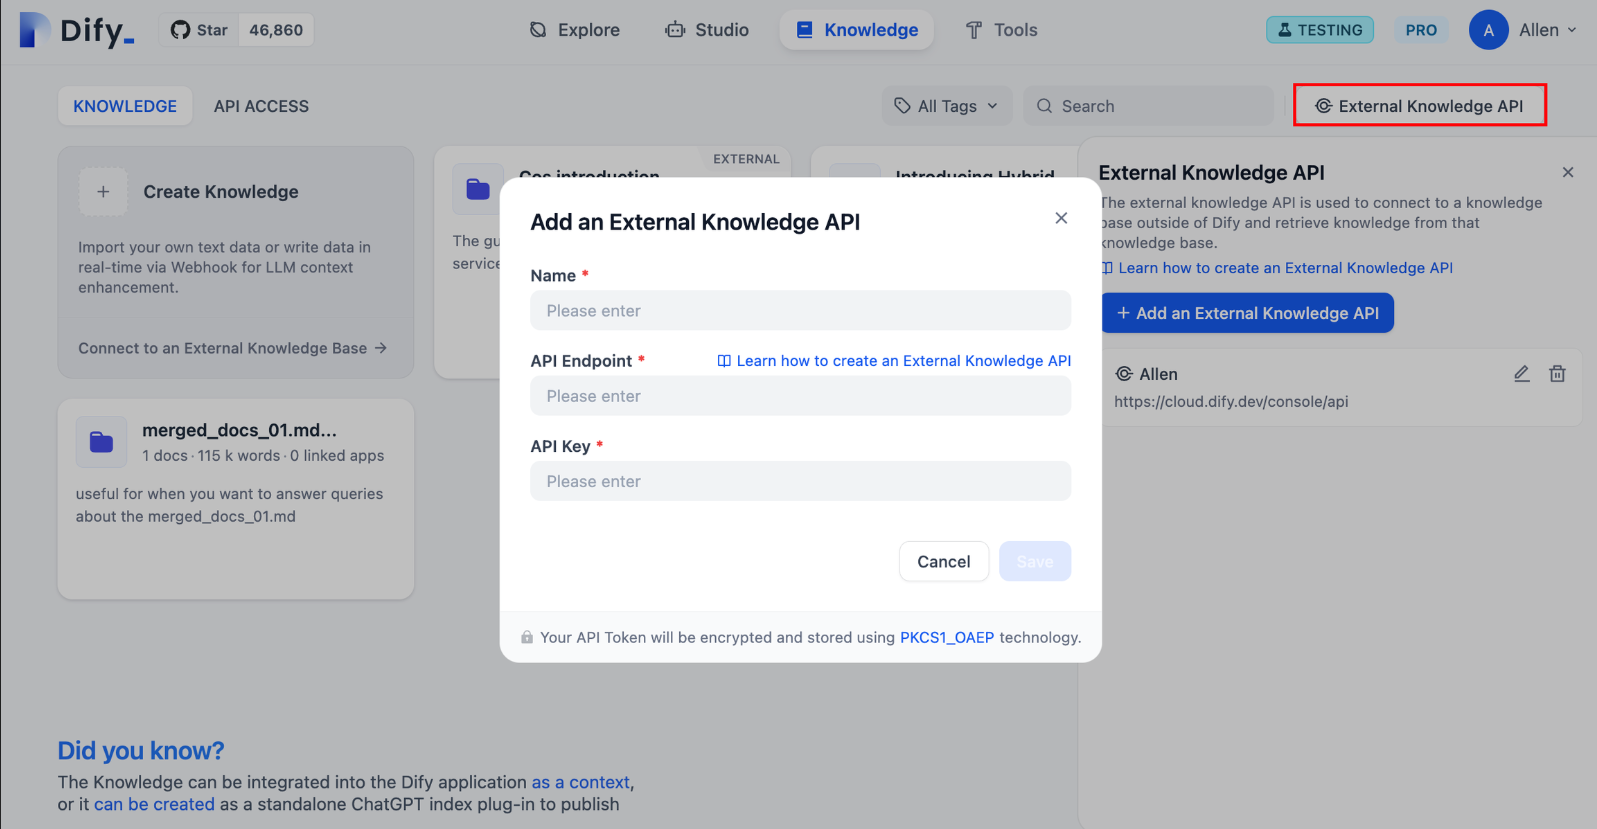
前往 “知识库” 页,点击右上角的 “外部知识库 API”,轻点 “添加外部知识库 API”。
按照页面提示,依次填写以下内容:
-
知识库的名称,允许自定义名称,用于区分所连接的不同外部知识 API;
-
API 接口地址,外部知识库的连接地址,示例
api-endpoint/retrieval;详细说明请参考外部知识库 API; -
API Key,外部知识库连接密钥,详细说明请参考外部知识库 API;
因为APIEndpoint需要网络url地址,这里使用本地当作服务器进行尝试
1 使用python+flask框架构建本地后端
1.1简单上手
       from flask import Flask
       app = Flask(__name__)

       @app.route('/')
       def hello_world():
          return 'Hello World'

       if __name__ == '__main__':
          app.run()
在简单上手中,我们使用到了装饰器:@app.route('/'),要先了解装饰器,然后了解falsk这个装饰器以及其他类似的装饰器的用法。
1.2falsk的其他装饰器以及用法:
【扩展阅读,可跳过】
@app.route()
-
作用:将视图函数与指定的 URL 路径进行绑定。
-
示例:
       @app.route('/') # 路由装饰器,绑定URL路径
       def home():
           return 'Hello, World!'
@app.before_request()
-
作用:注册一个函数,在每个请求执行之前调用。适用于一些请求前的预处理,比如认证检查、日志记录等。
-
示例:
       @app.before_request
       def before_request():
           print("This runs before every request.")
@app.after_request()
-
作用:注册一个函数,在每个请求执行之后调用。适用于请求处理后的操作,如修改响应数据、日志记录等。
-
示例:
       @app.after_request
       def after_request(response):
           print("This runs after each request.")
           return response  # 必须返回响应对象
@app.errorhandler()
-
作用:注册一个函数,用于处理指定 HTTP 错误码的错误。例如,处理 404 页面未找到或 500 服务器错误等。
-
示例:
         @app.errorhandler(404)
         def page_not_found(error):
             return "Page not found", 404
@app.before_first_request()
-
作用:在应用处理第一个请求之前执行一次。适用于一些应用初始化的操作,例如数据库连接或缓存初始化等。
-
示例:
         @app.before_first_request
         def before_first_request():
             print("This runs once before the first request.")
@app.route() 支持 HTTP 方法的装饰器
-
作用:
@app.route()装饰器可以通过methods参数指定哪些 HTTP 方法(如 GET、POST、PUT、DELETE 等)可以触发该路由。 -
示例:
         @app.route('/submit', methods=['POST'])
         def submit():
             return 'Form Submitted'
2 修改路由以及服务器设置
2.1 基础设置
由于dify启动时会占用本地默认的 127.0.0.1:5000,为了避免冲突,我们就需要通过修改端口的形式来规避这个问题,用到的接口是:
app.run(debug=True, host='127.0.0.1', port=5001)
app.run 中提供了修改基本信息的接口:
host:服务器的地址,window默认为127.0.0.1debug:调试模式是否启动port:端口号。这里使用不同的端口号来分辨dify以及知识库服务器。
2.2test code
-
根据需求会post一个
json的请求体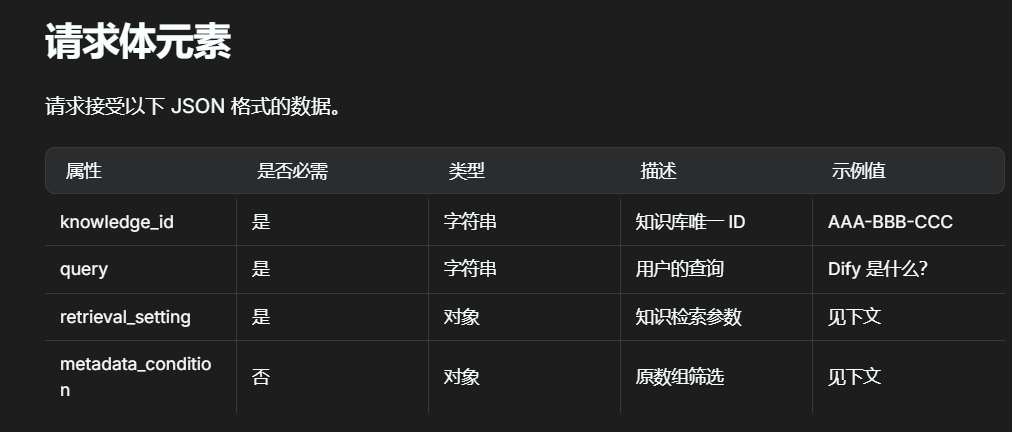
因此我们假设他传来的是
json、调用get方法
       from flask import Flask , request, jsonify


       app = Flask(__name__)

       @app.route('/retrieval',methods=['POST'])
       def get_data():
           data = request.get_json()
           print(data)
           return jsonify(data)

       @app.route('/')
       def default():
           return 'hello'

       if __name__ == '__main__':
           app.run(debug=True, host='127.0.0.1', port=5001)
           get_data()
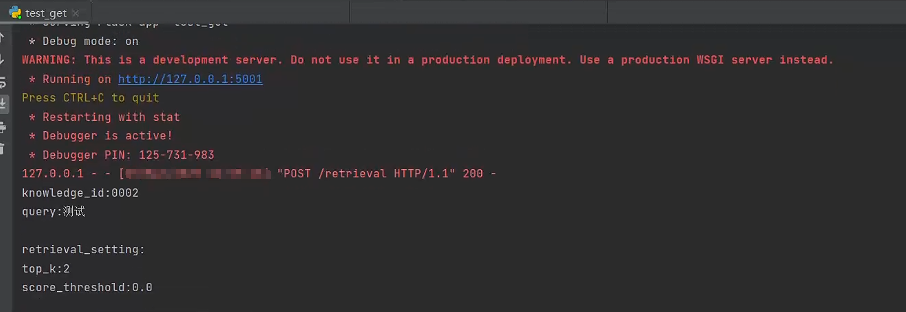
2.2.1 本地测试
先进行本地测试一下:

主页成功,测试 /retrieval页面:
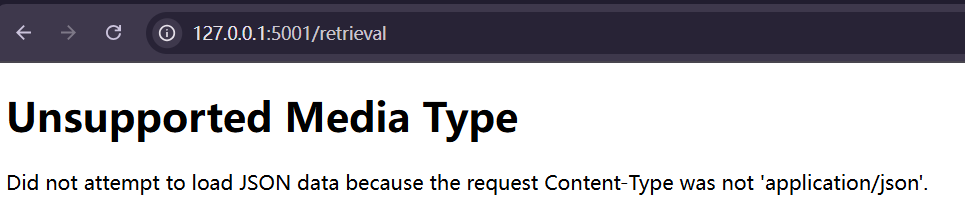

问题不大,因为我们没有上传json文件,启动dify尝试一下
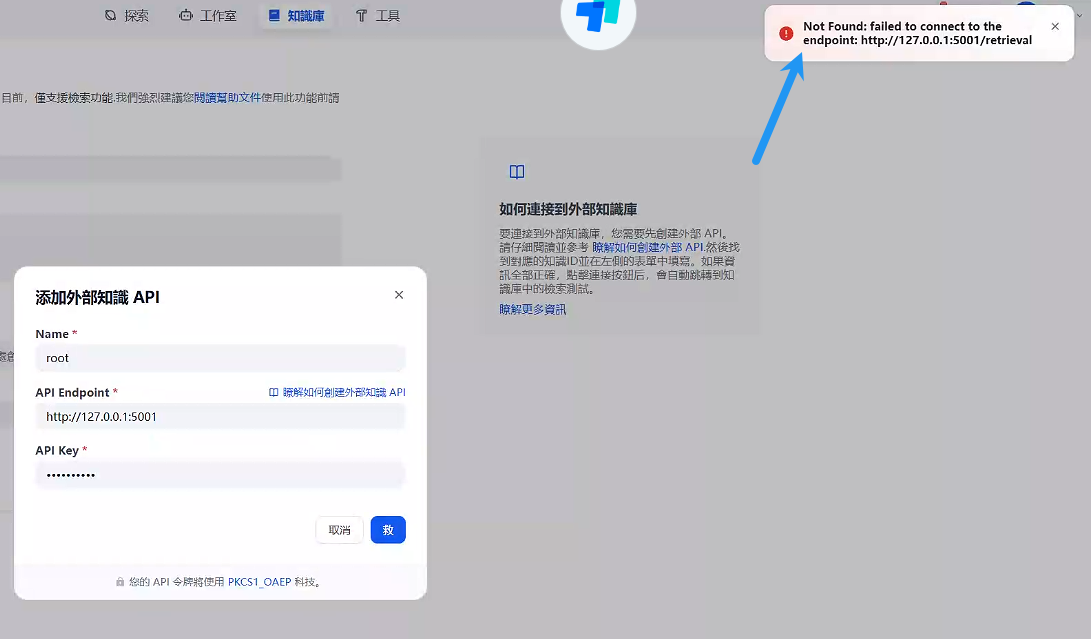
3 dify添加api测试
发现会报错,没办法访问:
3.1 问题解决:
- 问题思考
从计算机网络的角度来说,dify在WSL中运行,由于虚拟化,容器本地环境与windows的本地环境并不一致,即:当使用127.0.0.1进行访问时,访问的是容器内的主机,但我们的window环境并不在容器内部署,因此无法访问到window环境的127.0.0.1。中间需要一些NAT【单纯指网络地址转换】才能访问到主机
-
问题解决:找到了网上的一篇博主的推文:【docker知识】从容器中如何访问到宿主机 里面提及了如何在容器内访问解释为主机的
url将API ENDPOINT改为:
host.docker.internal
-
结果:

更换为
docker能转换的url就能访问成功。
4 完善post类
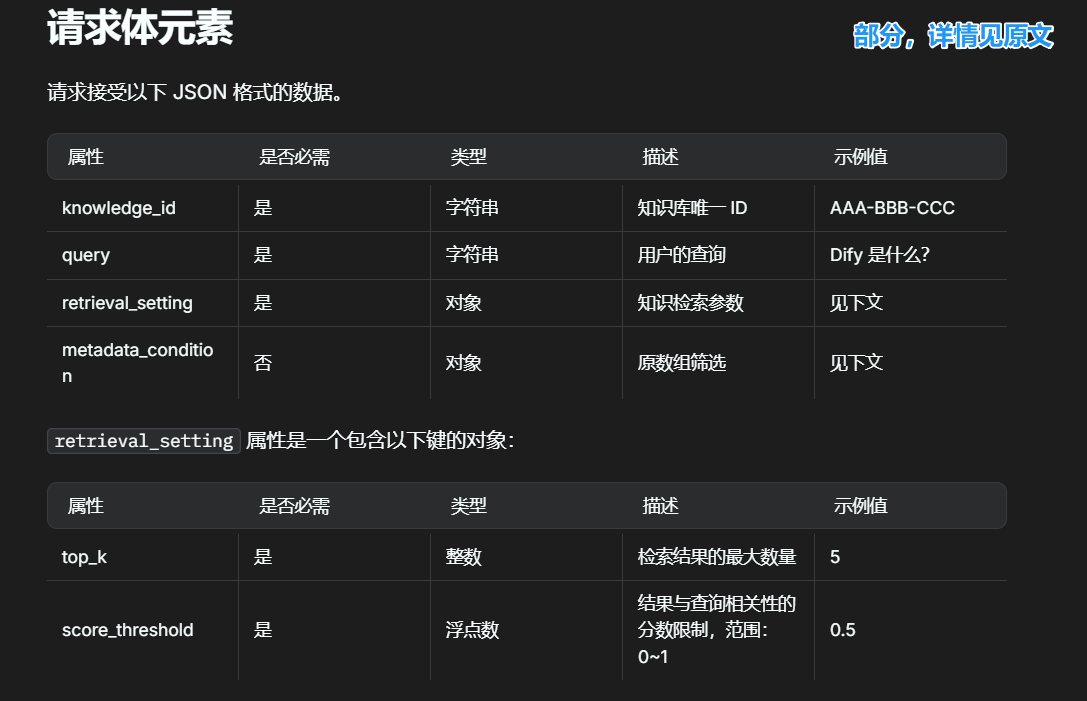
根据api规范进行构造:
理论上是从 Dify_class-> Records开始构建的,但是依赖类需要写在前面,不用担心,这些都是基本功,不难的,就是复杂了一点,理清楚逻辑之后慢慢写就好:
PS: 所有__repr__不要求写,我写着方便调试罢了
4.1 Dify_class 传入dify数据类
       class Dify_class:
           def __init__(self,posted_data:dict):
               """
        dify有4个属性。
        三个必填:知识库id、输入筛选器、检索设置(类)
        一个选填:元数据信息(类)
        :param posted_data: 收到的post,从json转换为字典形式
        """
               self.knowledge_id:str = posted_data.get('knowledge_id')
               self.query:str = posted_data.get('query')
               self.retrieval_setting = Retrieval_setting(
                   posted_data.get('retrieval_setting')
               )
               self.metadata_condition = Metadata_condition(
                   posted_data.get('metadata_condition')
               )
           def __repr__(self):
               res = f"knowledge_id:{self.knowledge_id} \nquery:{self.query} \n"f"{self.retrieval_setting.__repr__()}"
               if self.metadata_condition != None:
                   res.join(self.metadata_condition.__repr__())
               return res
4.1.1 dify_class 两个依赖类
       class Retrieval_setting:
           def __init__(self, posted_data:dict):
               self.top_k:int = posted_data.get('top_k')
               self.score_threshold:float = posted_data.get('score_threshold')
           def __repr__(self):
               return f"\nretrieval_setting: \ntop_k:{self.top_k} \nscore_threshold:{self.score_threshold}"

       class Metadata_condition:

           def __init__(self, posted_data:dict):
               if posted_data == None:
                   self.logical_operator = None
                   self.conditions = None
                   self.status = -1 # 用于查看有多少参数,用于repr, -1则为空,2则为都有(未完善)
               else:
                   self.conditions = posted_data.get('conditions')
                   logical_operator_:str = posted_data.get('logical_operator')
                   if logical_operator_ != None:
                       self.logical_operator = logical_operator_
                       self.status = 2
                   else:
                       self.logical_operator = None
                       self.status = 1
           def __repr__(self):
               if self.status == -1:
                   return "None"
               else:
                   return f'logical_operator:{self.logical_operator}\nconditions:{self.conditions}'
4.2 record类
       class Records:
           def __init__(self,_content:str, _score:float, _title:str, _metadata:dict=None):
               self.content = _content
               self.score = _score
               self.title = _title
               self.metadata = Metadata(_metadata)
           def to_dict(self):
               """
        将record类转换为字典
        :return: 返回单个字典类型的records
        """

               res_dict =  dict(
                   {
                       "metadata":{
                           "path":self.metadata.path,
                           "description":self.metadata.description
                       },
                       "score":self.score,
                       "title":self.title,
                       "content":self.content
                   }
               )
               return res_dict

           def __repr__(self):
               #没写metadata的
               return f'*************\nscore:{self.score} \ncontent:{self.content} \ntitle:{self.title} \n*************\n'
4.2.1 record 依赖类
       class Metadata:
           def __init__(self, record_dict:dict=None):
               if record_dict != None:
                   self.path = record_dict.get("path")
                   self.description = record_dict.get("description")
               else:
                   self.path = None
                   self.description = None
4.3 测试dify类
类main函数【用于测试】
test.json文件:
       {
           "knowledge_id": "your-knowledge-id",
           "query": "你的问题",
           "retrieval_setting":{
               "top_k": 2,
               "score_threshold": 0.5
           }
       }
main:
       if __name__ == '__main__':
           import json
           with open('test.json', mode='r',encoding='utf8') as fp:
               data = json.load(fp)
               dify_t = Dify_class(data)
               print(dify_t)
           test_record = Records("test_content", 1.0, "dify_test")
           print(test_record)
5 接入服务器连接
5.1 导入相关包
       from flask import Flask , request, jsonify
       import dify_class ,json
       #dify_class是4中的文件名称
5.2 设置服务器
       app = Flask(__name__)

       @app.route('/retrieval',methods=['POST'])
       def get_data():
           data = request.get_json()       #获取请求的json数据
           dify_t = dify_class.Dify_class(data)    #初始化dify请求类
           print(dify_t)                           #调试输出

           res = []
           for i in range(dify_t.retrieval_setting.top_k): #模拟 topk
               res.append(
                   dify_class.Records("test_content", 1.0, "dify_test").to_dict()  #测试回复类,构造一个请求类->返回他的字典形式->放入res列表中
               )
           res_dict = {
               "records": res
           }

           json_res = json.dumps(res_dict)
           return json_res, 200
5.3 主函数
       #outside knowledge id_0001
       if __name__ == '__main__':
           app.run(debug=True, host='127.0.0.1', port=5001)
           get_data()
5.4 测试
-
启动服务器
-
进行召回测试
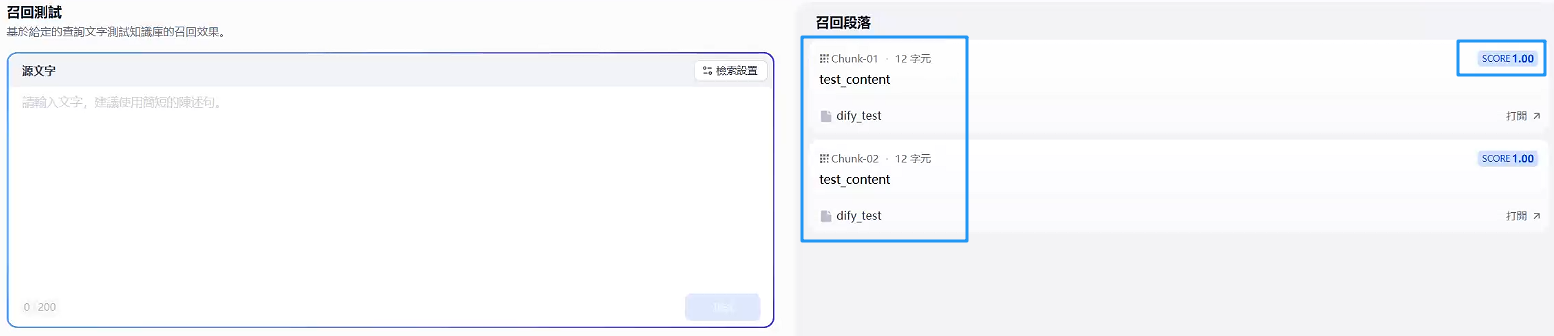
终于是显示测试效果出来了。能够返回你测试的样例就说明成功了 😭 😭,后续就是根据他
post的东西来进行检索了。


 已为社区贡献1条内容

所有评论(0)