
RP2040 VSCode C/C++开发环境快速部署
RP2040 VSCode C/C++开发环境快速部署
RP2040 VSCode C/C++开发环境快速部署
- 📌安装参考《树莓派(Raspberry Pi) Pico VSCode C/C++开发环境配置(无需Visual Studio)》
- 📍Windows环境下,一键式部署pico程序包,下载地址:
https://github.com/raspberrypi/pico-setup-windows/releases/tag/v1.5.1
⛳ 一键式部署(✨推荐指数:🌟🌟🌟🌟🌟)
- 🧨安装教程:
https://www.raspberrypi.com/news/raspberry-pi-pico-windows-installer/ - 🌿下载一键式安装包:
https://github.com/raspberrypi/pico-setup-windows/releases/latest/download/pico-setup-windows-x64-standalone.exe - 🌿部署完成后,在弹出的cmd安装窗口显示全部完整信息:

- 🌿前往默认解压目录:
C:\Users\Administrator\Documents\Pico-v1.5.1
- 🌿进入
C:\Users\Administrator\Documents\Pico-v1.5.1\pico-examples文件夹内,使用右键选择VScode打开。 - 🌿VScode打开后,打开
settings.json文件,修改cmake.generator为MinGW Makefiles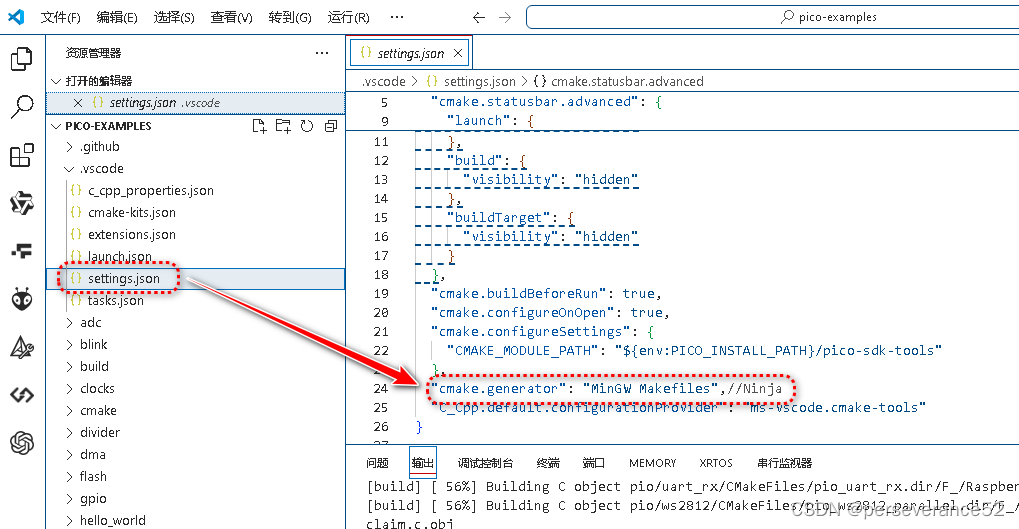
  "cmake.buildBeforeRun": true,
  "cmake.configureOnOpen": true,
  "cmake.configureSettings": {
    "CMAKE_MODULE_PATH": "${env:PICO_INSTALL_PATH}/pico-sdk-tools"
  },
  "cmake.generator": "MinGW Makefiles",//Ninja  MinGW Makefiles
  "C_Cpp.default.configurationProvider": "ms-vscode.cmake-tools"
-
- 🔖Ninja针对已经安装了
Visual Studio环境的情况下的配置。
- 🔖Ninja针对已经安装了
- 🔖完成以上配置后,即可进行编译了。
- 📜在对应例程的项目编译文件夹内可以看到,生成的相关文件:
- ✨ 一键式安装包部署的缺点就是,
pico-sdk版本不能自动更新问题。如果需要更新pico-sdk版本,需要前往github将新版本的pico-sdk通过git工具下载下来包含所需子模块。替换原来旧的pico-sdk文件目录,并且需要更新picotool\picotool.exe工具,最好将其添加到系统环境变量中,否则会在编译工程时找不到picotool。

📙一键式创建工程
- 📍参考《轻松玩转树莓派Pico之六、pico-project-generator使用》
- 🥕
pico-project-generator地址:https://github.com/raspberrypi/pico-project-generator(✨Windows下推荐下载分支上的pico-project-generator-update_vscode_json_to_sdk1_5版本)
🎉
pico-project-generator-update_vscode_json_to_sdk1_5版本,解决了在自动生成的文件:"项目\.vscode\c_cpp_properties.json"中编译器的路斜杠问题。"compilerPath": "C:\\Program Files (x86)\\GNU Arm Embedded Toolchain\\10 2021.10\\bin\\arm-none-eabi-gcc.EXE"
- 🍕个人觉得在
pico_project.py中针对windows下使用所生成的项目名称\TEST\.vscode\c_cpp_properties.json文件内容,还需要修改的地方:
            properties = ('{\n'
                  '  "configurations": [\n'
                  '    {\n'
                  '      "name": "win32",\n'
                  '      "includePath": [\n'
                  '        "${workspaceFolder}/**",\n'
                  '        "${env:PICO_SDK_PATH}/**"\n'
                  '      ],\n'
                  '      "defines": [],\n'
                  f'      "compilerPath": "{cPath}",\n'
                  '      "cStandard": "c17",\n'
                  '      "cppStandard": "c++14",\n'
                  '      "intelliSenseMode": "windows-gcc-arm",\n'
                  '      "configurationProvider" : "ms-vscode.cmake-tools"\n'
                  '    }\n'
                  '  ],\n'
                  '  "version": 4\n'
                  '}\n')
对应生成内容:
  "configurations": [
    {
      "name": "Win32",
      "includePath": [
        "${workspaceFolder}/**",
        "${env:PICO_SDK_PATH}/**"
      ],
      "defines": [],
      "compilerPath": "C:/Program Files (x86)/GNU Arm Embedded Toolchain/10 2021.10/bin/arm-none-eabi-gcc.EXE",
      "cStandard": "gnu17",
      "cppStandard": "gnu++14",
      "intelliSenseMode": "windows-gcc-arm",
      "configurationProvider" : "ms-vscode.cmake-tools"
    }
  ],
- 在
pico-project-generator主支上的文件pico_project.py修复所生成的项目名称\TEST\.vscode\c_cpp_properties.json文件路径问题,修改内容如下:
#引入所需的模块
from copy import copy

......

# Generates the requested project files, if any
def generateProjectFiles(projectPath, projectName, sdkPath, projects, debugger):

    oldCWD = os.getcwd()

    os.chdir(projectPath)

    deb = debugger_config_list[debugger]
    server_args = debug_server_args_list[debugger]
        # Need to escape windows files paths backslashes添加路径替换内容
    cPath = str(compilerPath).replace('\\', '/' )

    for p in projects :
        if p == 'vscode':
            v1 = ('{\n'
                  '  // Use IntelliSense to learn about possible attributes.\n'
                  '  // Hover to view descriptions of existing attributes.\n'
                  '  // For more information, visit: https://go.microsoft.com/fwlink/?linkid=830387\n'
                  '  "version": "0.2.0",\n'
                  '  "configurations": [\n'
                  '    {\n'
                  '      "name": "Cortex Debug",\n'
                  '      "cwd": "${workspaceRoot}",\n'
                  '      "executable": "${command:cmake.launchTargetPath}",\n'
                  '      "request": "launch",\n'
                  '      "type": "cortex-debug",\n'
                  '      "servertype": "openocd",\n'
                  '      "gdbPath": "gdb-multiarch",\n'
                  '      "serverArgs": [\n'
                  f'        {server_args}\n'
                  '      ],\n'
                  '      "device": "RP2040",\n'
                  '      "configFiles": [\n' + \
                  f'        "interface/{deb}",\n' + \
                  '        "target/rp2040.cfg"\n' + \
                  '        ],\n' +  \
                  '      "svdFile": "${env:PICO_SDK_PATH}/src/rp2040/hardware_regs/rp2040.svd",\n'
                  '      "runToEntryPoint": "main",\n'
                  '      // Give restart the same functionality as runToEntryPoint - main\n'
                  '      "postRestartCommands": [\n'
                  '          "break main",\n'
                  '          "continue"\n'
                  '      ]\n'
                  '    }\n'
                  '  ]\n'
                  '}\n')

            c1 = ('{\n'
                  '  "configurations": [\n'
                  '    {\n'
                  '      "name": "Win32",\n'
                  '      "includePath": [\n'
                  '        "${workspaceFolder}/**",\n'
                  '        "${env:PICO_SDK_PATH}/**"\n'
                  '      ],\n'
                  '      "defines": [],\n'
                  # 替换对象的地方
                  f'      "compilerPath": "{cPath}",\n'
                  '      "cStandard": "gnu17",\n'
                  '      "cppStandard": "gnu++14",\n'
                  '      "intelliSenseMode": "windows-gcc-arm",\n'
                  '      "configurationProvider" : "ms-vscode.cmake-tools"\n'
                  '    }\n'
                  '  ],\n'
                  '  "version": 4\n'
                  '}\n')
- ✨注意下载并解压后的文件路径不要太长。否则启动会失败。
📗启动方式
- 🌿在所在目录下,地址栏内通过输入cmd命令->开启gui界面命令:
python pico_project.py --gui,或者直接在该目录地址栏使用一键式启动命令打开:cmd /c "pico_project.py --gui"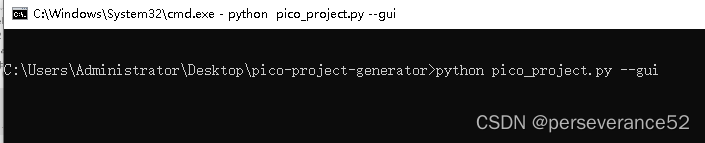
- 🐛补充:在某些未知情况下,如果使用相关python命令无法启动打开UI工程配置界面,可以尝试重新安装一遍Python来解决。
- 🌿根据个人需求进行项目配置
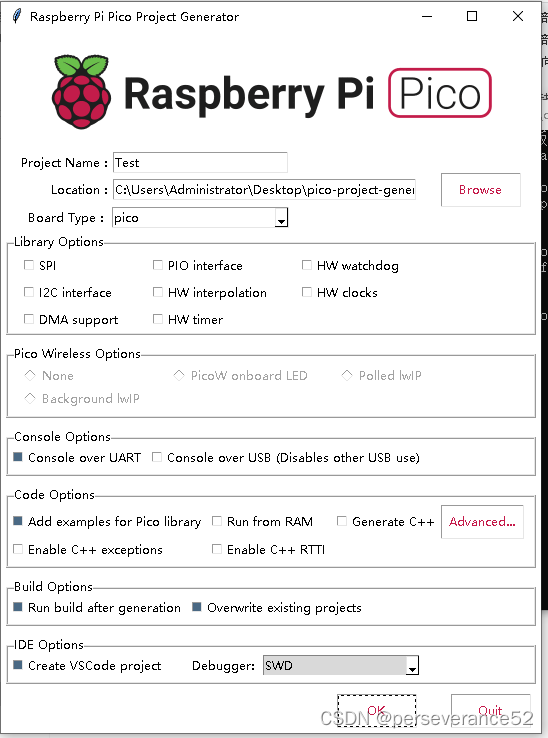
- 🌿点击
OK后,将自动创建并编译。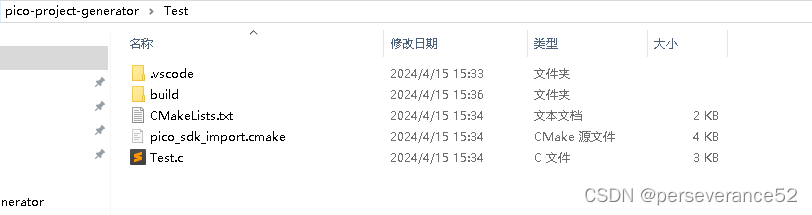
- ⚡针对自动生成的工程并编译过的,建议在使用VSCode进行工程再编译前,先将程序自动生成并编译,所生成的
build文件夹删除掉,不然,可能会造成在VScode里面,再进行cmake编译的时候,会报错。- ✨另外对于windows平台,自动生成的项目工程,在使用VSCode打开后,编译器解析报错问题:
[cmake] CMake Error: CMake was unable to find a build program corresponding to "Ninja".  CMAKE_MAKE_PROGRAM is not set.  You probably need to select a different build tool.
[cmake] -- Configuring incomplete, errors occurred!
修改项目工程"xxx\.vscode\settings.json":
"cmake.generator": "Ninja"
修改为:
"cmake.generator": "MinGW Makefiles",//Ninja MinGW Makefiles
- 从源头解决自动生成工程的问题,可以修改
pico_project.py文件:
"cmake.generator": "MinGW Makefiles",\n'
- 🌿工程创建后,可以直接使用VSCode打开并编译。
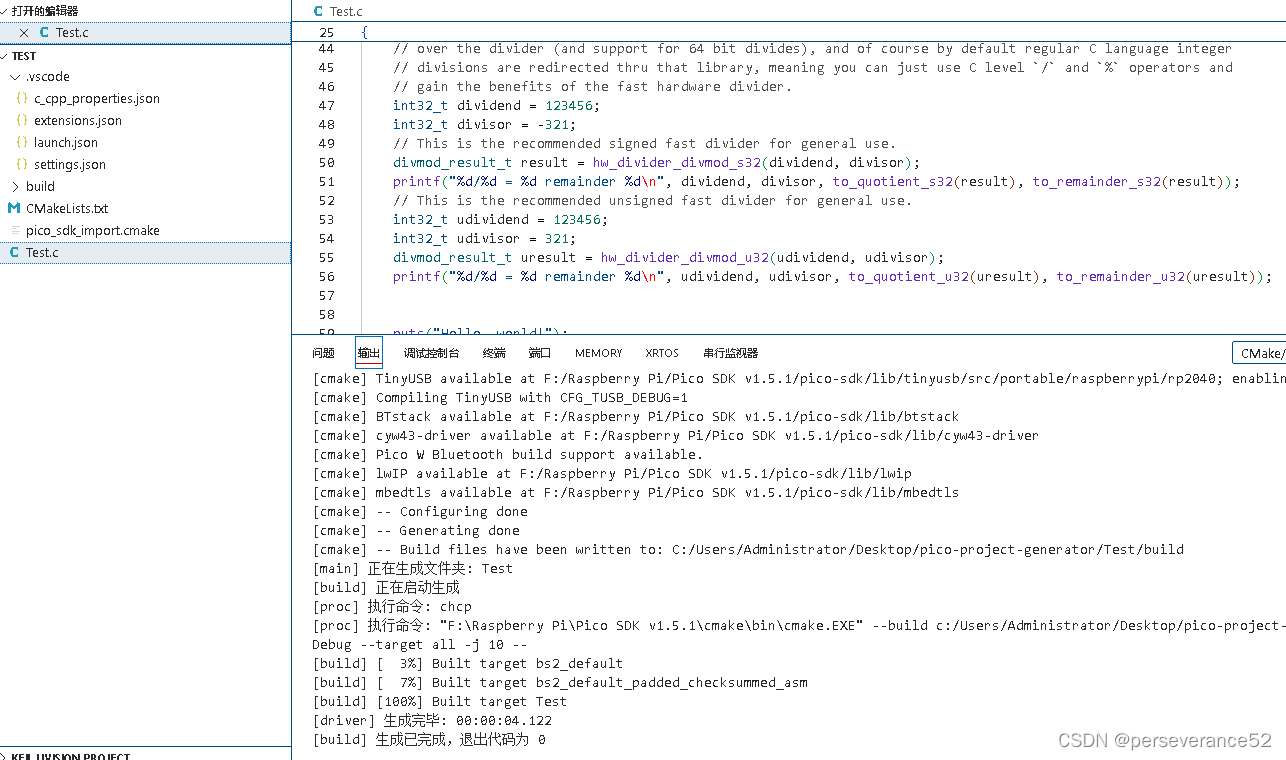
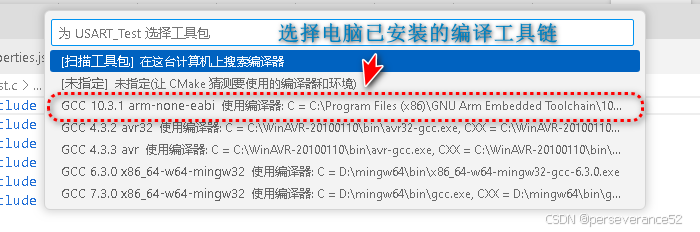
- ✨编译前提:如果VSCode没有自动配置编译器,那么需要手动设置并选择一下编译器的路径。
📒CMakeLists.txt文件内容解析
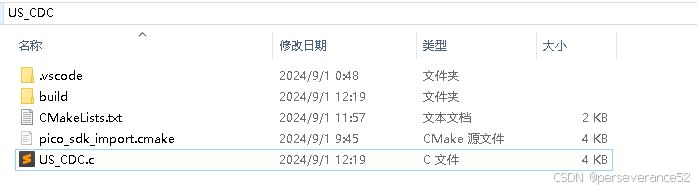
-🔖 一般创建的工程包含3个文件:
CMakeLists.txt、pico_sdk_import.cmake、工程.c
# Generated Cmake Pico project file

cmake_minimum_required(VERSION 3.13)

set(CMAKE_C_STANDARD 11)
set(CMAKE_CXX_STANDARD 17)

# Initialise pico_sdk from installed location注意这里的路径是反斜杠
# (note this can come from environment, CMake cache etc)
set(PICO_SDK_PATH "F:/Raspberry Pi/Pico SDK v1.5.1/pico-sdk")

set(PICO_BOARD pico CACHE STRING "Board type")

# Pull in Raspberry Pi Pico SDK (must be before project)
include(pico_sdk_import.cmake)

if (PICO_SDK_VERSION_STRING VERSION_LESS "1.4.0")
  message(FATAL_ERROR "Raspberry Pi Pico SDK version 1.4.0 (or later) required. Your version is ${PICO_SDK_VERSION_STRING}")
endif()

project(US_CDC C CXX ASM)

# Initialise the Raspberry Pi Pico SDK
pico_sdk_init()

# Add executable. Default name is the project name, version 0.1

add_executable(US_CDC US_CDC.c )

pico_set_program_name(US_CDC "US_CDC")
pico_set_program_version(US_CDC "0.1")
# 标准输出接口
pico_enable_stdio_uart(US_CDC 1)# 使能串口0作为标准输出
pico_enable_stdio_usb(US_CDC 0)# 不使能USB CDC

# Add the standard library to the build 添加标准库 pico_stdlib 库
target_link_libraries(US_CDC
        pico_stdlib)

# Add the standard include files to the build
target_include_directories(US_CDC PRIVATE
  ${CMAKE_CURRENT_LIST_DIR}
  ${CMAKE_CURRENT_LIST_DIR}/.. # for our common lwipopts or any other standard includes, if required
)
# 除 ELF 文件外,创建 map/bin/hex/uf2 文件。
pico_add_extra_outputs(US_CDC)
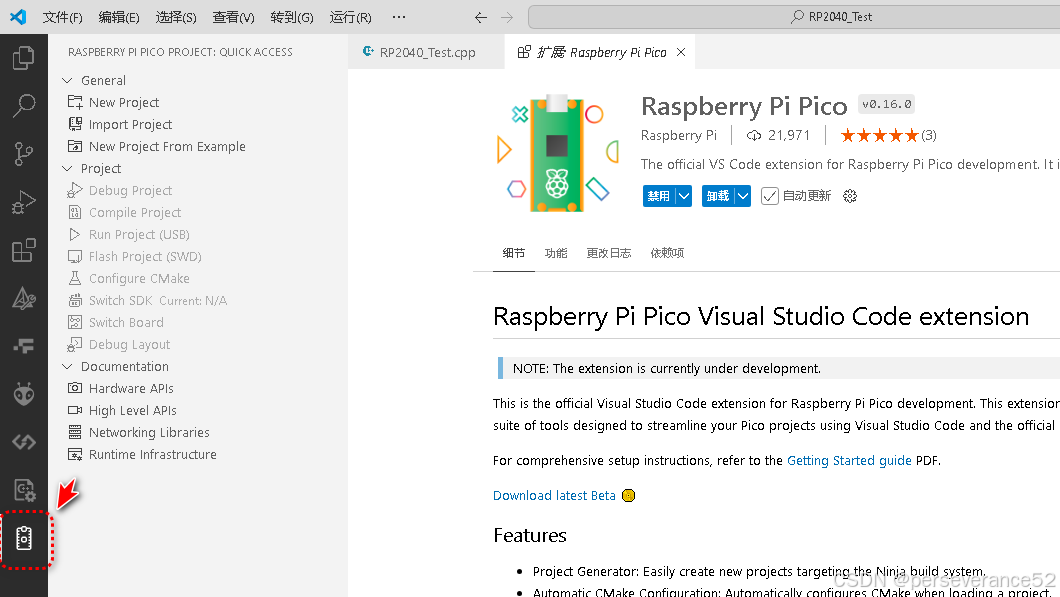
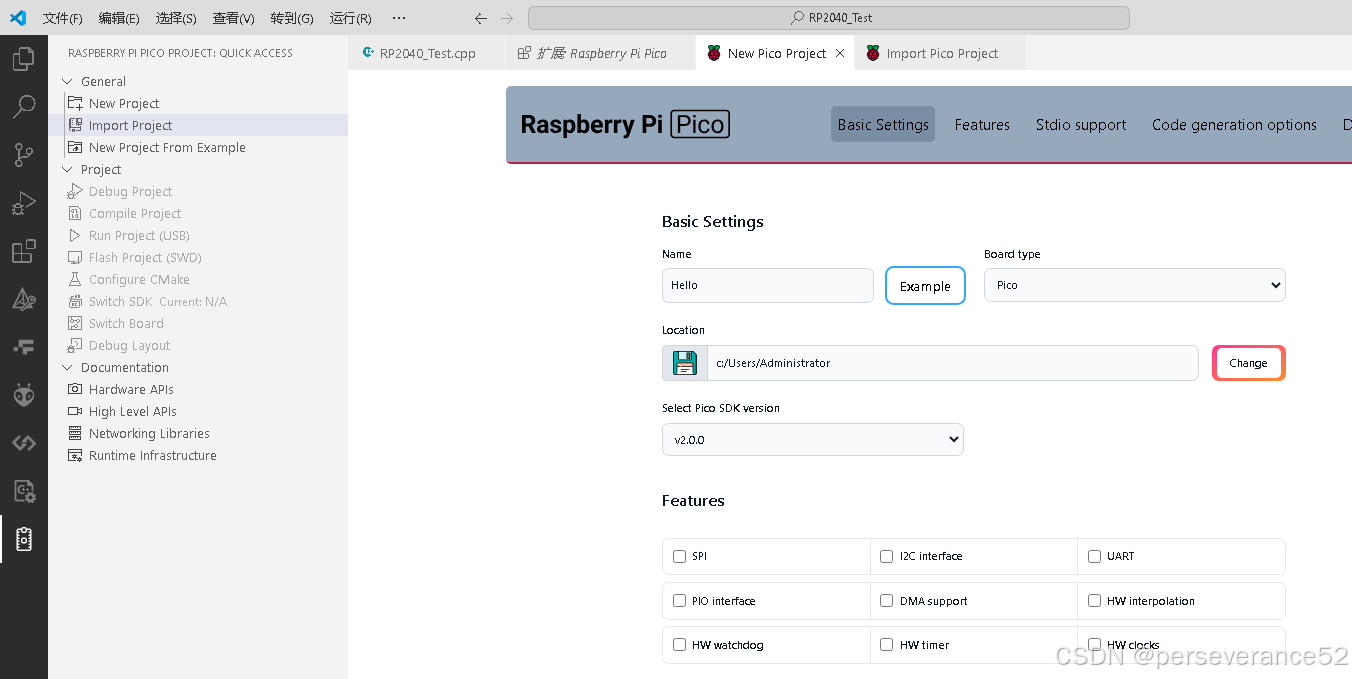
🛠VSCode 配合Raspberry Pi Pico插件
- 在VSCode中安装Raspberry Pi Pico插件,类似plateformIO插件,安装后,可以直接创建或导入PICO C SDK工程
🌾程序烧录
- 需要下载
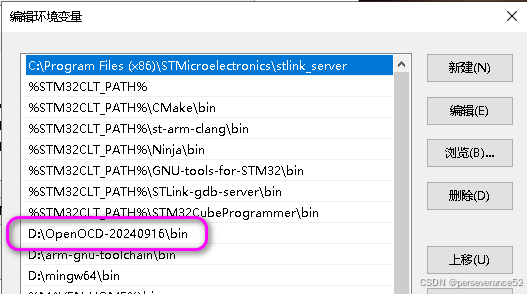
OpenOCD,下载地址:https://www.openocd.org/ - 将OpenOCD下载并解压后,将文件位置,添加到系统的环境变量中。
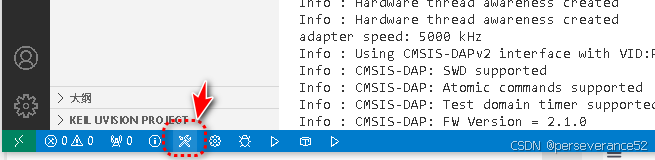
📘CMSIS-DAP烧录命令
- 🔧通过RP2040的
SWD接口烧录, - 🌿烧录命令:
openocd -f interface/cmsis-dap.cfg -f target/rp2040.cfg -c "adapter speed 5000" -c "program USART_Test.elf verify reset exit"
- 其中
USART_Test.elf为编译所生成的文件名。
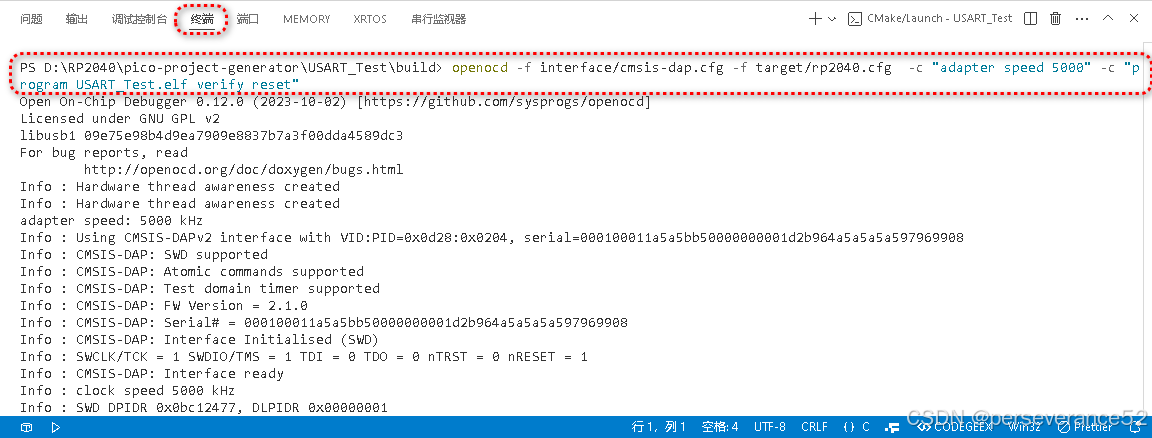
- 📜烧录信息:
PS D:\RP2040\pico-project-generator\USART_Test\build> openocd -f interface/cmsis-dap.cfg -f target/rp2040.cfg  -c "adapter speed 5000" -c "program USART_Test.elf verify reset exit"
Open On-Chip Debugger 0.12.0 (2023-10-02) [https://github.com/sysprogs/openocd]
Licensed under GNU GPL v2
libusb1 09e75e98b4d9ea7909e8837b7a3f00dda4589dc3
For bug reports, read
        http://openocd.org/doc/doxygen/bugs.html
Info : Hardware thread awareness created
Info : Hardware thread awareness created
adapter speed: 5000 kHz
Info : Using CMSIS-DAPv2 interface with VID:PID=0x0d28:0x0204, serial=000100011a5a5bb50000000001d2b964a5a5a5a597969908
Info : CMSIS-DAP: SWD supported
Info : CMSIS-DAP: Atomic commands supported
Info : CMSIS-DAP: Test domain timer supported
Info : CMSIS-DAP: FW Version = 2.1.0
Info : CMSIS-DAP: Serial# = 000100011a5a5bb50000000001d2b964a5a5a5a597969908
Info : CMSIS-DAP: Interface Initialised (SWD)
Info : SWCLK/TCK = 1 SWDIO/TMS = 1 TDI = 0 TDO = 0 nTRST = 0 nRESET = 1
Info : CMSIS-DAP: Interface ready
Info : clock speed 5000 kHz
Info : SWD DPIDR 0x0bc12477, DLPIDR 0x00000001
Info : SWD DPIDR 0x0bc12477, DLPIDR 0x10000001
Info : [rp2040.core0] Cortex-M0+ r0p1 processor detected
Info : [rp2040.core0] target has 4 breakpoints, 2 watchpoints
Info : [rp2040.core1] Cortex-M0+ r0p1 processor detected
Info : [rp2040.core1] target has 4 breakpoints, 2 watchpoints
Info : starting gdb server for rp2040.core0 on 3333
Info : Listening on port 3333 for gdb connections
Warn : [rp2040.core1] target was in unknown state when halt was requested
[rp2040.core0] halted due to debug-request, current mode: Thread
xPSR: 0xf1000000 pc: 0x000000ea msp: 0x20041f00
[rp2040.core1] halted due to debug-request, current mode: Thread
xPSR: 0xf1000000 pc: 0x000000ea msp: 0x20041f00
** Programming Started **
Info : Found flash device 'win w25q64fv/jv' (ID 0x001740ef)
Info : RP2040 B0 Flash Probe: 8388608 bytes @0x10000000, in 128 sectors

Info : Padding image section 1 at 0x10005a50 with 176 bytes (bank write end alignment)
Warn : Adding extra erase range, 0x10005b00 .. 0x1000ffff
** Programming Finished **
** Verify Started **
** Verified OK **
** Resetting Target **
shutdown command invoked
📘OpenOCD JLINK烧录报错解决措施
- 👉推荐使用
UsbDriverTool工具将驱动类型转换为WinUSB类型。 - 🥕
UsbDriverTool工具下载地址:https://visualgdb.com/UsbDriverTool/ - 🔧修改驱动方法:
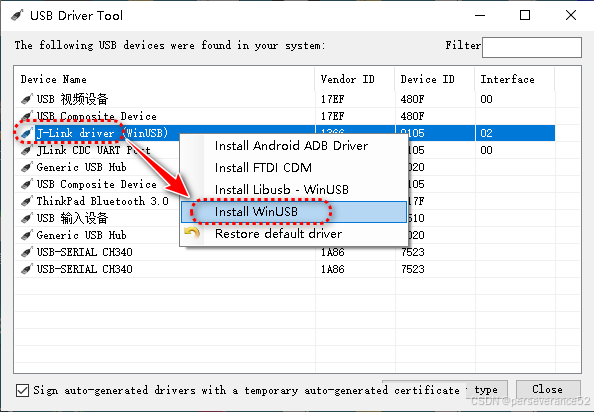
- ✨如果需要回到Keil MDK开发其他ARM内核单片机,需要将驱动还原为来的,否则识别不到JLink,如果在基于VSCode 开发ARM单片机就不需要改驱动。
- 🔖如果使用
openocd命令,执行烧录命令还是报错,建议将下载速度调整到100KHz - 2000KHz.,个人测试可以使用。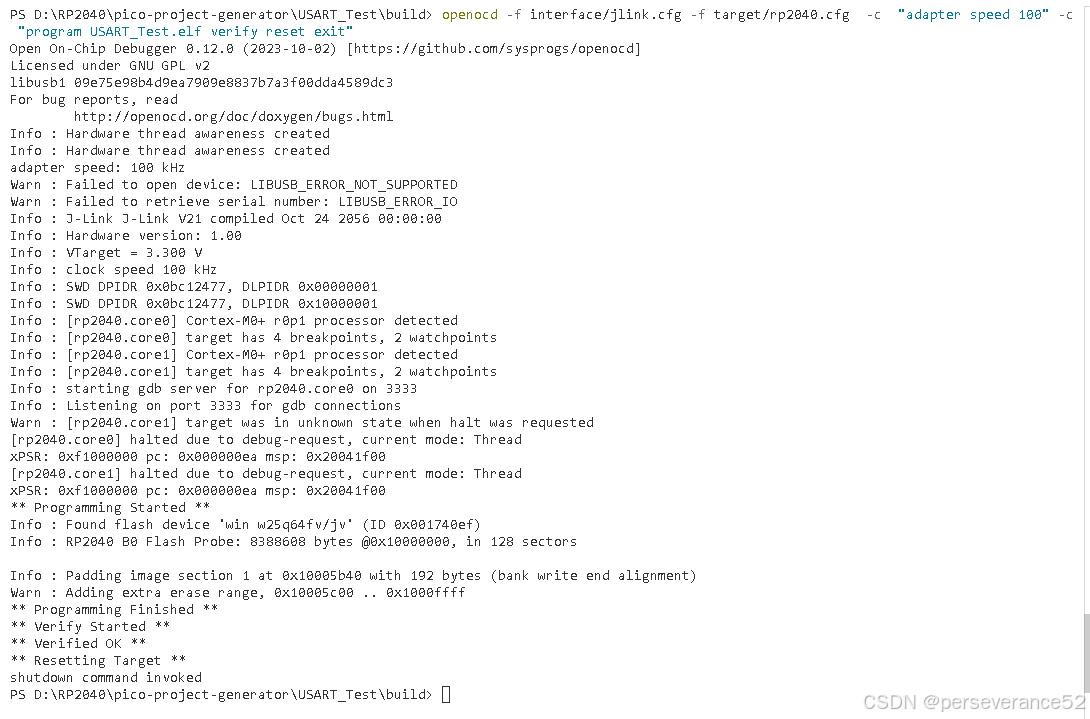
- 🌿JLINK SWD烧录命令:
openocd -f interface/jlink.cfg -f target/rp2040.cfg -c "adapter speed 100" -c "program USART_Test.elf verify reset exit"
- 🔖其中速度参数:
-c "adapter speed 100":100KHz.
✨在没有安装Visual Studio环境下手动配置搭建方式✨
- 🔖以下必要安装工具:
-
🌿VSCode安装
-
🌿安装GNU Arm嵌入式工具链(提供交叉编译工具链及GDB调试):ARM GCC compiler:
https://developer.arm.com/downloads/-/gnu-rm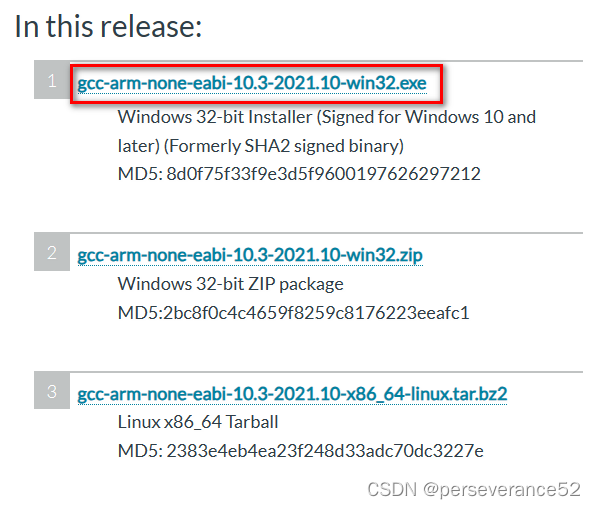
-
🌿mingw-w64(提供c/c++编译环境):
https://sourceforge.net/projects/mingw-w64/files/mingw-w64/mingw-w64-release/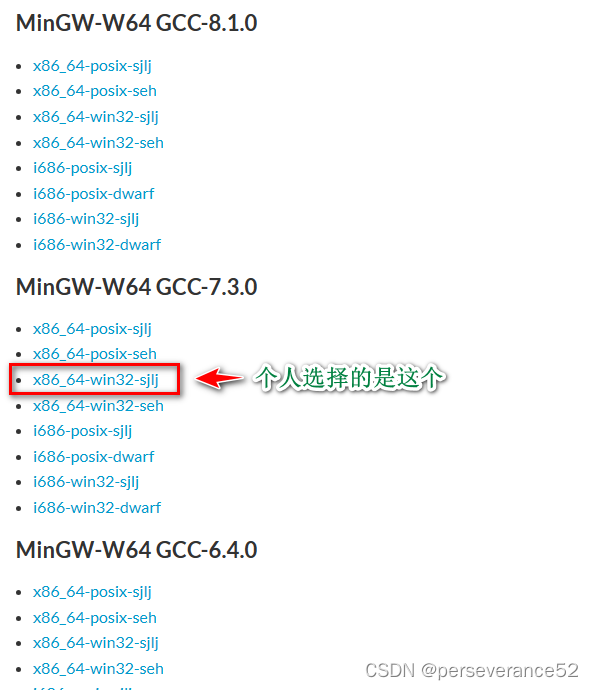
-
🌿CMake:
https://cmake.org/download/?login=from_csdn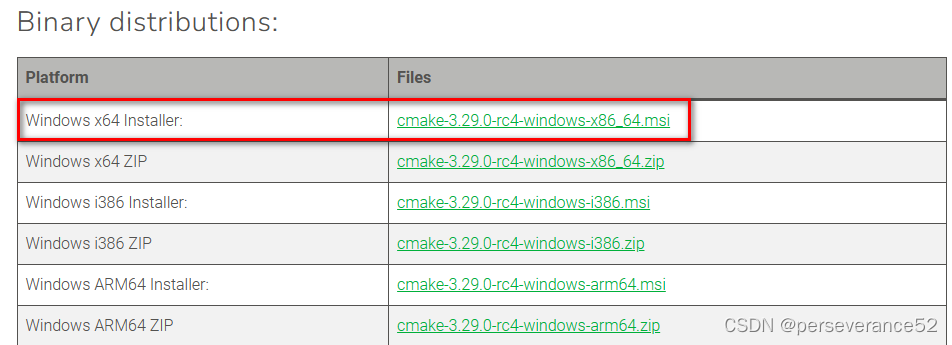
-
🌿Python安装:
https://www.python.org/downloads/windows/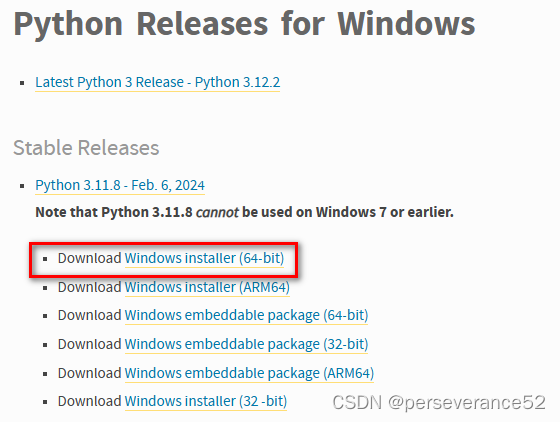
-
🌿Git 工具:
https://git-scm.com/download/win?login=from_csdn
🛠下载SDK资源包以及例程资源
- 🌿从github上克隆pico sdk资源包:
git clone -b master https://github.com/raspberrypi/pico-sdk.git
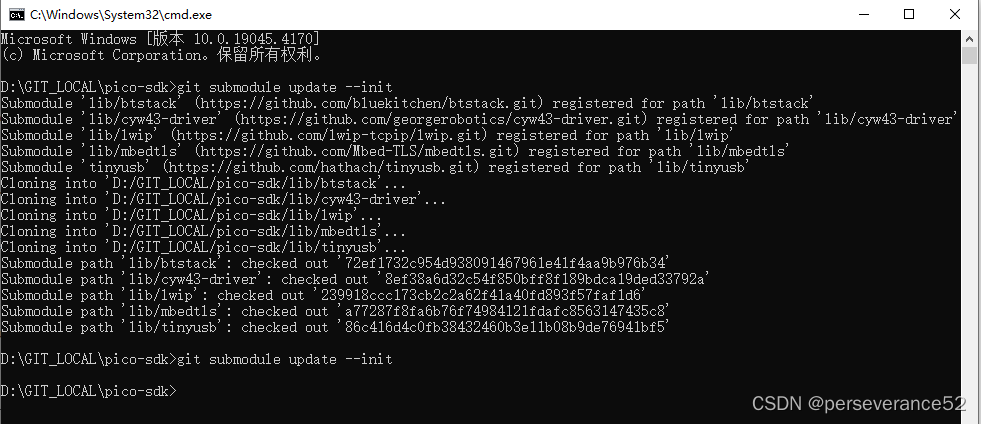
- 🔖执行一次,子模块更新命令:(确保每一个子模块都下载完成)
git submodule update --init
- 🌿从github上克隆pico例程资源:
git clone https://github.com/raspberrypi/pico-examples.git

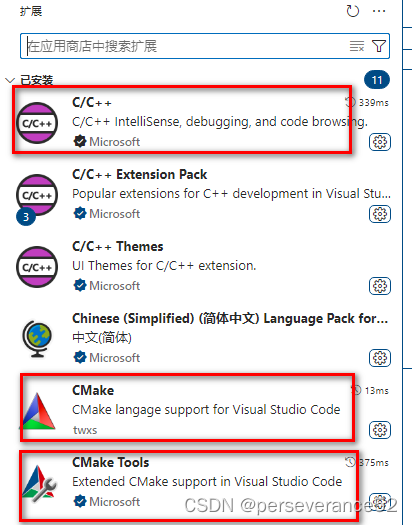
⛳VSCode插件必要插件
- 🔧C/C++
- 🔧CMake
- 🔧CMake Tools
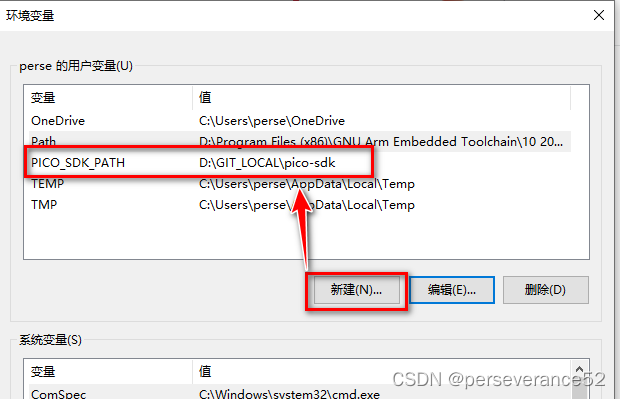
📙VSCode参数配置系统环境变量配置
- 🧨这是在没有安装Visual Studio环境下配置搭建方式。
-
🎋
Cmake Generator参数配置:MinGW Makefiles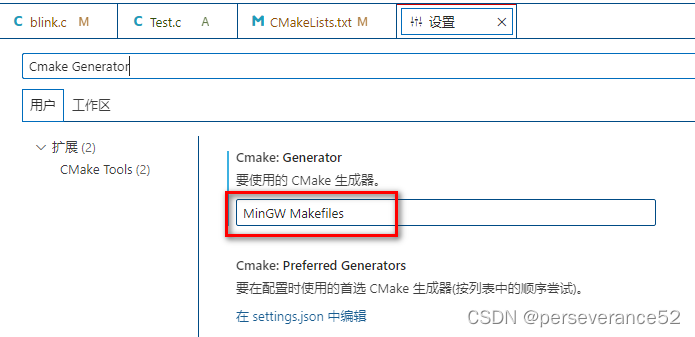
-
🎋
Cmake Environment参数配置:添加pico-sdk的路径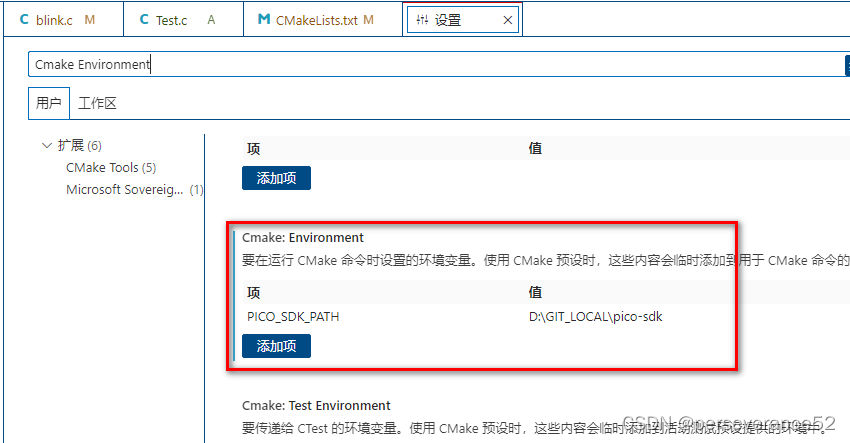
-
🎋将
pico-sdk资源包的路径添加到系统环境变量中:
-
🎋
GNU Arm Embedded Toolchain环境变量:(安装的时候,默认勾选可以省去手动自己添加)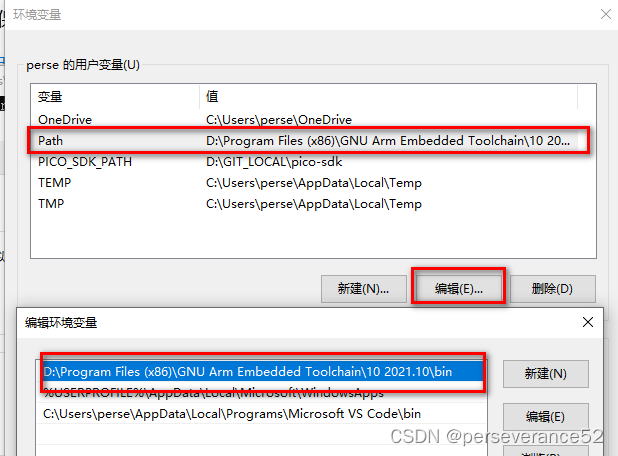
-
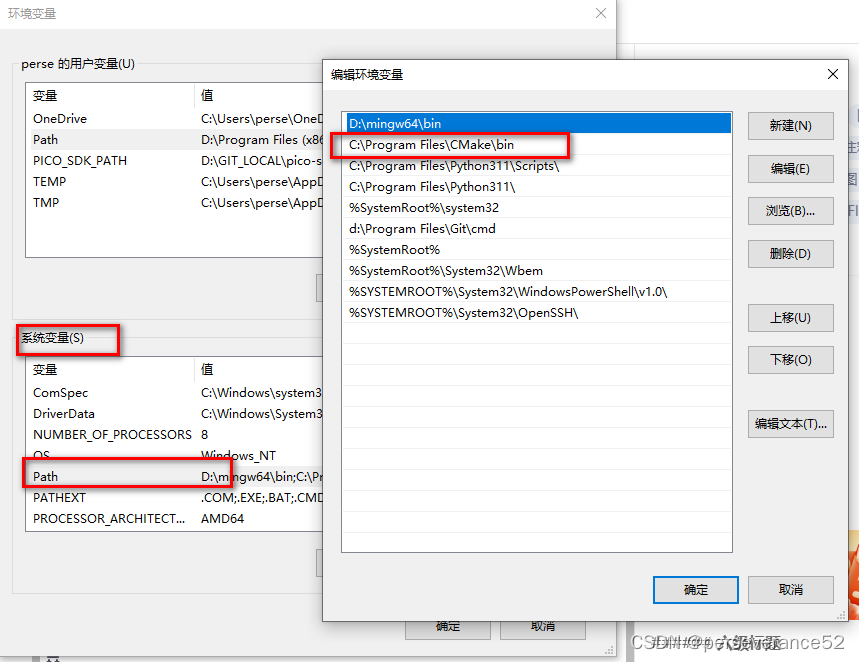
🎋CMake系统环境变量和mingw64环境变量:(安装的时候,默认勾选可以省去手动自己添加,mingw64需要自己添加)
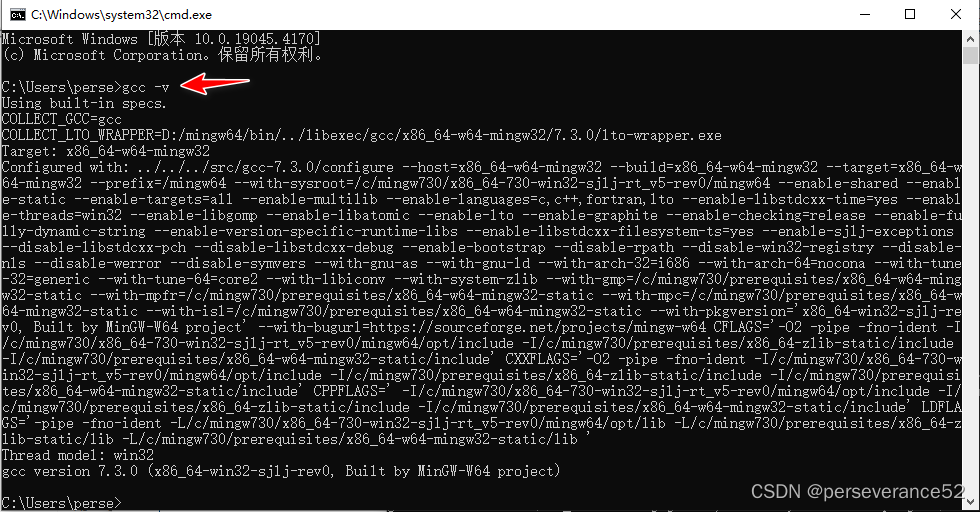
- 🔖测试
cmake和GNU Arm Embedded Toolchain是否安装和正确配置:
cmd命令:cmake --version;arm-none-eabi-gcc --version
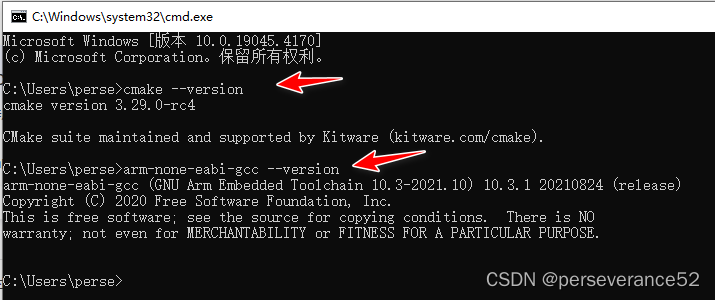
- 🔖mingw64查看版本,测试是否安装和配置环境变量成功。
🔨例程工程编译
- 🌾使用
VSCode打开文件夹,选择pico-examples文件夹,并打开。(⚡注意这里选择的是pico-examples文件夹,而不是选择pico-examples内的子项目文件夹打开)。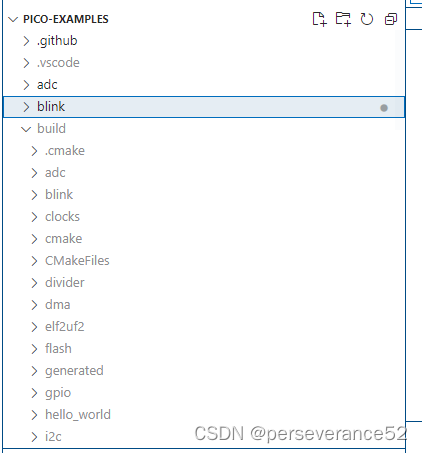
-
- 🕚等待cmake自动完成配置。
- ⚒选择全部编译:
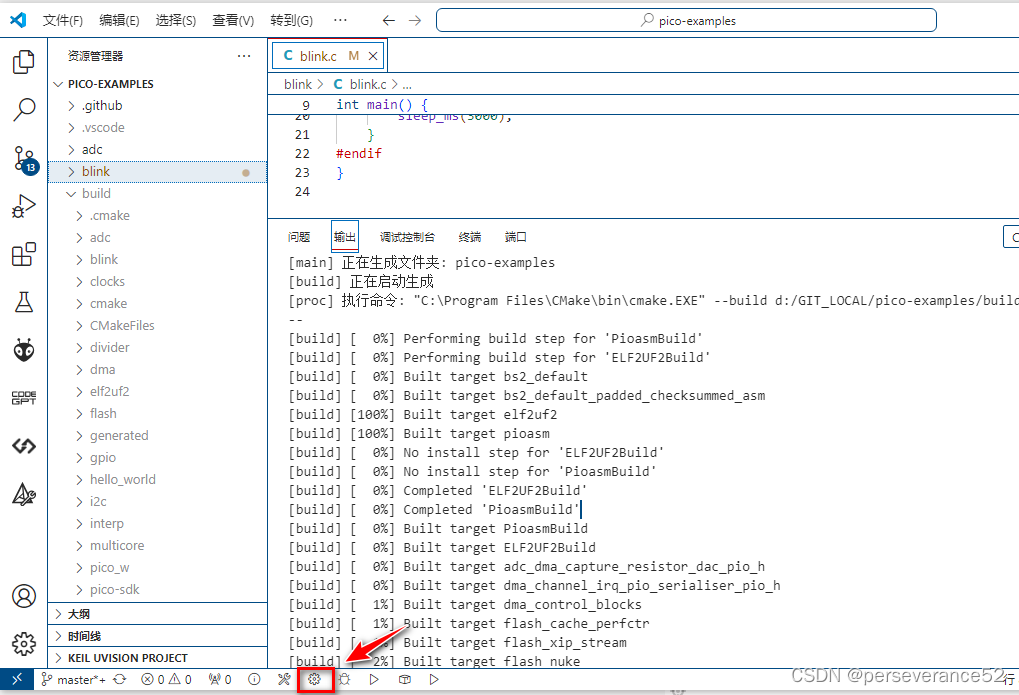
-
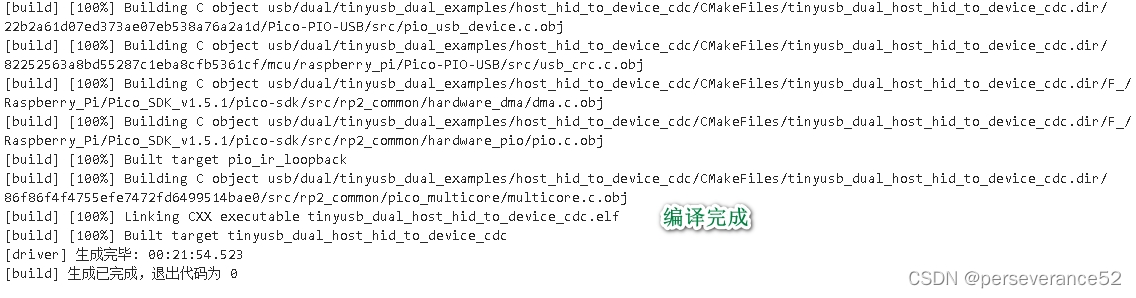
- ⌛编译完成:
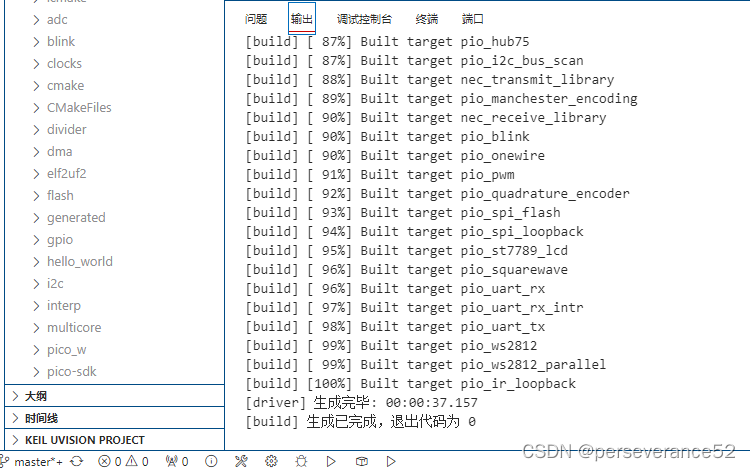
- ⌛编译完成:
-
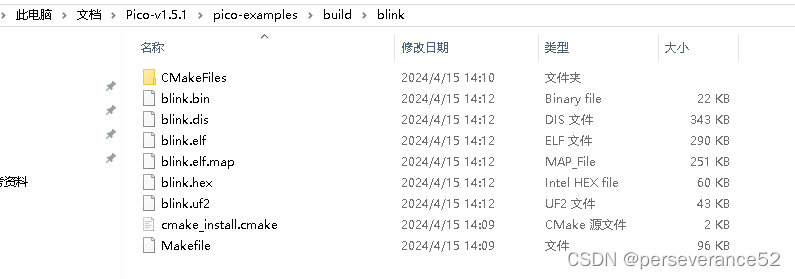
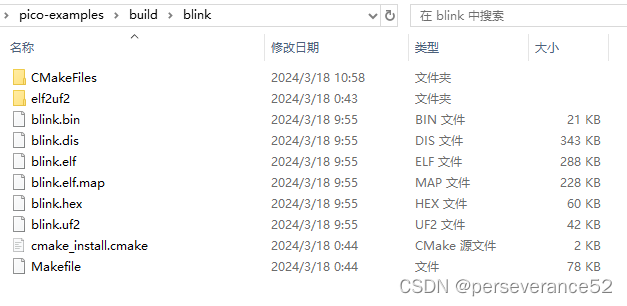
- 📜所生产的烧录文件在
pico-examples\build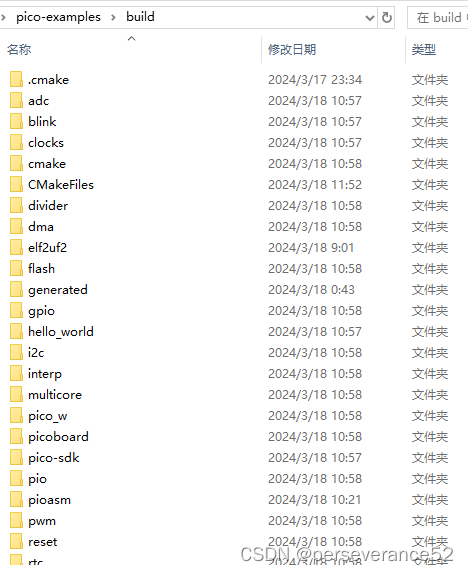
- 📜所生产的烧录文件在
📘自定义新增项目
-
🌿新增项目:直接随便拷贝一个例程项目重命名,来快速完成新项目的创建。(直接参考例程依葫芦画瓢)
-
🌿将新项目的名称添加到
pico-examples中的CMakeLists.txt文件中:(✨这个和上面的文件名相同,但是路径不同,注意区分)
-
🔖完成以上操作后,就可以重新编译,即可将新项目编译进来了。
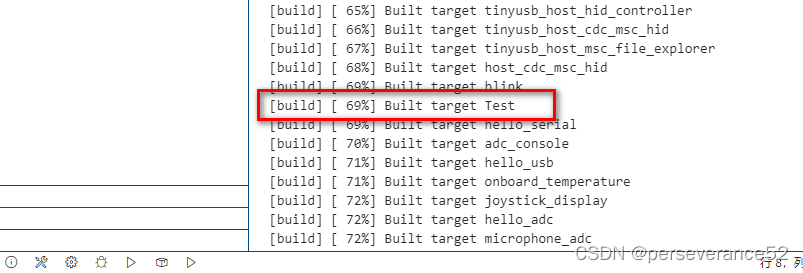
- 🎉不过这样编译时,每次都会对整个
pico-examples中的所有项目进行编译一次,如果仅仅是对单个项目做了修改,那么编译上速度还是很快的。
单一项目编译进行编译
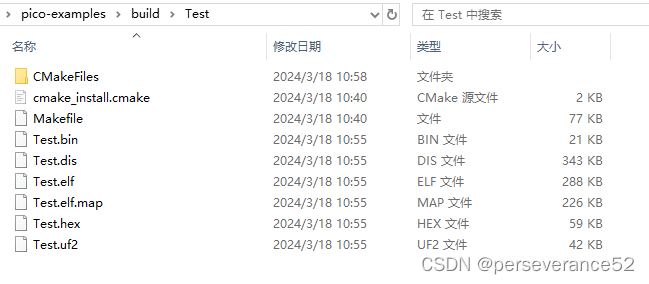
- 🌿首先进入需要进行编译的项目对应的文件夹.例如:
pico-examples\build\Test。(注意这里不是pico-examples\Test)

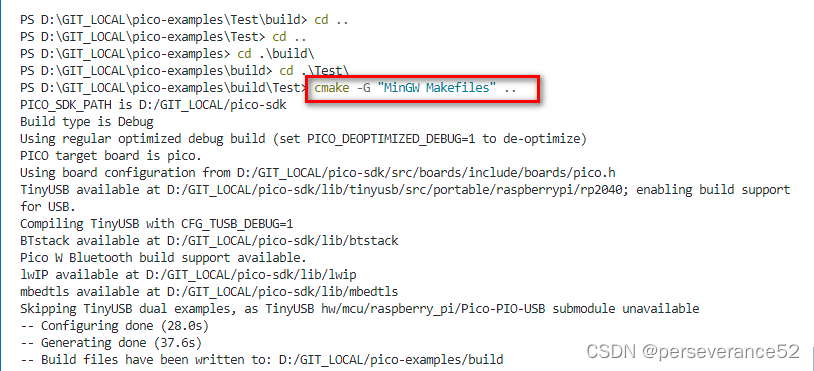
- 🌿进入
Build目录后,执行cmake命令:
# 生成编译配置文件
cmake -G "MinGW Makefiles" ..
# 或者cmake -G "Unix Makefiles" ..
- 如果在windows环境下,直接使用
cmake ..cmake会报错,并提示是否使用NMake命令。此时,需要删除build文件夹内的所有产生的文件,如果直接再调用cmake -G "MinGW Makefiles" ..进行再编译或报错。
- 🔖在Build文件夹产生了很多文件,并且包括
Makefile文件。
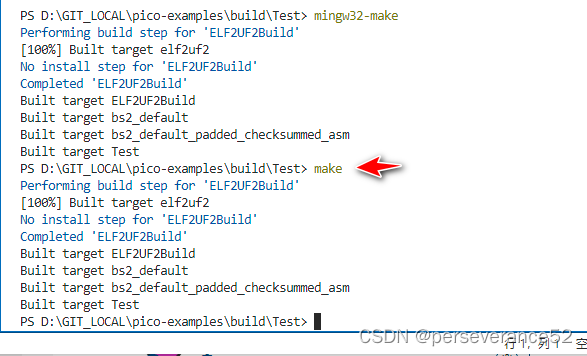
- 🌿最后执行
mingw32-make。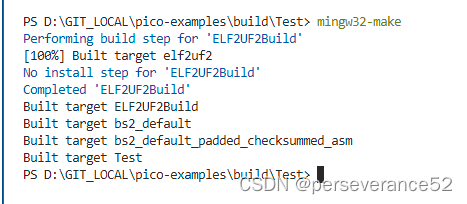
- 🎉为了输入命令方便,可以将目录下的
D:\mingw64\bin的mingw32-make.exe重命名或者复制,粘贴出一份进行重命名为make.exe,这样在编译最后一步就可以使用make来执行编译操作了。
🗑项目工程编译临时文件批处理清理
✨个人花了一点时间,模仿Keil工程临时文件批处理写的。将代码保存为.bat格式放置到工程项目文件夹根目录下,双击运行即可清理掉所有编译所产生的中间链接文件。只保留烧录文件和.map文件不被清理。
@echo off & title 批量删除当前目录下指定格式之外文件夹
cd /d "%~dp0"
::设置要排除的文件格式,多个格式之间使用英文逗号隔开
set "match=.cmake"
set "match2=CMakeFiles"
set "match3=generated"
set "match4=pico-sdk"

::删除文件
del cmake_install.cmake /s
del compile_commands.json /s
del CMakeCache.txt /s
del Makefile /s
del *.dis/s
::要保留的文件
::del  *.bin /s
::del  *.elf /s
::del  *.map /s
::del  *.hex /s
::del  *.uf2 /s

cd /d "build"
:: 遍历当前目录及其子目录中的所有文件夹
for /f  "tokens=*" %%i in ('dir /b /ad') do (
    if  "%%i"=="%match%" (
         echo 正在删除文件夹: "%%i"
	rd /s /q "%%i"
    ) else if  "%%i"=="%match2%" (
         echo 正在删除文件夹: "%%i"
	rd /s /q "%%i"
    ) else if  "%%i"=="%match3%" (
         echo 正在删除文件夹: "%%i"
	rd /s /q "%%i"
    ) else if  "%%i"=="%match4%" (
         echo 正在删除文件夹: "%%i"
	rd /s /q "%%i"
    )else (
        echo 扫描到文件夹: "%%i"
    )
)

::删除文件夹
::rd /s /q "build\.cmake"
::rd /s /q "build\CMakeFiles"
::rd /s /q "build\generated"
::rd /s /q "build\pico-sdk"


::pause

一站式 AI 云服务平台
更多推荐


 27
27 0
0- 0


 已为社区贡献6条内容

所有评论(0)