
Jenkins 如何玩转接口自动化测试?
上个世纪的接口自动化测试成本很高,如果项目没能通过自动化测试来保证接口的质量,仅仅依靠手动测试,不仅费时费力,还容易导致问题!而通过上文的介绍,我们只需要使用Apifox提供的url链接,就能跑自动化测试。再将ApifoxCLI集成到jenkins就能实现自动化测试的持续集成!简直就是神器!httpshttpshttpshttpshttpshttpshttpshttpshttpshttpshttp
Apifox CLI
Apifox CLI是Apifox提供的接口持续集成命令行运行工具。用于支持实时运行在线数据及导出数据运行等两种方式。
安装方式如下👇
npm install -g apifox-cli
⏰ 注意事项:Apifox CLI依赖的Node.js版本需要 >= v10
下面是通过对官网提供的宠物商店接口测试用例,我们通过Apifox CLI并结合这个测试用例来进行自动化测试的实践🌰
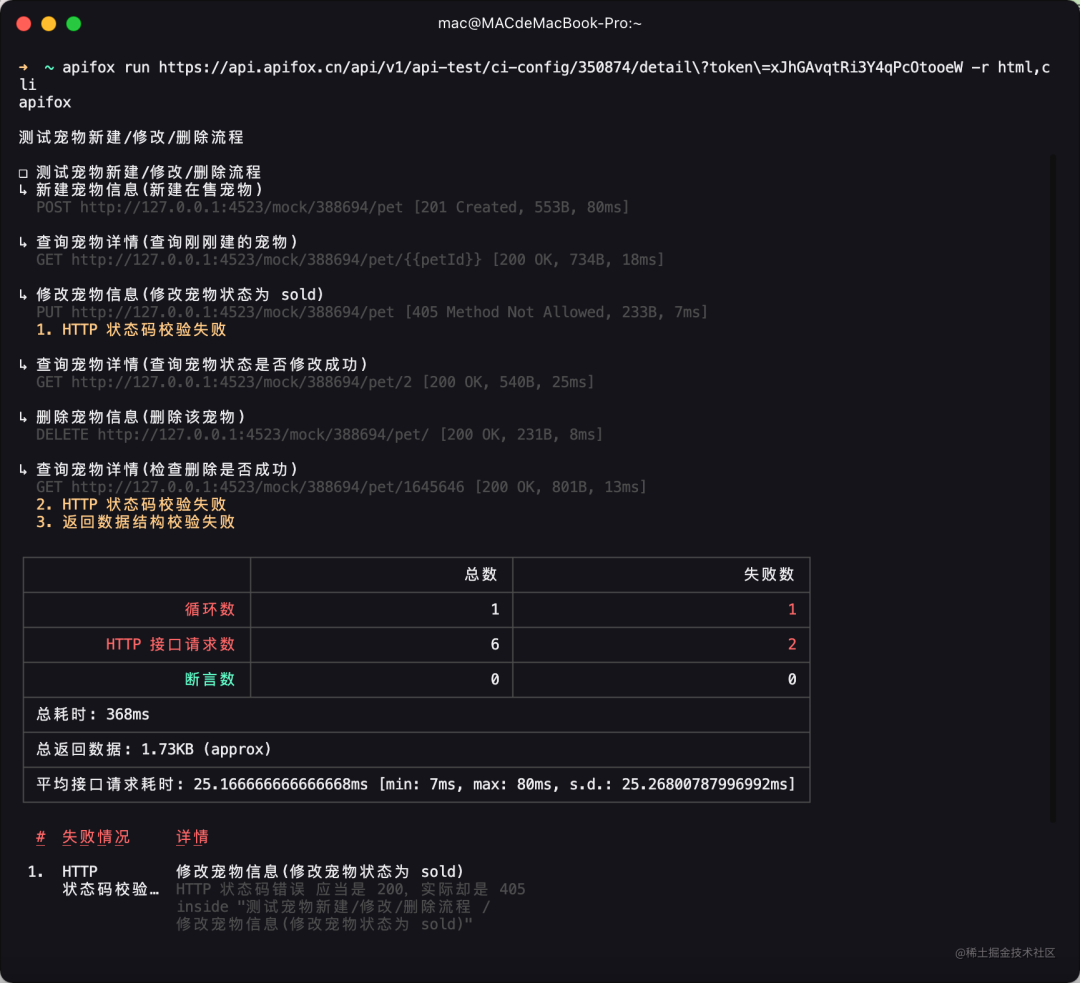
Apifox CLI
👧 小飞同学:那上图命令行中的url是从哪里获取的呢?
你可以在Apifox的自动化测试Tab中找到测试用例,然后选择你要测试的用例名称并点击详情。如下所示 👇
![]()
自动化测试
然后在该测试用例的详情中,点击持续集成的按钮,会弹出一个持续集成配置的窗口
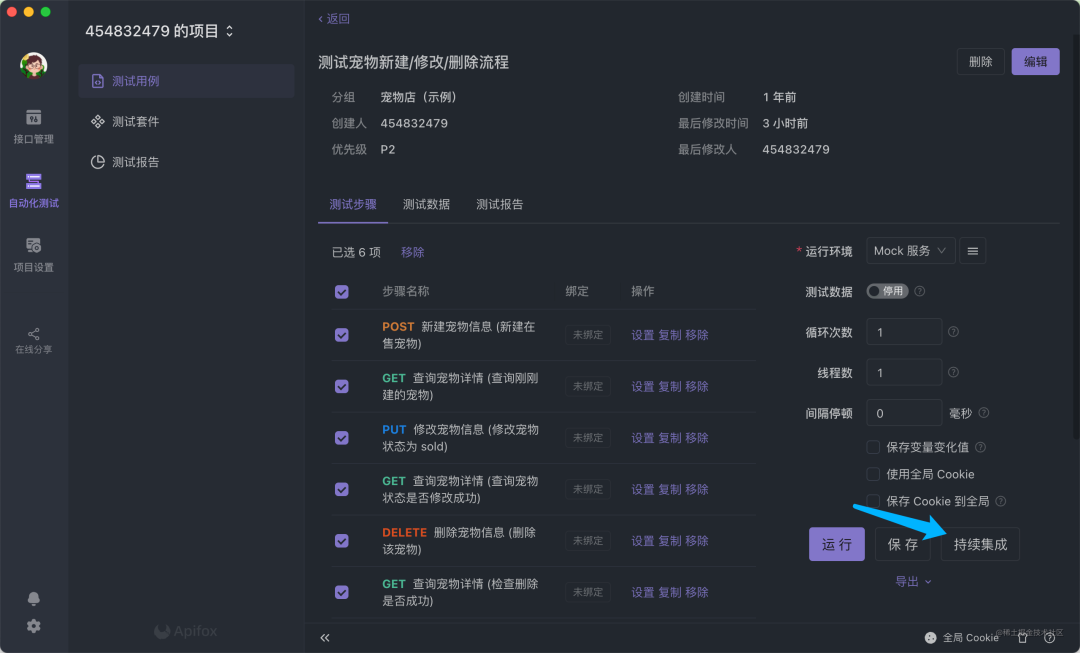
持续集成
接下来我们在持续集成窗口中点击新建 👇
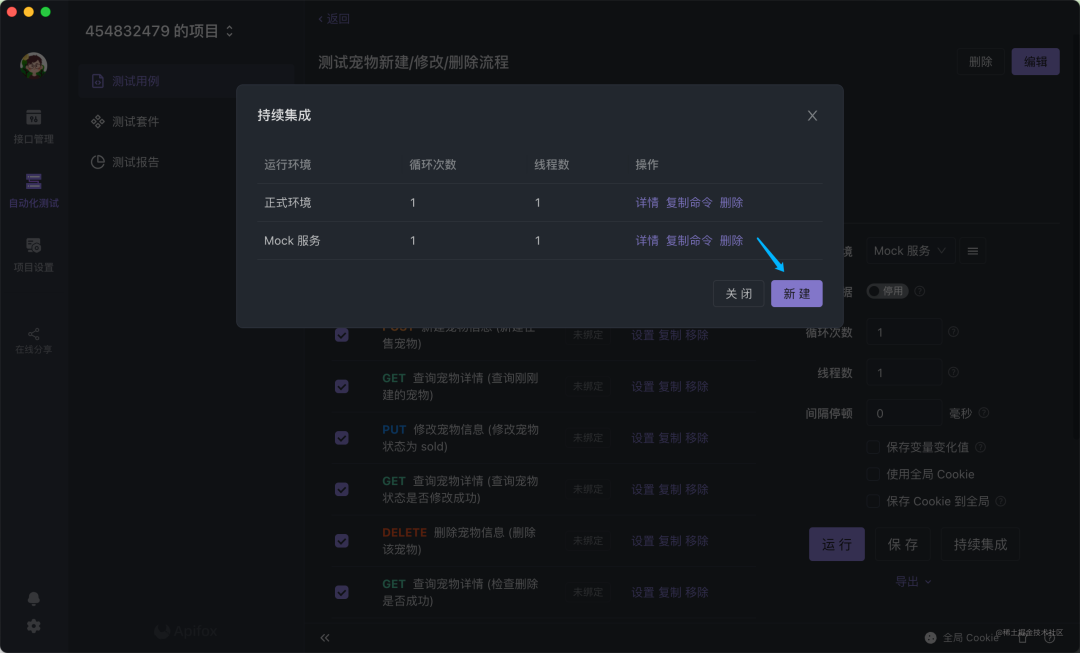
创建持续集成
最后在窗口选择运行环境、循环次数、线程数等等信息,点击保存即可创建该运行url

测试用例持续集成的url创建成功了
那怎么在Jenkins上玩转Apifox?
1.1 安装Nodejs环境
打开Jenkins后我们首先需要先安装NodeJS环境。当前演示的Jenkins版本是Jenkins 2.346.1,如果是旧版本的jenkin 访问操作路径不同
首先在dashboard面板左侧菜单选择系统管理菜单,然后在系统配置模块下选择插件管理 👇
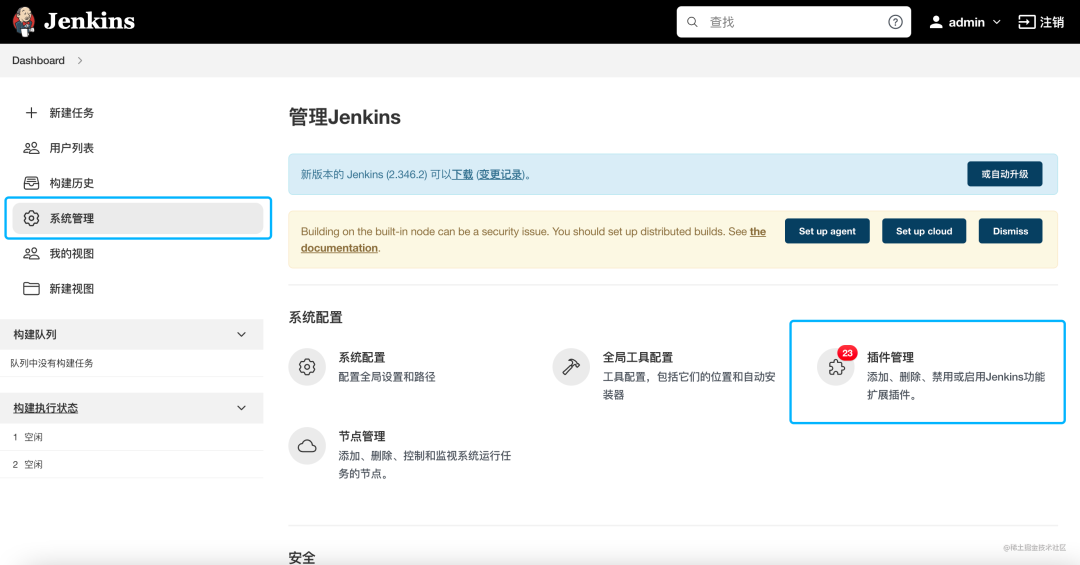
jenkins
选择可选插件,并搜索Nodejs 点击安装即可
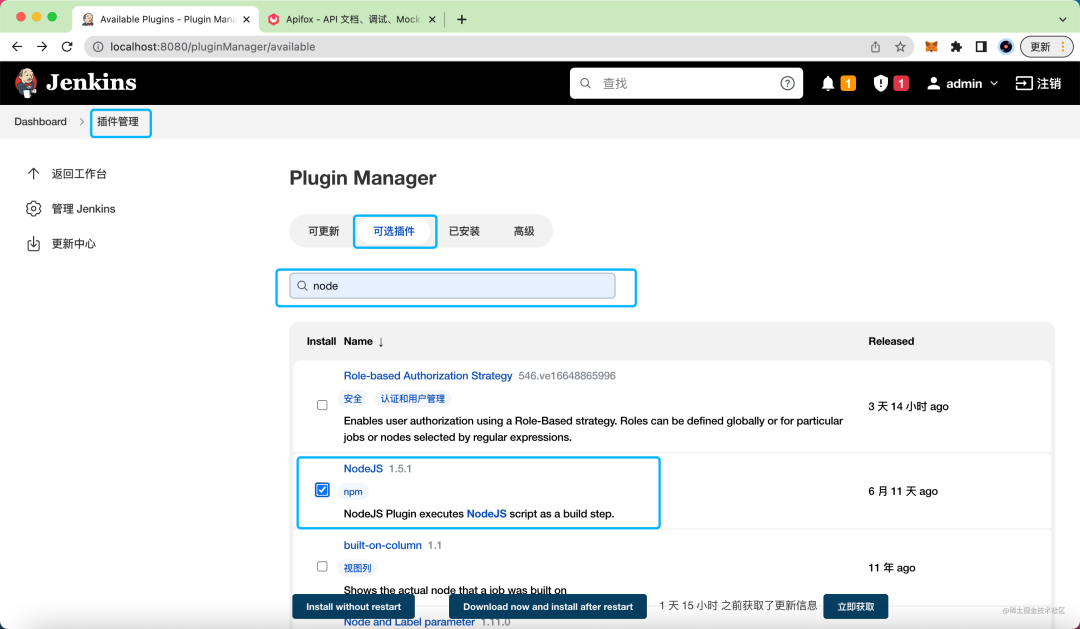
插件管理
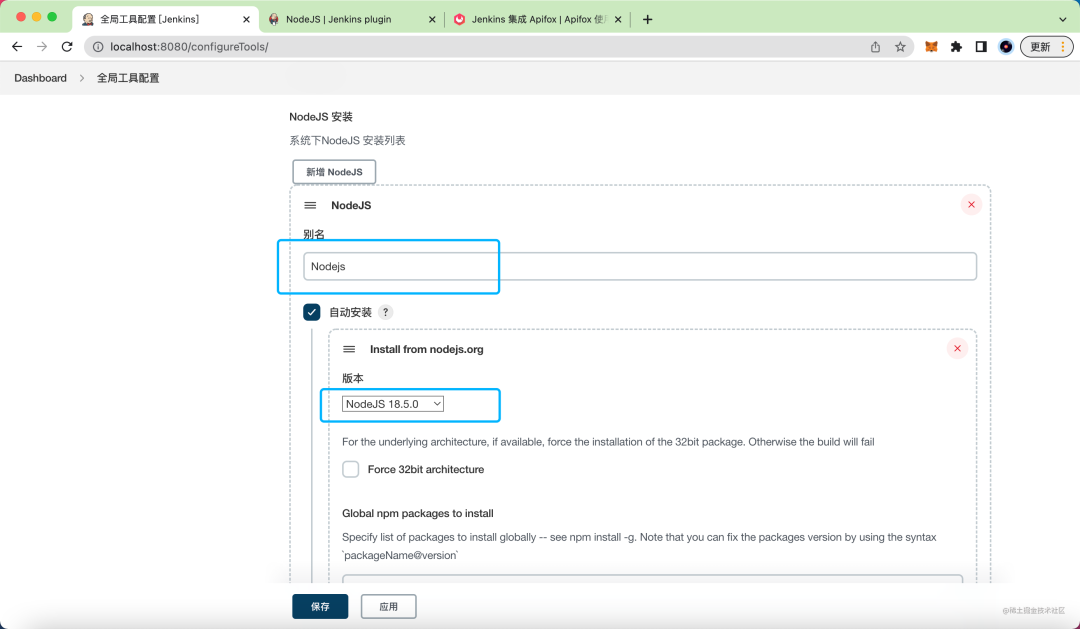
1.2 全局工具配置
安装完Nodejs插件环境之后,接下来需要在全局工具配置中设置Nodejs的相关配置,下图全局工具配置的入口👇
![]()
全局工具配置
然后选择你期望运行的Nodejs版本, 如果你是window操作系统还需要指定运行路径
选择Nodejs版本
1.3 新建项目Job
完成上述环境配置之后,你已经完成一半的流程✅ 接下来我们创建一个任务 Job,来实现接口自动化测试。
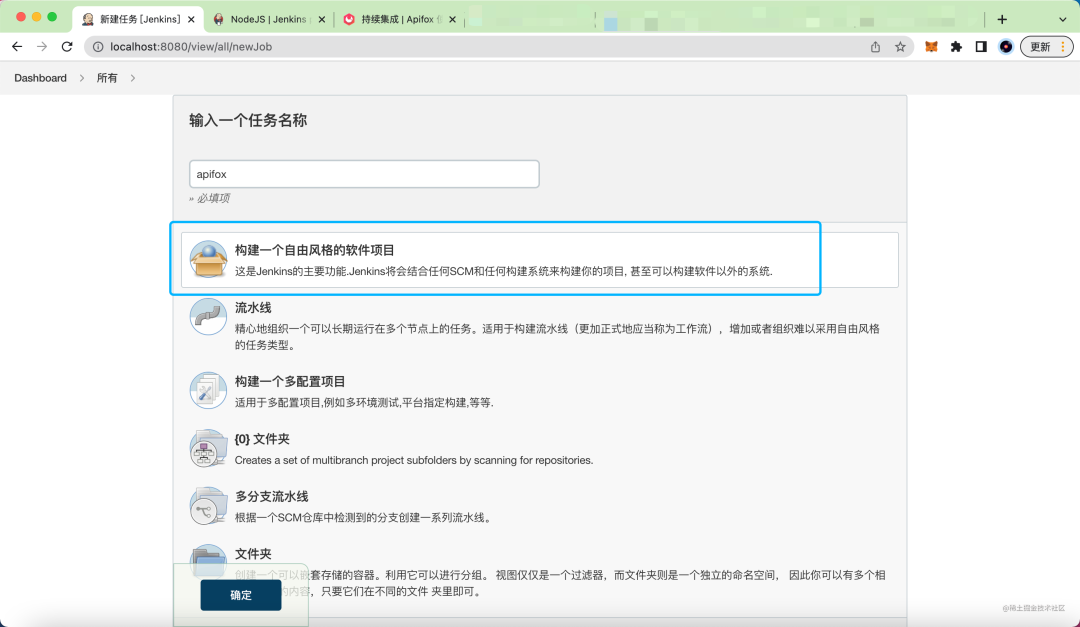
创建任务
创建任务成功之后,在job的配置中选择构建环境且设置Node 如下图所示👇
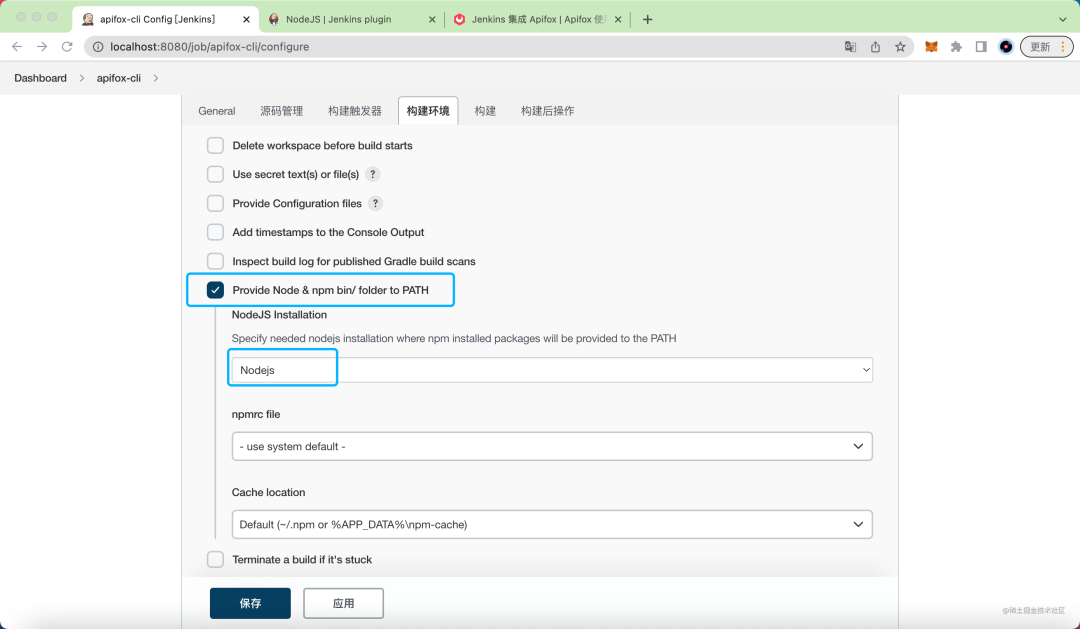
配置构建环境
设置之后选择构建模块(build),新建一个构建步骤,选择类型:执行 Shell
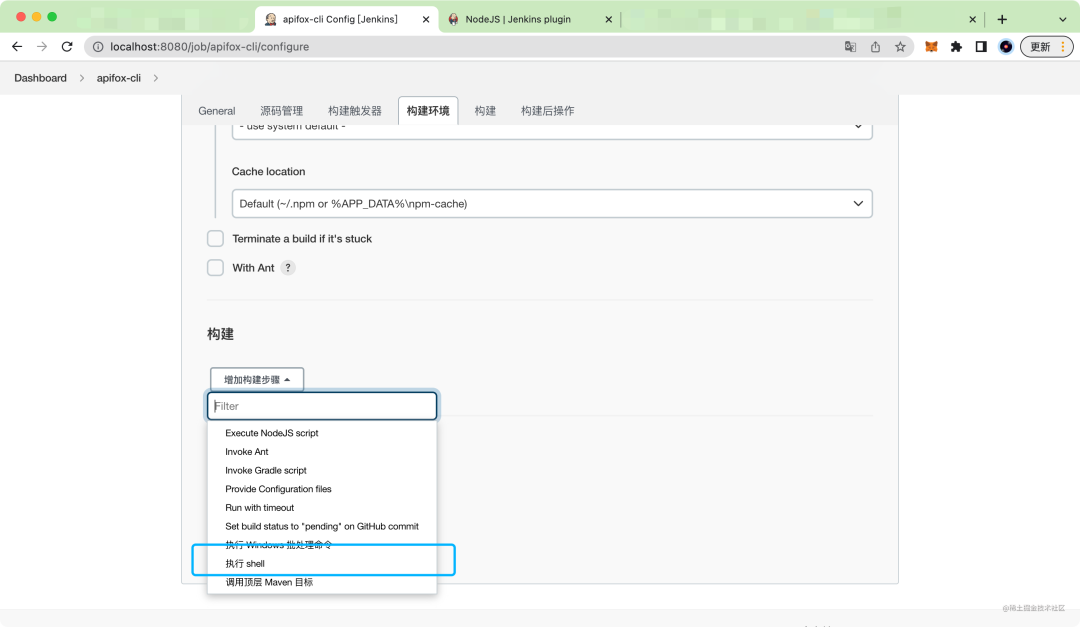
配置构建
最后我们将上文通过Apifox生成的持续集成url链接复制到Shell输入框中
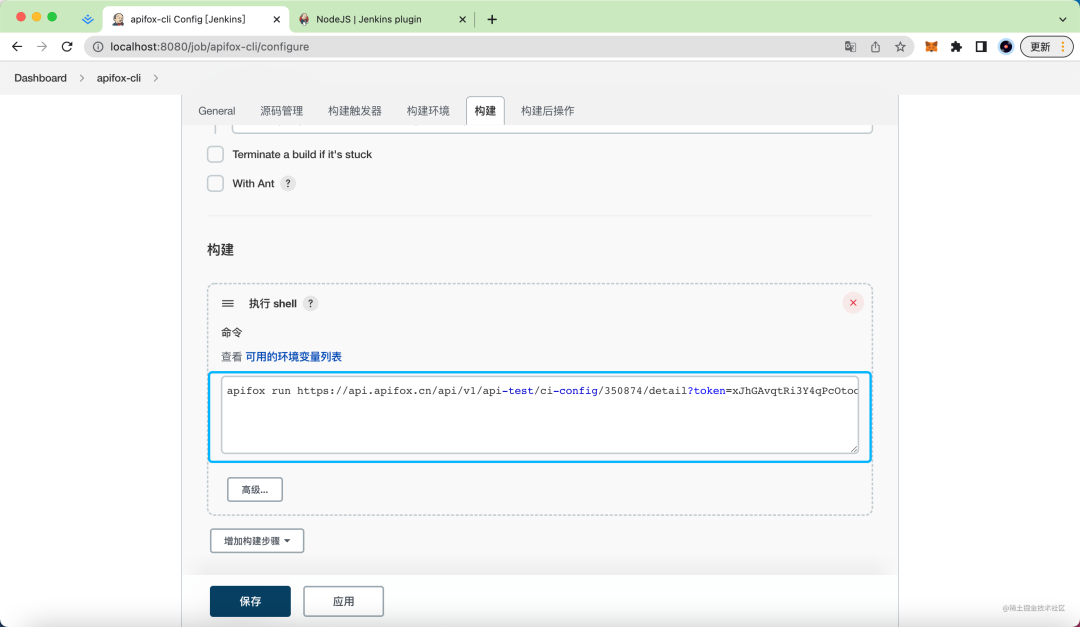
输入 URL
完成上述操作之后,我们可以来运行这个任务Job,点击控制台输出看下输出结果!结果符合我们预期!

运行Jenkins任务
最后
上个世纪的接口自动化测试成本很高,如果项目没能通过自动化测试来保证接口的质量,仅仅依靠手动测试,不仅费时费力,还容易导致问题!
而通过上文的介绍,我们只需要使用Apifox 提供的url链接, 就能跑自动化测试。再将Apifox CLI集成到jenkins就能实现自动化测试的持续集成!简直就是神器!
——————————————————————————————————————————
第二版
接口自动化测试是现代化软件开发流程中不可或缺的一环,而Jenkins作为最流行的持续集成工具,为接口自动化测试提供了强大的平台支持。本文将深入探讨如何在Jenkins中高效实施接口自动化测试。
一、接口自动化测试的核心价值
1.1 为什么需要接口自动化测试
-
早期缺陷发现:在开发阶段即可发现接口问题
-
回归测试效率:快速验证核心功能,减少人工测试时间
-
持续集成支持:与CI/CD流水线无缝集成
-
质量度量:提供可量化的质量指标
1.2 Jenkins在自动化测试中的优势
-
强大的调度能力:支持定时执行、事件触发
-
丰富的插件生态:与各种测试工具无缝集成
-
完善的报告机制:可视化测试结果
-
分布式执行:支持多节点并行测试
二、Jenkins环境搭建与配置
2.1 Jenkins安装与基础配置
2.1.1 安装方式选择
bash
# Docker方式安装(推荐)
docker run -d \
  --name jenkins \
  -p 8080:8080 \
  -p 50000:50000 \
  -v jenkins_home:/var/jenkins_home \
  jenkins/jenkins:lts

# 传统安装方式
# 下载Jenkins war包
wget https://get.jenkins.io/war-stable/latest/jenkins.war
java -jar jenkins.war --httpPort=8080
2.1.2 初始配置
-
获取初始管理员密码
-
安装推荐插件
-
创建管理员账户
2.2 关键插件安装
必须安装的插件:
-
Pipeline:流水线核心插件
-
Git plugin:Git代码库集成
-
HTML Publisher plugin:HTML报告发布
-
Email Extension Plugin:邮件通知扩展
-
Allure Plugin或JUnit Plugin:测试报告集成
-
Role-based Authorization Strategy:权限管理
-
Dashboard View:仪表盘视图
三、接口自动化测试框架选择与集成
3.1 主流测试框架对比
| 框架名称 | 语言 | 特点 | 适合场景 |
|---|---|---|---|
| Postman+Newman | JavaScript | 图形化界面,易于上手 | 中小型项目,快速验证 |
| RestAssured | Java | 与Java生态集成好 | Java技术栈项目 |
| Requests+Pytest | Python | 简洁灵活,生态丰富 | 数据驱动测试 |
| JMeter | Java | 性能测试为主,支持接口测试 | 性能与功能结合 |
| Karate | Java | BDD风格,自包含 | 行为驱动开发 |
3.2 测试框架与Jenkins集成方案
3.2.1 Postman+Newman方案
groovy
pipeline {
    agent any

    stages {
        stage('Checkout') {
            steps {
                git 'https://github.com/yourrepo/api-tests.git'
            }
        }

        stage('Install Dependencies') {
            steps {
                sh 'npm install -g newman newman-reporter-html'
            }
        }

        stage('Run Tests') {
            steps {
                sh '''
                    newman run collections/API_Tests.postman_collection.json \
                    -e environments/Production.postman_environment.json \
                    --reporters cli,html \
                    --reporter-html-export reports/newman-report.html
                '''
            }
        }

        stage('Publish Report') {
            steps {
                publishHTML([
                    reportDir: 'reports',
                    reportFiles: 'newman-report.html',
                    reportName: 'Postman API Test Report'
                ])
            }
        }
    }
}
3.2.2 Python+Pytest方案
groovy
pipeline {
    agent {
        docker {
            image 'python:3.9'
            args '-v $HOME/.cache/pip:/root/.cache/pip'
        }
    }

    stages {
        stage('Setup') {
            steps {
                sh 'pip install -r requirements.txt'
            }
        }

        stage('Test') {
            steps {
                sh '''
                    python -m pytest tests/ \
                    --alluredir=./allure-results \
                    --junitxml=./test-results/junit.xml
                '''
            }
        }

        stage('Generate Report') {
            steps {
                script {
                    allure([
                        includeProperties: false,
                        jdk: '',
                        properties: [],
                        reportBuildPolicy: 'ALWAYS',
                        results: [[path: 'allure-results']]
                    ])
                }
            }
        }
    }

    post {
        always {
            junit 'test-results/junit.xml'
        }
    }
}
四、Jenkins Pipeline设计与实践
4.1 声明式Pipeline基础结构
groovy
pipeline {
    agent any

    options {
        timeout(time: 1, unit: 'HOURS')
        buildDiscarder(logRotator(numToKeepStr: '10'))
        disableConcurrentBuilds()
    }

    parameters {
        choice(
            name: 'ENVIRONMENT',
            choices: ['DEV', 'TEST', 'STAGING', 'PROD'],
            description: '选择测试环境'
        )
        string(
            name: 'TEST_TAG',
            defaultValue: 'smoke',
            description: '测试标签 (smoke/regression/full)'
        )
    }

    environment {
        API_BASE_URL = "${params.ENVIRONMENT == 'PROD' ? 'https://api.prod.com' : 'https://api.test.com'}"
        TEST_TIMEOUT = '30'
    }

    stages {
        // 测试阶段将在下面详细展开
    }

    post {
        success {
            script {
                currentBuild.description = "✅ ${params.ENVIRONMENT}环境测试通过"
            }
        }
        failure {
            script {
                currentBuild.description = "❌ ${params.ENVIRONMENT}环境测试失败"
            }
        }
        always {
            // 清理和报告生成
        }
    }
}
4.2 完整的接口测试Pipeline示例
groovy
pipeline {
    agent any

    tools {
        jdk 'jdk11'
        python 'python3'
    }

    stages {
        stage('Prepare Environment') {
            steps {
                script {
                    echo "开始准备测试环境: ${params.ENVIRONMENT}"

                    // 创建测试数据
                    sh '''
                        python scripts/create_test_data.py \
                        --env ${params.ENVIRONMENT} \
                        --test-tag ${params.TEST_TAG}
                    '''

                    // 环境健康检查
                    timeout(time: 5, unit: 'MINUTES') {
                        waitUntil {
                            def response = sh(
                                script: "curl -s -o /dev/null -w '%{http_code}' ${API_BASE_URL}/health",
                                returnStdout: true
                            ).trim()
                            return response == '200'
                        }
                    }
                }
            }
        }

        stage('Run API Tests') {
            parallel {
                stage('Authentication Tests') {
                    steps {
                        sh '''
                            python -m pytest tests/auth/ \
                            -m auth \
                            --base-url ${API_BASE_URL} \
                            --html=reports/auth-report.html \
                            --self-contained-html
                        '''
                    }
                }

                stage('User API Tests') {
                    steps {
                        sh '''
                            python -m pytest tests/user/ \
                            -m user \
                            --base-url ${API_BASE_URL} \
                            --html=reports/user-report.html \
                            --self-contained-html
                        '''
                    }
                }

                stage('Order API Tests') {
                    steps {
                        sh '''
                            python -m pytest tests/order/ \
                            -m order \
                            --base-url ${API_BASE_URL} \
                            --html=reports/order-report.html \
                            --self-contained-html
                        '''
                    }
                }
            }
        }

        stage('Performance Tests') {
            when {
                expression { params.TEST_TAG == 'full' }
            }
            steps {
                sh '''
                    jmeter -n \
                    -t tests/performance/api_performance.jmx \
                    -l results/performance.jtl \
                    -e -o reports/performance
                '''
            }
        }

        stage('Security Tests') {
            when {
                expression { params.ENVIRONMENT in ['STAGING', 'PROD'] }
            }
            steps {
                sh '''
                    zap-baseline.py \
                    -t ${API_BASE_URL}/api-docs \
                    -r reports/security-report.html
                '''
            }
        }
    }

    post {
        always {
            // 收集测试结果
            junit '**/test-results/*.xml'

            // 发布HTML报告
            publishHTML([
                reportDir: 'reports',
                reportFiles: '**/*.html',
                reportName: 'API Test Reports',
                keepAll: true
            ])

            // 归档测试结果
            archiveArtifacts artifacts: '**/reports/*.html, **/results/*.jtl'

            // 清理测试数据
            sh 'python scripts/cleanup_test_data.py --env ${params.ENVIRONMENT}'
        }

        success {
            emailext(
                subject: "✅ API测试通过: ${env.JOB_NAME} #${env.BUILD_NUMBER}",
                body: """
                    <h2>API测试执行成功</h2>
                    <p>项目: ${env.JOB_NAME}</p>
                    <p>构建号: ${env.BUILD_NUMBER}</p>
                    <p>测试环境: ${params.ENVIRONMENT}</p>
                    <p>测试标签: ${params.TEST_TAG}</p>
                    <p>查看详细报告: ${env.BUILD_URL}HTML_20Report/</p>
                """,
                to: 'team@example.com'
            )
        }

        failure {
            emailext(
                subject: "❌ API测试失败: ${env.JOB_NAME} #${env.BUILD_NUMBER}",
                body: """
                    <h2>API测试执行失败</h2>
                    <p>项目: ${env.JOB_NAME}</p>
                    <p>构建号: ${env.BUILD_NUMBER}</p>
                    <p>测试环境: ${params.ENVIRONMENT}</p>
                    <p>失败详情: ${env.BUILD_URL}console</p>
                    <p>查看测试报告: ${env.BUILD_URL}HTML_20Report/</p>
                """,
                to: 'team@example.com',
                attachLog: true
            )

            // 失败时发送Slack通知
            slackSend(
                color: 'danger',
                message: "API测试失败: ${env.JOB_NAME} #${env.BUILD_NUMBER}",
                channel: '#api-alerts'
            )
        }

        unstable {
            // 处理测试不稳定的情况
            script {
                currentBuild.description = "⚠️ 测试不稳定 - 需要人工检查"
            }
        }
    }
}
五、高级配置与优化
5.1 参数化构建与动态配置
groovy
// 使用配置文件管理测试参数
stage('Load Test Configuration') {
    steps {
        script {
            def config = readJSON file: "configs/${params.ENVIRONMENT}.json"
            env.TEST_USERS = config.testUsers
            env.MAX_CONCURRENT_REQUESTS = config.maxConcurrent
            env.API_VERSION = config.apiVersion

            // 动态生成测试用例
            sh """
                python scripts/generate_tests.py \
                --config configs/${params.ENVIRONMENT}.json \
                --output tests/generated
            """
        }
    }
}
5.2 测试数据管理策略
groovy
stage('Test Data Management') {
    steps {
        script {
            // 使用数据库模板恢复数据
            sh '''
                # 备份当前数据
                pg_dump -h ${DB_HOST} -U ${DB_USER} test_db > backup.sql

                # 恢复模板数据
                psql -h ${DB_HOST} -U ${DB_USER} test_db < test_data_template.sql

                # 注入动态测试数据
                python scripts/inject_test_data.py \
                --env ${params.ENVIRONMENT} \
                --test-id ${BUILD_TAG}
            '''

            // 或者使用Docker数据库容器
            sh '''
                docker run -d \
                --name test-db-${BUILD_NUMBER} \
                -e POSTGRES_PASSWORD=test123 \
                postgres:13

                # 等待数据库就绪
                sleep 10

                # 初始化数据
                docker exec test-db-${BUILD_NUMBER} psql -U postgres -f /data/init.sql
            '''
        }
    }
}
5.3 并行测试执行优化
groovy
stage('Parallel Test Execution') {
    parallel {
        stage('API Test Suite 1') {
            agent {
                label 'test-node-1'
            }
            steps {
                sh 'pytest tests/suite1/ --junitxml=suite1-results.xml'
            }
        }

        stage('API Test Suite 2') {
            agent {
                label 'test-node-2'
            }
            steps {
                sh 'pytest tests/suite2/ --junitxml=suite2-results.xml'
            }
        }

        stage('API Test Suite 3') {
            agent {
                docker {
                    image 'python:3.9'
                    args '--network=host'
                }
            }
            steps {
                sh 'pytest tests/suite3/ --junitxml=suite3-results.xml'
            }
        }
    }

    post {
        always {
            // 合并测试结果
            junit '**/*-results.xml'
        }
    }
}
六、测试报告与监控
6.1 多维度报告集成
groovy
stage('Generate Comprehensive Reports') {
    steps {
        script {
            // Allure报告
            sh 'allure generate allure-results -o allure-report --clean'

            // HTML报告
            sh '''
                python -m pytest \
                --html=reports/detailed-report.html \
                --self-contained-html \
                --tb=short
            '''

            // 生成测试覆盖率报告
            sh '''
                coverage run -m pytest
                coverage html -d reports/coverage
                coverage xml -o reports/coverage.xml
            '''

            // 性能测试报告
            sh '''
                jmeter -g results/performance.jtl \
                -o reports/performance-dashboard
            '''
        }
    }
}
6.2 自定义仪表盘
groovy
// Jenkins Dashboard配置
listView('API Test Dashboard') {
    columns {
        status()
        weather()
        name()
        lastSuccess()
        lastFailure()
        lastDuration()
        buildButton()
    }

    jobs {
        regex('.*-api-test')
    }

    // 添加自定义HTML面板
    configure { node ->
        node / 'topPortlets' {
            'hudson.plugins.view.dashboard.core.HtmlPortlet' {
                name('API Test Summary')
                html('''
                    <div style="padding: 20px;">
                        <h2>📊 API测试概览</h2>
                        <div id="test-metrics"></div>
                    </div>
                    <script>
                        // 调用API获取测试数据并展示
                    </script>
                ''')
            }
        }
    }
}
6.3 实时监控与告警
groovy
stage('Test Monitoring') {
    steps {
        script {
            // 实时监控API响应时间
            def responseTimes = [:]
            def endpoints = ['/api/v1/users', '/api/v1/orders', '/api/v1/products']

            endpoints.each { endpoint ->
                def start = System.currentTimeMillis()
                def status = sh(
                    script: "curl -s -o /dev/null -w '%{http_code}' ${API_BASE_URL}${endpoint}",
                    returnStdout: true
                ).trim()
                def duration = System.currentTimeMillis() - start

                responseTimes[endpoint] = [
                    status: status,
                    response_time: duration
                ]

                // 如果响应时间超过阈值,记录警告
                if (duration > 1000) {
                    echo "⚠️ 警告: ${endpoint} 响应时间 ${duration}ms"
                    currentBuild.result = 'UNSTABLE'
                }
            }

            // 发送到监控系统
            writeJSON file: 'response-times.json', json: responseTimes
            sh '''
                curl -X POST ${MONITORING_API}/metrics \
                -H "Content-Type: application/json" \
                --data @response-times.json
            '''
        }
    }
}
七、最佳实践与注意事项
7.1 安全最佳实践
groovy
// 使用Jenkins Credentials管理敏感信息
withCredentials([
    string(credentialsId: 'api-token', variable: 'API_TOKEN'),
    usernamePassword(
        credentialsId: 'db-credentials',
        usernameVariable: 'DB_USER',
        passwordVariable: 'DB_PASSWORD'
    )
]) {
    stage('Secure API Testing') {
        steps {
            sh '''
                # 安全地使用凭据
                export API_AUTH_HEADER="Bearer ${API_TOKEN}"

                # 运行需要认证的测试
                python -m pytest tests/secure/ \
                --api-token ${API_TOKEN}
            '''
        }
    }
}
7.2 测试环境隔离
groovy
pipeline {
    agent {
        docker {
            image 'python:3.9-slim'
            args '''
                --network=test-network
                --dns=8.8.8.8
                --memory=2g
                --cpus="1.0"
            '''
            reuseNode true
        }
    }

    environment {
        // 每个构建使用独立的环境
        TEST_DB_NAME = "test_${BUILD_TAG}"
        TEST_REDIS_DB = "${BUILD_NUMBER}"
        ISOLATION_ID = "${BUILD_TAG}"
    }

    stages {
        stage('Setup Isolated Environment') {
            steps {
                sh '''
                    # 创建独立的数据库
                    createdb ${TEST_DB_NAME}

                    # 配置隔离的网络
                    docker network create test-net-${BUILD_NUMBER}

                    # 启动依赖服务
                    docker run -d \
                    --name redis-test-${BUILD_NUMBER} \
                    --network test-net-${BUILD_NUMBER} \
                    redis:alpine
                '''
            }
        }
    }
}
7.3 测试用例管理与维护
groovy
// 使用标签管理测试用例
stage('Selective Test Execution') {
    steps {
        script {
            def testCommand = 'pytest'

            switch(params.TEST_TAG) {
                case 'smoke':
                    testCommand += ' -m smoke'
                    break
                case 'regression':
                    testCommand += ' -m "not slow"'
                    break
                case 'full':
                    testCommand += ' -v'
                    break
                default:
                    testCommand += ' -m smoke'
            }

            // 根据变更文件选择测试
            def changedFiles = sh(
                script: 'git diff --name-only HEAD~1 HEAD',
                returnStdout: true
            ).split('\n')

            def affectedTests = []
            changedFiles.each { file ->
                if (file.endsWith('.py')) {
                    def testFile = file.replace('src/', 'tests/test_')
                    if (fileExists(testFile)) {
                        affectedTests << testFile
                    }
                }
            }

            if (affectedTests) {
                testCommand += " ${affectedTests.join(' ')}"
            }

            sh "${testCommand}"
        }
    }
}
八、常见问题与解决方案
8.1 测试稳定性问题
groovy
// 重试机制
stage('Flaky Test Handling') {
    steps {
        retry(3) {
            timeout(time: 5, unit: 'MINUTES') {
                sh 'pytest tests/ --flake-finder'
            }
        }
    }
}

// 测试依赖检查
stage('Dependency Check') {
    steps {
        script {
            def healthCheck = sh(
                script: """
                    curl -s ${API_BASE_URL}/health | \
                    jq -r '.status'
                """,
                returnStdout: true
            ).trim()

            if (healthCheck != 'UP') {
                error "依赖服务不健康: ${healthCheck}"
            }
        }
    }
}
8.2 性能优化
groovy
// 使用缓存加速依赖安装
stage('Cache Dependencies') {
    steps {
        cache([
            'pip': [
                path: '**/site-packages',
                includes: '*.py'
            ],
            'node_modules': [
                path: 'node_modules'
            ]
        ]) {
            sh 'pip install -r requirements.txt'
            sh 'npm install'
        }
    }
}

// 并行测试数据准备
stage('Parallel Data Setup') {
    parallel {
        stage('Setup User Data') {
            steps {
                sh 'python scripts/setup_users.py'
            }
        }
        stage('Setup Product Data') {
            steps {
                sh 'python scripts/setup_products.py'
            }
        }
    }
}
九、进阶:与Kubernetes集成
groovy
// Jenkins在Kubernetes中运行测试
pipeline {
    agent {
        kubernetes {
            label 'api-test-pod'
            yaml """
apiVersion: v1
kind: Pod
spec:
  containers:
  - name: python
    image: python:3.9
    command: ['cat']
    tty: true
    volumeMounts:
    - name: test-data
      mountPath: /test-data
    resources:
      requests:
        cpu: "500m"
        memory: "1Gi"
  - name: postgres
    image: postgres:13
    env:
    - name: POSTGRES_PASSWORD
      value: test123
    ports:
    - containerPort: 5432
  volumes:
  - name: test-data
    emptyDir: {}
"""
        }
    }

    stages {
        stage('Run Tests in K8S') {
            steps {
                container('python') {
                    sh '''
                        # 在K8S Pod中运行测试
                        pytest tests/ \
                        --db-host localhost \
                        --db-port 5432
                    '''
                }
            }
        }
    }
}
十、总结与展望
10.1 核心要点回顾
-
选择合适的测试框架:根据团队技术栈和项目需求
-
设计健壮的Pipeline:考虑失败处理、并行执行、环境隔离
-
完善的报告体系:多维度展示测试结果
-
安全与性能:确保测试过程的安全性和效率
10.2 未来发展方向
-
AI驱动测试:智能生成测试用例和预测缺陷
-
混沌工程集成:在测试中引入故障,验证系统韧性
-
云原生测试:更好地支持微服务和容器化部署
-
测试即代码:更深入的版本控制和代码化管理
10.3 推荐工具链
text
测试框架: Pytest + Requests / RestAssured
报告工具: Allure / ReportPortal
监控: Prometheus + Grafana
部署: Docker + Kubernetes
代码质量: SonarQube
API文档: Swagger / OpenAPI

一站式 AI 云服务平台
更多推荐


 1
1 0
0- 0


 已为社区贡献18条内容

所有评论(0)