
【Linux 系统运维基础】Linux命令大全
常用的Linux 命令大全。 列举常用的Linux命令
Linux 命令大全
立志列举出Linux中常用的所有命令(
有很多命令不使用的话,很快会忘记哦)。
1. cd 目录前进/ 后缀
-
cd /表示跳转到根目录下,无论是哪个目录下,执行此命令后一定会跳转到根目录下。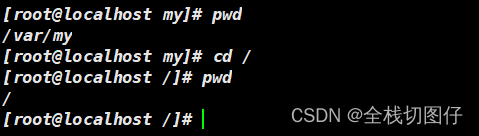
-
cd ~表示跳转到主目录下。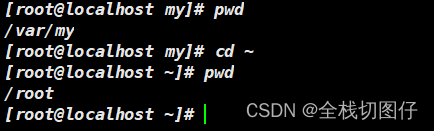
-
cd .表示跳转还是当前目录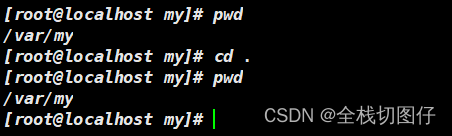
-
cd ..表示跳转到上一级目录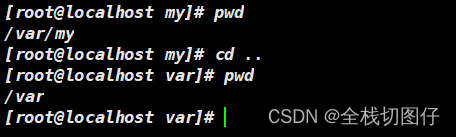
-
cd /xx/xx表示绝对目录跳转。如果前面添加了/表示从根目录下开始计算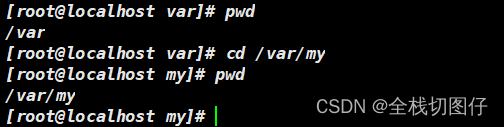
-
cd xxx/xx表示当前目录跳转。从所在目录开始计算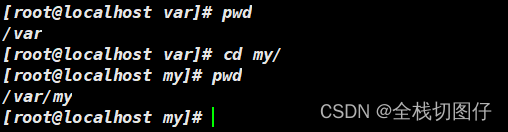
2. ls 查询列表
多个命令可以一起使用,而且没有先后顺序。例如:
ls -lha===ls -hal
-
ls通过命令直接查询列表
-
ls -l查询长格式的列表。 等同于ll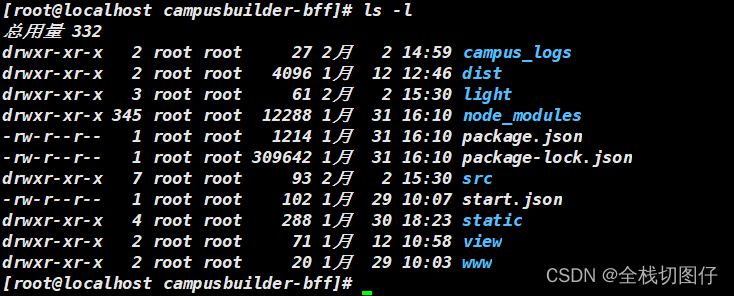
-
ls -lh文件大小以恰当形式展示。比如:KB, M等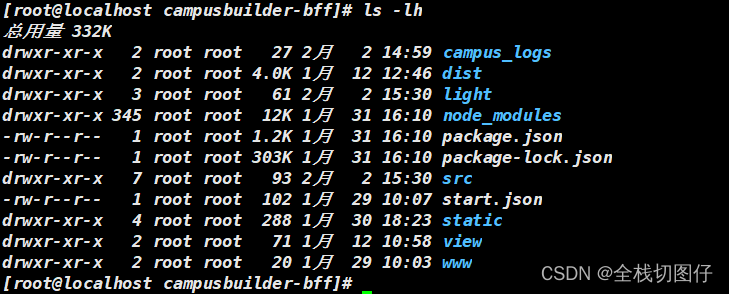
-
ls -al可以展示隐藏文件
3. pwd 当前目录
表示当前光标所在的目录

4. mkdir 创建目录
!!!记住只有创建文件夹递归的时候 需要用到参数
-p其余的递归都是-r的。
-
mkdir aaa bbb ccc可以通过创建多个文件夹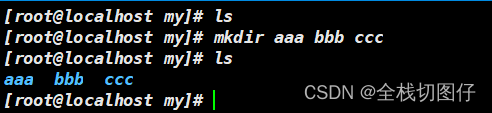
-
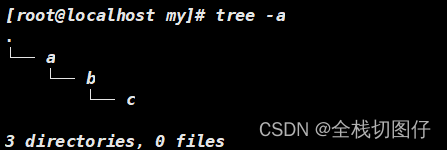
mkdir -p a/b/c可以递归的创建文件夹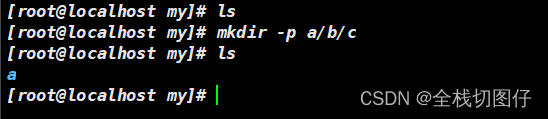
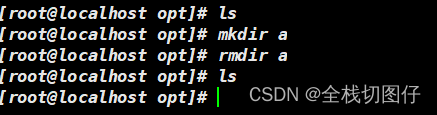
5. rmdir 删除目录
可以直接删除空文件夹
6. rm 删除
-
rm xxx可以直接删除文件,但是不可以删除目录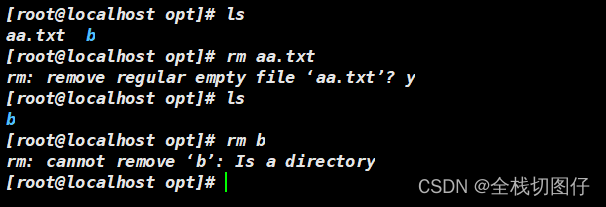
-
rm -r xxx可以删除文件夹 以及文件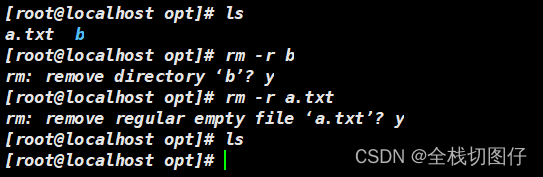
-
rm -rf xxx以强制(无需询问)的形式删除文件以及文件夹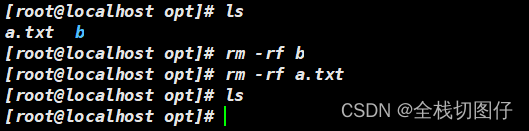
7. cp 复制
-
cp 文件 yy/yy复制文件到指定目录下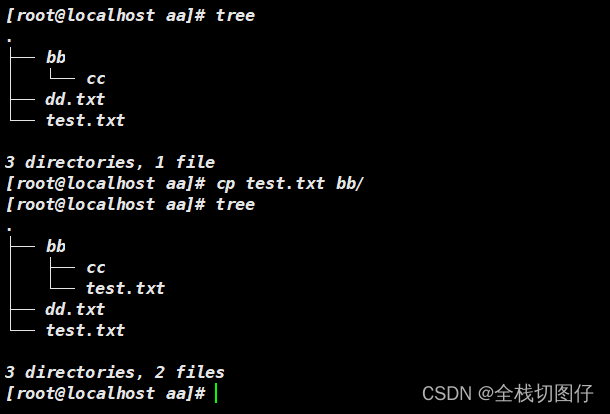
-
cp -r xx yy递归复制目录 到指定目录下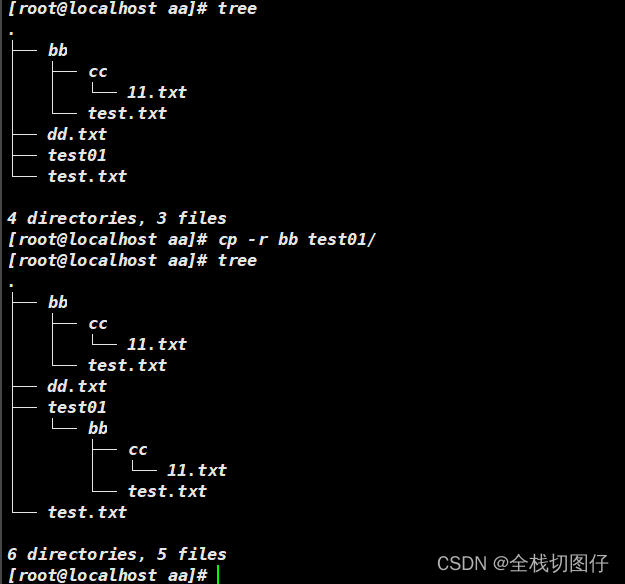
8. mv 移动/命名
-
mv aa bb如果修改的名称不存在,就是修改名称。此时bb就不存在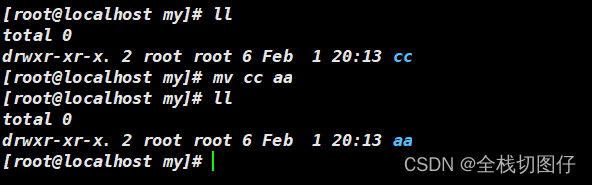
-
mv xx yy如果修改的名称存在,就是移动文件。此时yy就存在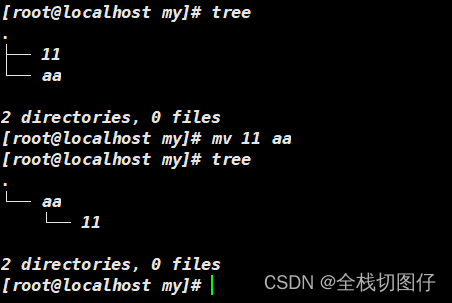
9. touch 创建文件
-
touch xx yy zz创建多个文件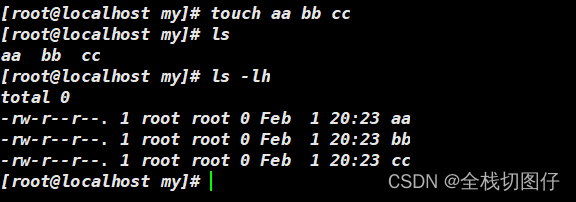
10. echo 输出
-
echo xx > yy以覆盖的形式将内容添加到文件中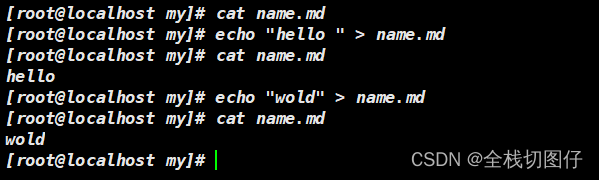
-
echo xx >> yy以追加的形式将内容添加到文件中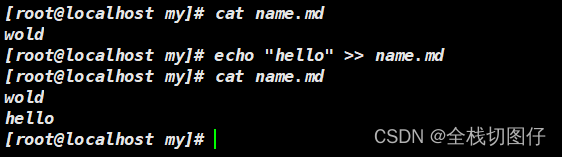
11. cat 打印
-
cat name.md直接在控制台打印log
-
cat -n name.md以显示行号的形式在控制台输出log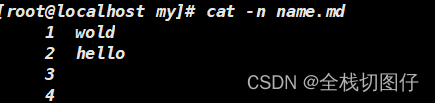
-
cat > a.txt <<EOF以重定向的方式进行输入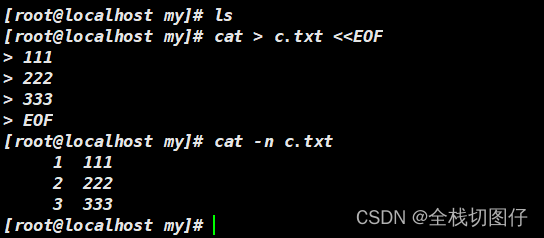
12. more 打印
-
more name.md一页一页的翻动显示 -
more -[NUM] name.md以指定行数的方式 一部分一部分显示,以空格键向下翻页
13. tail 打印
-
tail -f xx着文件的增长,输出附加数据. 动态看log -
tail -n [NUM] xx查看指定行数的内容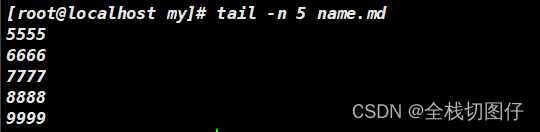
14. Vim 相关
14.1 编辑模式
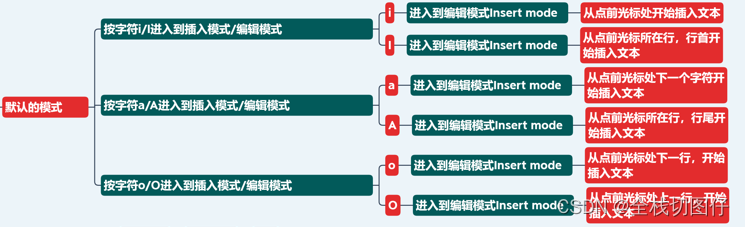
i命令模式下 输入i在当前光标的位置进行插入I命令模式下 输入I在当前光标的行首位置进行插入a命令模式下 输入a在当前光标的下一个位置进行插入A命令模式下 输入A在当前光标的行尾位置进行插入o命令模式下 输入o当前光标位置的下一行添加一行O命令模式下输入O当前光标位置的上一行添加一行
14.2 模式的区分
-
命令模式
使用
vi命令进入文本后,直接就是命令模式
-
编辑模式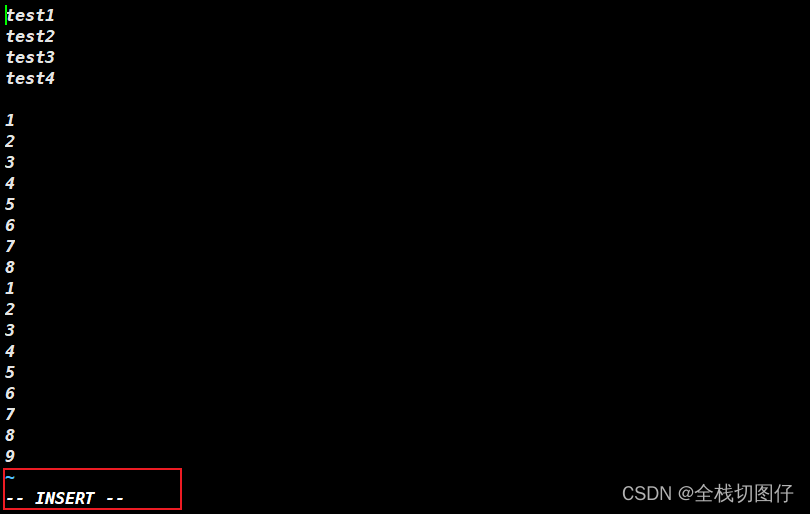
使用
i/I/o/O/a/A等命令后 都可以进入编辑模式
-
底部命令模式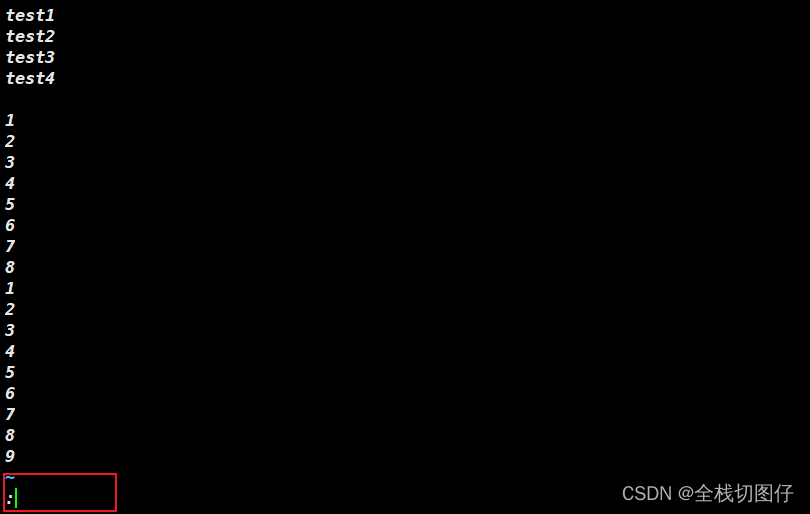
此时 按键
ESC后,再次按shift+:, 就可以进去底部命令模式
14.3 命令模式下快捷键
yy复制当前行p在光标所在行的下一行,进行粘贴dd删除所在行nyy复制所在行往下的 n 行数据ndd删除所在行往下的 n 行数据gg快速跳转到文件首行的首字符G快速跳转到文件尾行的尾字符u进行动作撤销$快速跳转到所在行的尾字符/keyword表示搜索关键字s/old/new表示替换所在行的第一个关键字s/old/new/g表示替换所在行的所有的关键字%s/old/new/g表示替换所在文件的所有的关键字
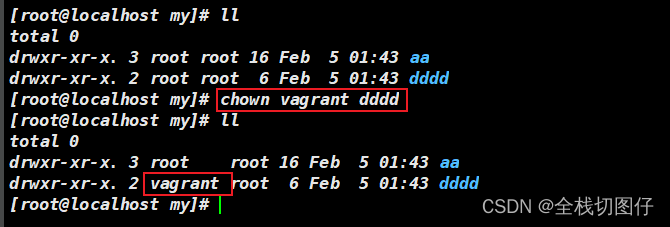
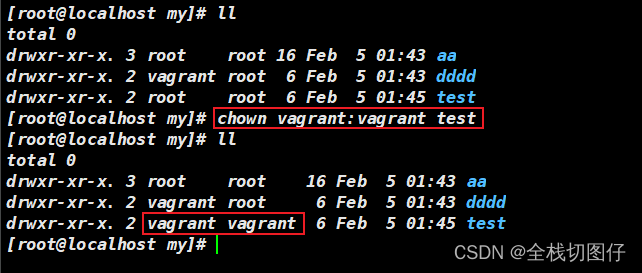
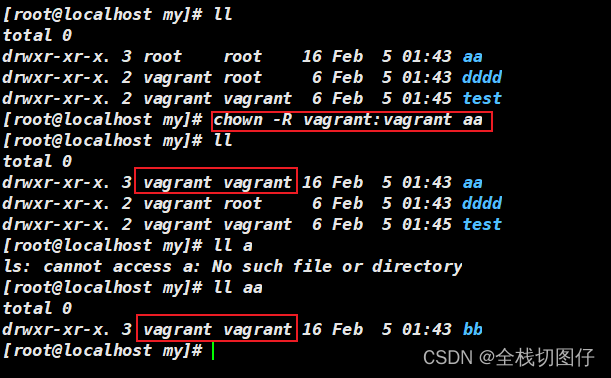
15. chown 修改属主/ 属组
- 修改属主
chown 用户名 文件
- 修改属组
chown vagrant:vagrant test
- 递归修改属主 以及属组
chown -R vagrant:vagrant aa
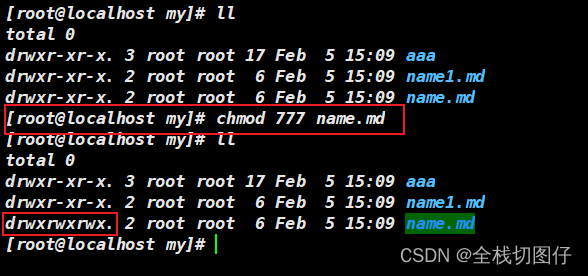
16. chmod 修改权限
- 一般修改权限的方式
chmod 777 name.md
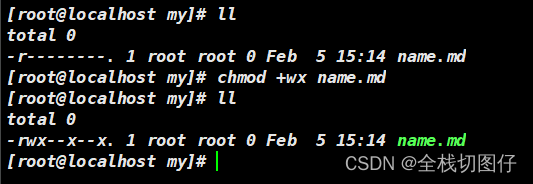
- 通过特殊符号修改权限
chmod +wx name.md
- 通过特殊的符号 来删除权限
chmod a-x name.md
a表示所有的。-x表示删除执行权限

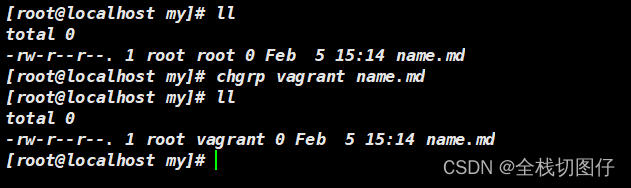
17. chgrp 修改群组
chgrp vagrant name.md
18. id 查询用户 或是 群组
- 查询当前用户
id

- 查询指定用户
id [vagrant]

19. su 切换用户
可以进行用户切换
su [root]

20. sudo 普通用户提高权限
sudo yum install network-tools -y
21. whoami 显示当前用户
whoami

21. passwd
修改密码
- 修改自己的密码
passwd

- 修改指定用户密码
passwd vagrant

22. useradd 添加用户
22.1. 普通方式添加用户
useradd lihh1

22.2. 以指定目录的方式创建用户【-d】
useradd lihh1 -d /home/lihh1

22.3. 创建用户,指定bash【-s】
useradd lihh2 -d /home/lihh2 -m -s /bin/sh

22.4. 创建用户 指定群组【-g】
useradd lihh3 -g lihh2

23. userdel 删除用户
userdel -r [用户]
-r参数 表示删除用户的同时 会删除创建的目录

24. w 查看登入系统的用户信息
w

25. last 显示用户最近登录信息
last
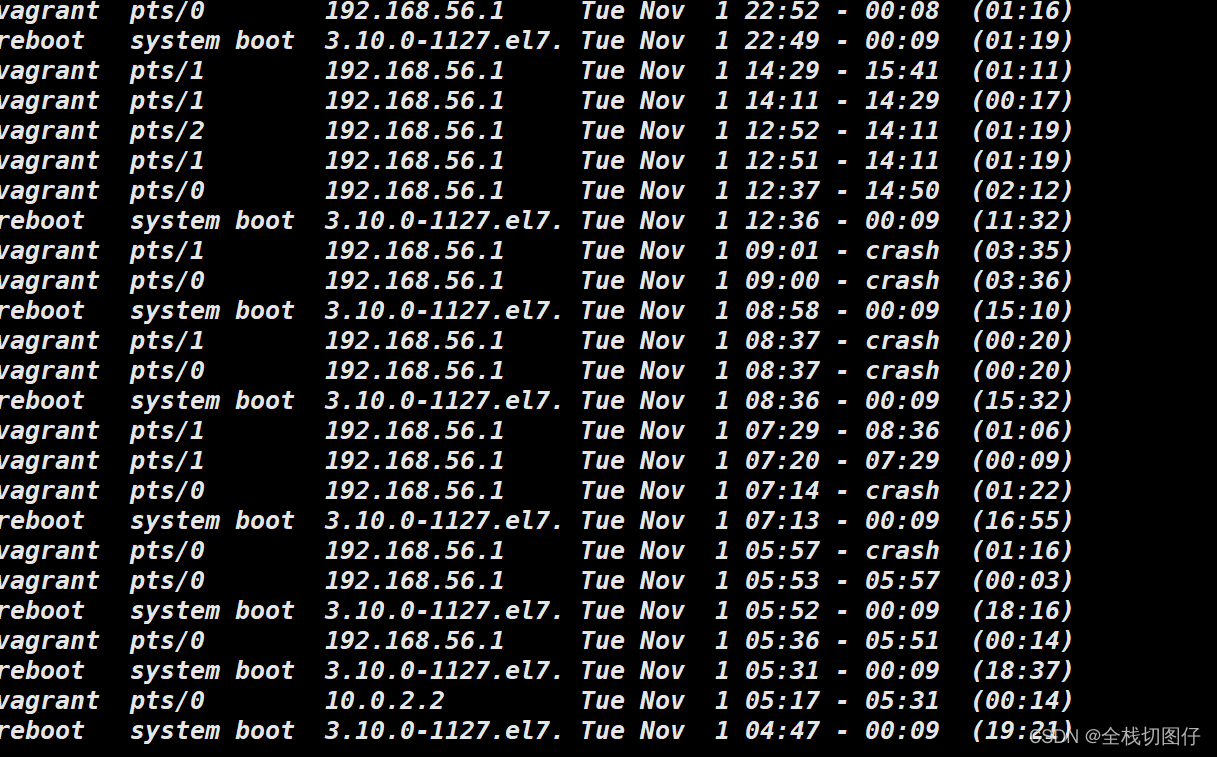
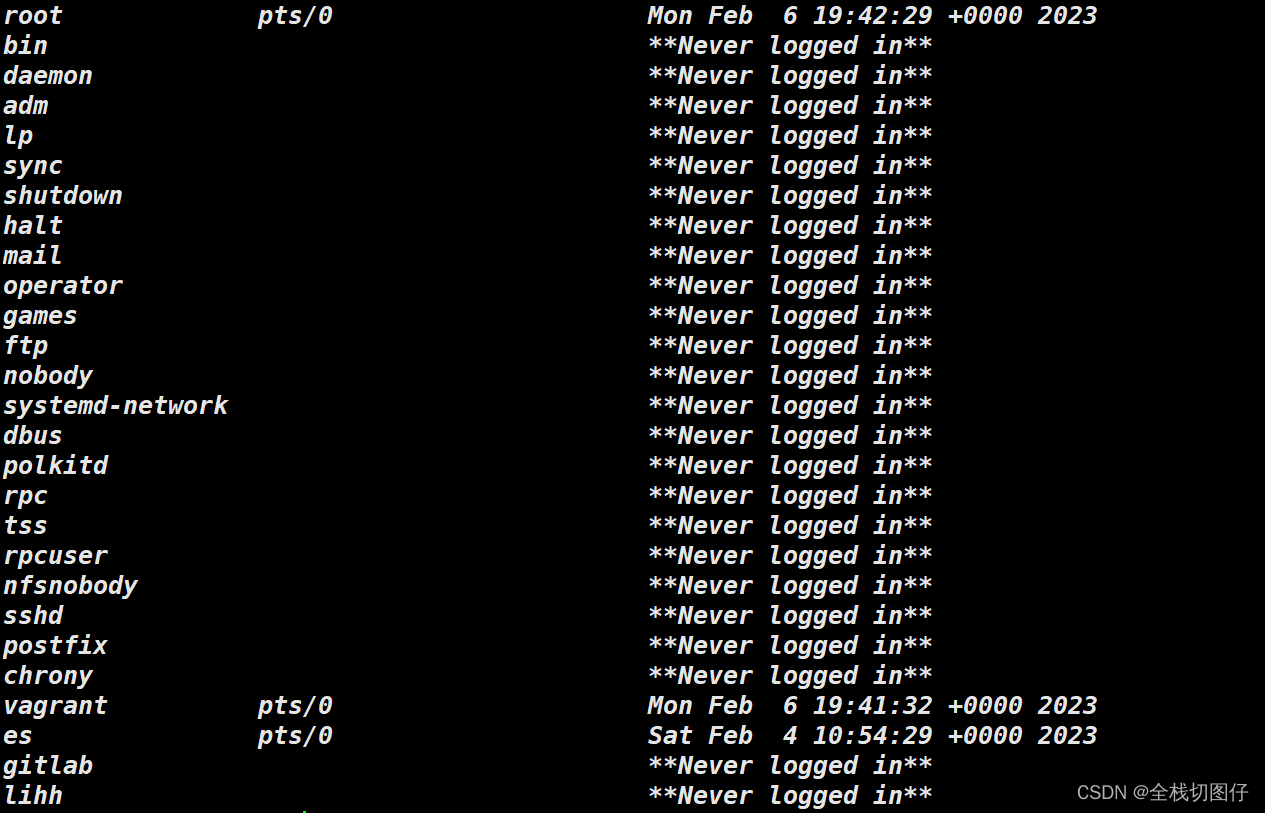
26. lastlog 显示登录日志,包括没有登录的
lastlog
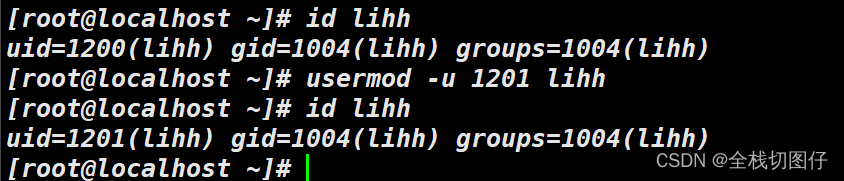
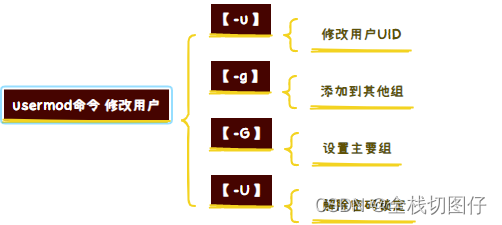
26. usermod 修改用户
26.1 修改用户的uid
usermod -u 1201 lihh
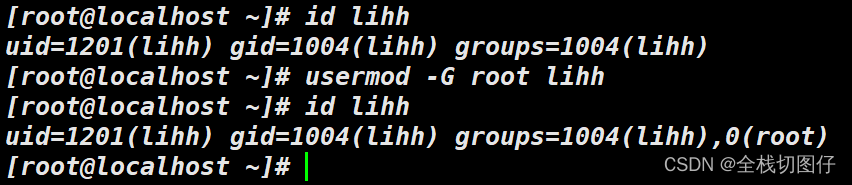
26.2 设置主要组
usermod -G root lihh
26.3 其他参数
27. !!等 命令行等快捷方式
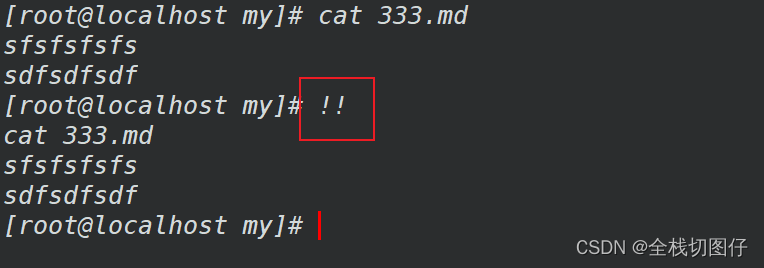
27.1 !! 执行上一条命令
!!
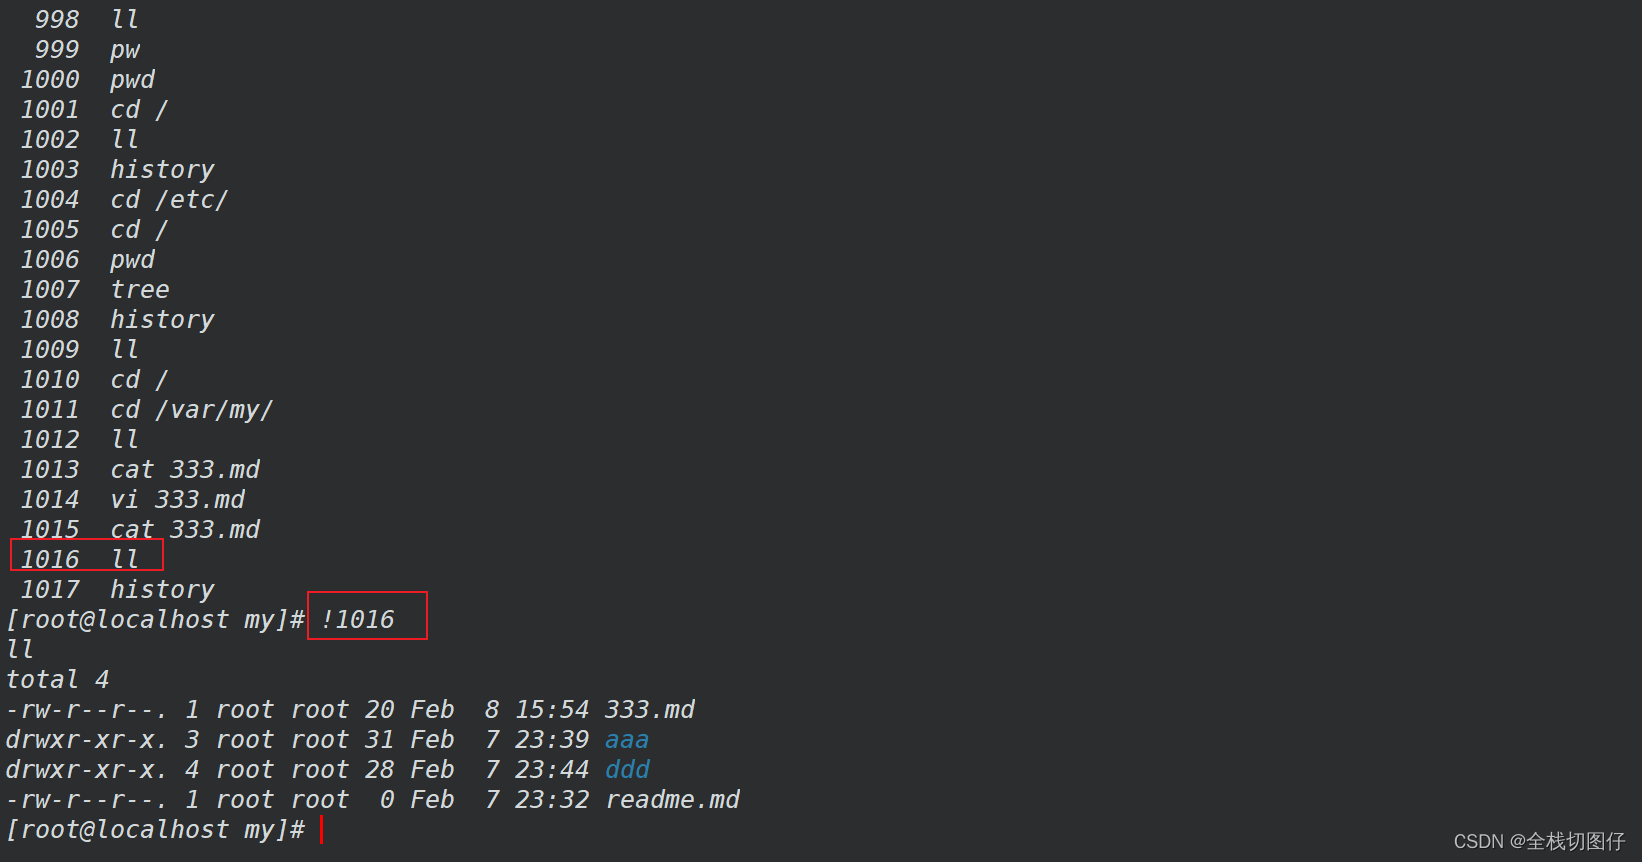
27.2 ![NUMB] 执行命令行中第几行
!1016
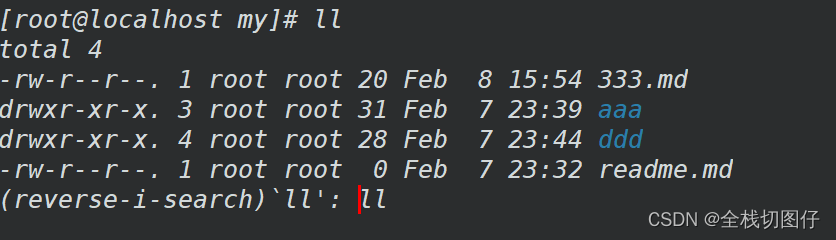
27.3 ctrl + R 在历史记录中搜索命令
ctrl + R
28. 命令行移动的快捷键
- Ctrl + A 光标迅速回到行首
- Ctrl + E 光标迅速回到行尾
- Ctrl + k 删除光标到行尾内容
- Ctrl + u 删除光标到行首内容
- Ctrl + y 粘贴删除的内容
- Ctrl + c 临时终止命令行命令
- Esc + b 移动到当前单词的开头
- Esc + f 移动到当前单词的结尾
29. grep 从数据源中检索
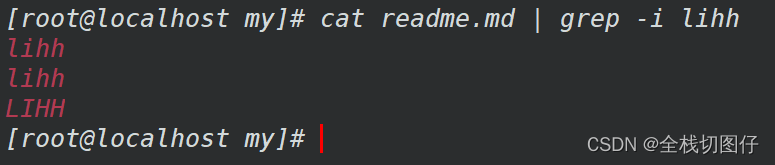
29.1 -i 忽略大小写
cat readme.md | grep -i lihh
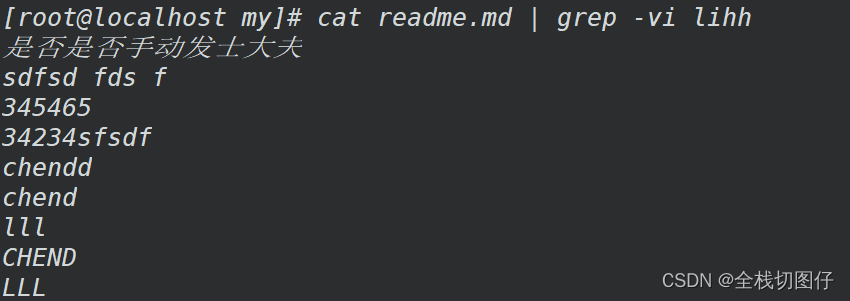
29.2 -v 筛选不包含某项的,反向选择
cat readme.md | grep -vi lihh
29.3. -c 匹配某个关键字出现的次数
grep -ci lihh readme.md

29.4 -w 按单词进行筛选
跟单纯的grep不同,这个命令是按整体的单词而言的。
ifconfig eth0 | grep -w inet

29.5 -r 进行递归查询
grep -rin "text" ./
# -r 表示递归检索
# -i 表示忽略大小写
# -n 表示显示行号
[root@localhost data]# grep -rin "text" ./
./day05/readme.md:1:text
[root@localhost data]#
29.# 其余的命令
grep options 'keys' filename
OPTIONS:
    -i: 不区分大小写
    -v: 查找不包含指定内容的行,反向选择
    -w: 按单词搜索
    -o: 打印匹配关键字
    -c: 统计匹配到的次数
    -n: 显示行号
    -r: 逐层遍历目录查找
    -A: 显示匹配行及后面多少行
    -B: 显示匹配行及前面多少行
    -C: 显示匹配行前后多少行
    -l:只列出匹配的文件名
    -L:列出不匹配的文件名
    -e: 使用正则匹配
    -E:使用扩展正则匹配
    ^key:以关键字开头
    key$:以关键字结尾
    ^$:匹配空行
    --color=auto :可以将找到的关键词部分加上颜色的显示
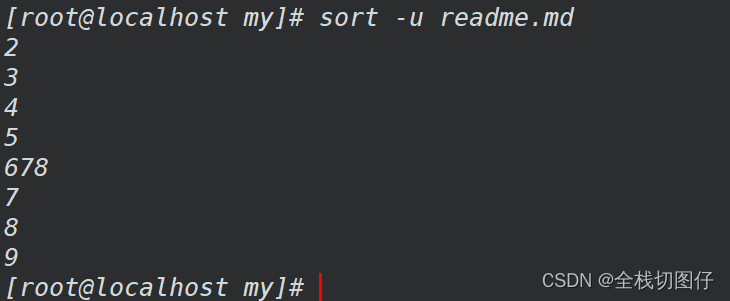
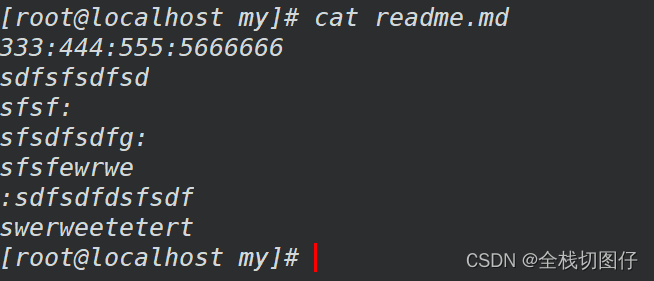
30. sort 排序命令
基础数据
30.1 -u 去除重复行
sort -u readme.md
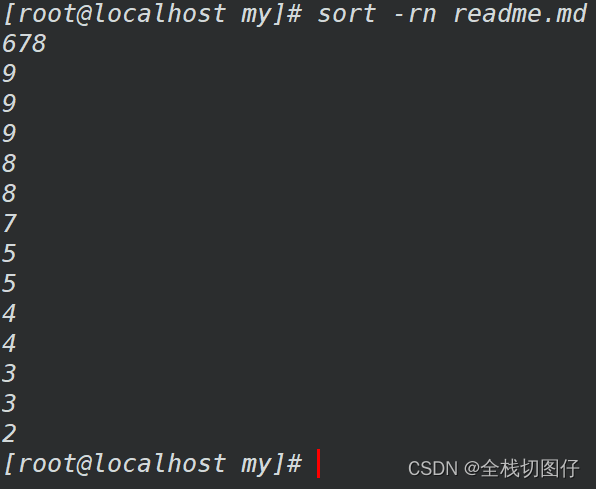
30.2 -rn 以数字降序排列,默认是字符
添加参数
-n表示要求以数字排序
sort -rn readme.md
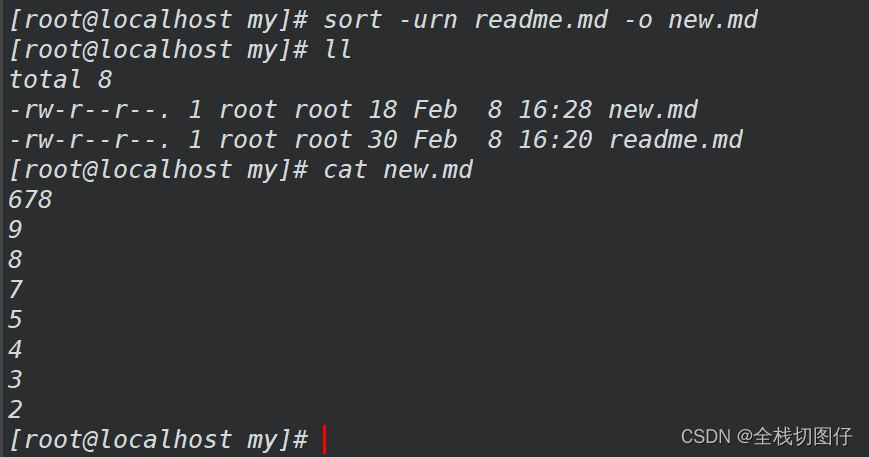
30.3 -o 重定向到文件中
sort -urn readme.md -o new.md
30.4 其他的命令
语法:
sort [options] file
将文件的每一行作为一个单位,从首字符向后,依次按ASCII码值进行比较,最后将他们按升序输出。

options:
-u :去除重复行
-r :降序排列,默认是升序
-o : 将排序结果输出到文件中  类似 重定向符号>
-n :以数字排序,默认是按字符排序
-t :分隔符
-k :第N列
-b :忽略前导空格。
-R :随机排序,每次运行的结果均不同。
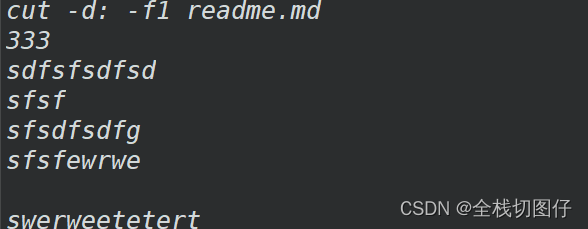
31. cut 字符串截取
31.1 -d 以指定符号分割
cut -d: -f1 readme.md
# 每行以冒号分割,同时每行截取第一个列内容
# cut -d: -f1,6,7 1.txt 		以:冒号分割,截取第1,6,7列内容
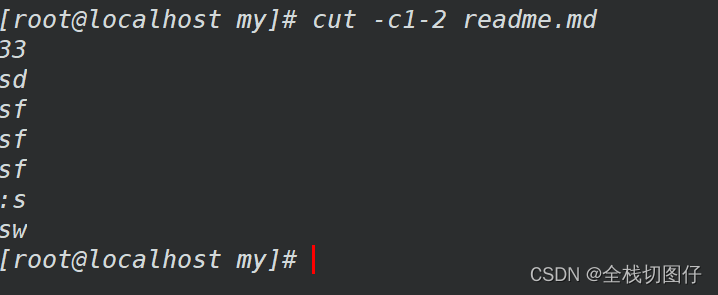
31.2 -c 只选中指定的字符
cut -c1-2 readme.md
# 每行选中1~2个字符
31.3 其他命令
  -b, --bytes=列表              只选中指定的这些字节
  -c, --characters=列表         只选中指定的这些字符
  -d, --delimiter=分界符        使用指定分界符代替制表符作为区域分界
  -f, --fields=LIST       select only these fields;  also print any line
                            that contains no delimiter character, unless
                            the -s option is specified
  -n                      with -b: don't split multibyte characters
      --complement              补全选中的字节、字符或域
  -s, --only-delimited          不打印没有包含分界符的行
      --output-delimiter=字符串 使用指定的字符串作为输出分界符,默认采用输入
                                的分界符
      --help            显示此帮助信息并退出
      --version         显示版本信息并退出
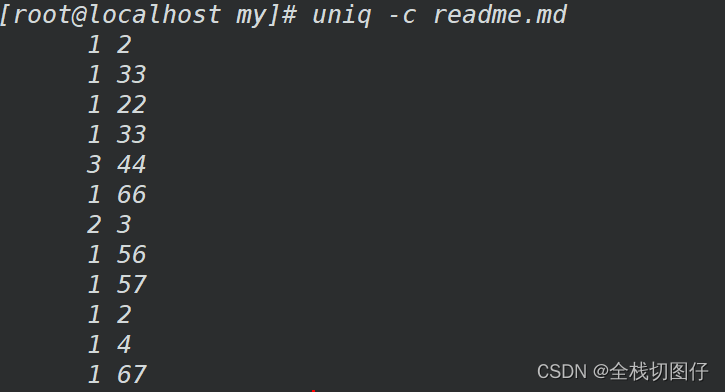
32. uniq 连续消息去重
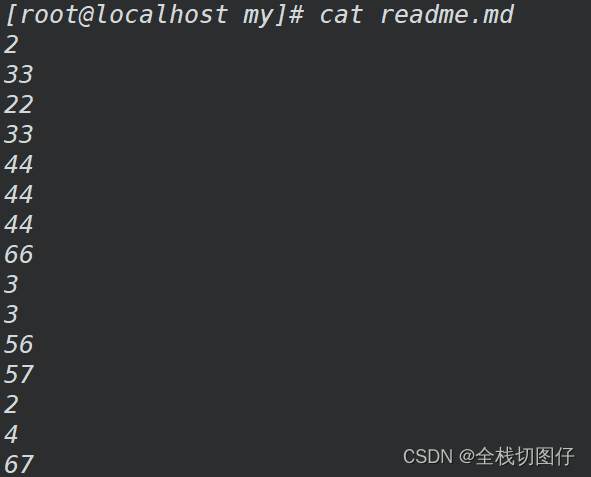
32.1 -c 统计重复行次数
uniq -c readme.md
32.2 -d 只显示重复行
uniq -d readme.md

32.3 其他命令
Mandatory arguments to long options are mandatory for short options too.
  -c, --count           统计重复行次数
  -d, --repeated        只显示重复行
  -i, --ignore-case     忽略大小写
  -s, --skip-chars=N    avoid comparing the first N characters
  -u, --unique          only print unique lines
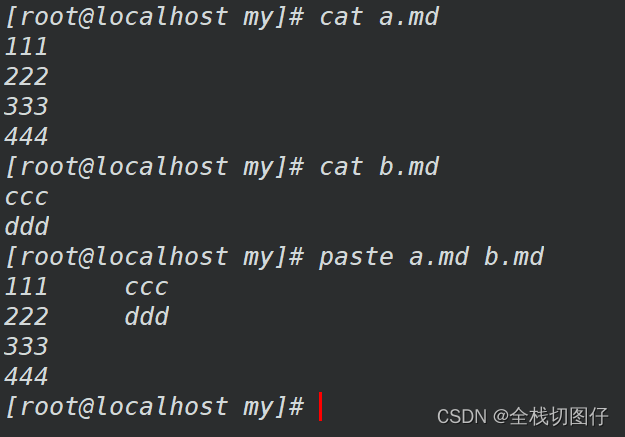
33. paste 合并文件内容
- 参数
Mandatory arguments to long options are mandatory for short options too.
  -d, --delimiters=列表 改用指定列表里的字符替代制表分隔符
  -s, --serial          不使用平行的行目输出模式,而是每个文件占用一行
      --help            显示此帮助信息并退出
      --version         显示版本信息并退出
- 命令
paste a.md b.md
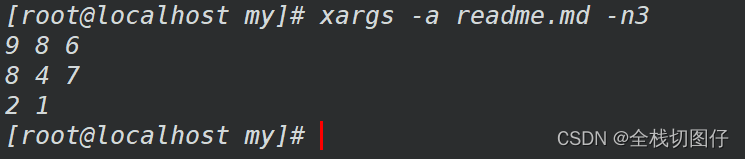
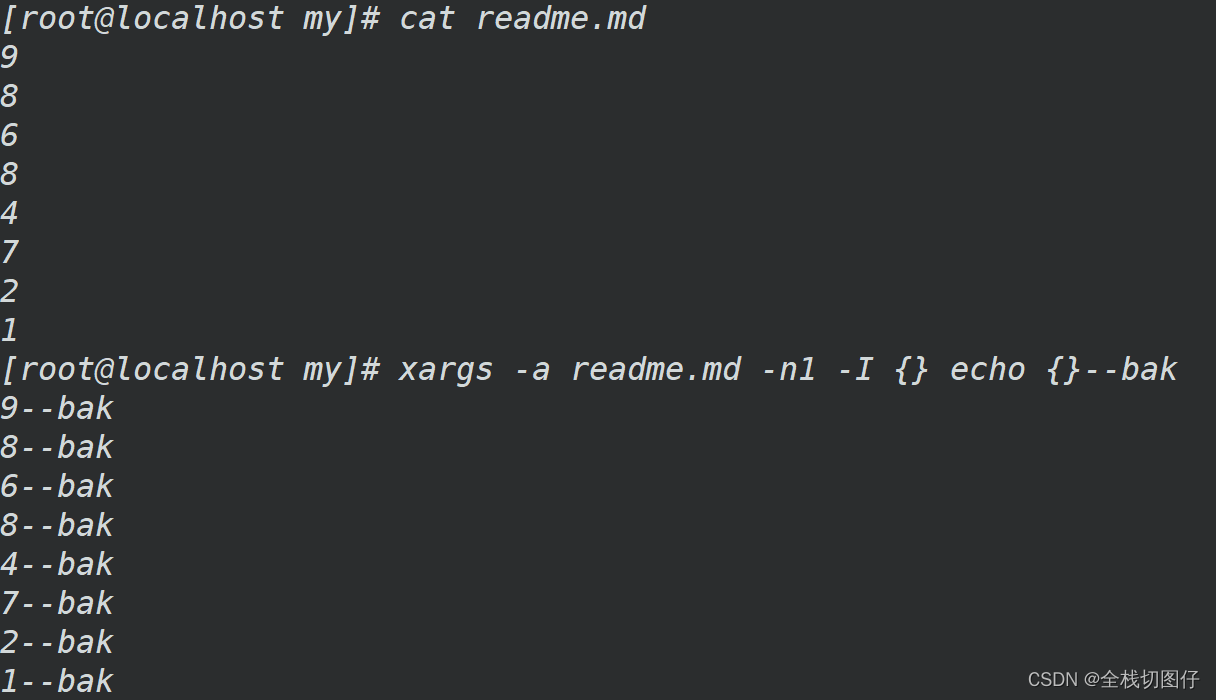
34. xargs 结果传递
34.1 -a 从文件读入作为sdtin
xargs -a readme.md

34.2 -n 每行显示的字符
xargs -a readme.md -n3
34.3 -I 将xargs接收的每项名称,逐行赋值给 {},可以用 {} 代替
xargs -a readme.md -n1 -I {} echo {}--bak
35. tr 替换
格式
用法:tr [选项]... SET1 [SET2]
从标准输入中替换、缩减和/或删除字符,并将结果写到标准输出。

  -c, -C, --complement          首先补足SET1
  -d, --delete                  删除匹配SET1 的内容,并不作替换
  -s, --squeeze-repeats 		如果匹配于SET1 的字符在输入序列中存在连续的
                                重复,在替换时会被统一缩为一个字符的长度
  -t, --truncate-set1           先将SET1 的长度截为和SET2 相等
      --help            		显示此帮助信息并退出
      --version         		显示版本信息并退出

用法1:把commands命令输出做为tr输入进行处理
commands | tr  'string1'  'string2'

用法2:把文件中的内容输入给tr进行处理
tr  'string1'  'string2' < filename

用法3:把文件中的内容输入给tr进行处理,需要使用到选项
tr options 'string1' < filename
35.1 替换指定内容
统一将空格替换为别的内容
[root@localhost day04]# cat 222.md
22 333 222 55 33 55 666
[root@localhost day04]# cat 222.md | tr " " ":"
22:333:222:55:33:55:666
[root@localhost day04]#
35.2 将重复的值 替换为一个
重复替换空格
[root@localhost day04]# ifconfig eth0 | grep -w inet
        inet 10.0.2.15  netmask 255.255.255.0  broadcast 10.0.2.255
[root@localhost day04]# ifconfig eth0 | grep -w inet | tr -s " "
 inet 10.0.2.15 netmask 255.255.255.0 broadcast 10.0.2.255
[root@localhost day04]#
替换连续的&
[root@localhost day04]# cat 333.md
123&&&45&&67&&&&89&&&&&
[root@localhost day04]# cat 333.md | tr -s "&"
123&45&67&89&
[root@localhost day04]#
35.3 使用正则替换
[root@localhost day04]# cat 333.md
123&&&45&&67&&&&89&&&&&
[root@localhost day04]# cat 333.md | tr "[0-9]" "$"
$$$&&&$$&&$$&&&&$$&&&&&
[root@localhost day04]#
35.4 小写替换大写
[root@localhost day04]# cat /etc/passwd | grep -w lihh
lihh:x:1104:0::/home/lihh:/bin/bash
[root@localhost day04]# cat /etc/passwd | grep -w lihh | tr "[a-z]" "[A-Z]"
LIHH:X:1104:0::/HOME/LIHH:/BIN/BASH
[root@localhost day04]#
36. tar 解压/ 压缩
36.1 常用参数命令
# -c 表示创建一个新包
# -f 表示指定包的名称. 此参数必须是最后一个参数
tar -cf all.tar *.png # 将所有后缀为png的图片,都压缩到all包中
# -r 增加新的文件到包中
tar -rf all.tar 1.png # 将指定图片增加到包中
# -u 更新新的文件到包中
tar -uf all.tar 2.png # 更新指定包中的图片
# -t 列举出包中的所有的文件
tar -tf all.tar
# -x 将包进行解压
tar -xf all.tar
# -z 指定参数-z来调用gzip 将包进行压缩
tar -czf all.tar.gz *.png
# -v 显示过程
tar -xvf all.tar
# -C 解压输出到指定的目录
tar -xvf all.tar -C ./tmp/001
36.2 -c 创建新包
[root@localhost temp]# tar -cf all.tar *.png
[root@localhost temp]# ll
total 12
-rw-r--r--. 1 root root     0 Feb 14 19:12 1.png
-rw-r--r--. 1 root root     0 Feb 14 19:13 2.png
-rw-r--r--. 1 root root 10240 Feb 14 19:13 all.tar
drwxr-xr-x. 3 root root    17 Feb 14 18:29 tmp
[root@localhost temp]# tar -tf all.tar
1.png
2.png
[root@localhost temp]#
36.3 -f 指定包的名称,必须放到命令尾部
[root@localhost temp]# tar -cf all.tar *.png
[root@localhost temp]# ll
total 12
-rw-r--r--. 1 root root     0 Feb 14 19:12 1.png
-rw-r--r--. 1 root root     0 Feb 14 19:13 2.png
-rw-r--r--. 1 root root 10240 Feb 14 19:13 all.tar
drwxr-xr-x. 3 root root    17 Feb 14 18:29 tmp
[root@localhost temp]# tar -tf all.tar
1.png
2.png
[root@localhost temp]#
36.4 -r 增加一个文件到包中
[root@localhost temp]# tar -tf all.tar
1.png
2.png
[root@localhost temp]# touch 3.png
[root@localhost temp]# tar -rf all.tar 3.png
[root@localhost temp]# tar -tf all.tar
1.png
2.png
3.png
[root@localhost temp]#
36.5 -u 更新一个文件到包中
[root@localhost temp]# tar -tf all.tar
1.png
2.png
3.png
[root@localhost temp]# tar -uf all.tar 3.png
[root@localhost temp]# tar -tf all.tar
1.png
2.png
3.png
[root@localhost temp]#
36.6 -t 列举出包中所有文件
[root@localhost temp]# tar -tf all.tar
1.png
2.png
3.png
[root@localhost temp]#
36.7 -x 对包进行解压
[root@localhost temp]# ll
total 12
-rw-r--r--. 1 root root 10240 Feb 14 19:14 all.tar
drwxr-xr-x. 3 root root    17 Feb 14 18:29 tmp
[root@localhost temp]# tar -xf all.tar
[root@localhost temp]# ll
total 12
-rw-r--r--. 1 root root     0 Feb 14 19:12 1.png
-rw-r--r--. 1 root root     0 Feb 14 19:13 2.png
-rw-r--r--. 1 root root     0 Feb 14 19:14 3.png
-rw-r--r--. 1 root root 10240 Feb 14 19:14 all.tar
drwxr-xr-x. 3 root root    17 Feb 14 18:29 tmp
[root@localhost temp]#
36.8 -z 指定参数-z来调用gzip 将包进行压缩。 一般用来处理后缀为.tar.gz文件
[root@localhost temp]# ll
total 12
-rw-r--r--. 1 root root     0 Feb 14 19:12 1.png
-rw-r--r--. 1 root root     0 Feb 14 19:13 2.png
-rw-r--r--. 1 root root     0 Feb 14 19:14 3.png
-rw-r--r--. 1 root root 10240 Feb 14 19:14 all.tar
drwxr-xr-x. 3 root root    17 Feb 14 18:29 tmp
[root@localhost temp]# tar -czf all.tar.gz *.png
[root@localhost temp]# ll
total 16
-rw-r--r--. 1 root root     0 Feb 14 19:12 1.png
-rw-r--r--. 1 root root     0 Feb 14 19:13 2.png
-rw-r--r--. 1 root root     0 Feb 14 19:14 3.png
-rw-r--r--. 1 root root 10240 Feb 14 19:14 all.tar
-rw-r--r--. 1 root root   129 Feb 14 19:17 all.tar.gz
drwxr-xr-x. 3 root root    17 Feb 14 18:29 tmp
[root@localhost temp]#
36.9 -v 显示解压过程
[root@localhost temp]# tar -xvzf all.tar.gz
1.png
2.png
3.png
[root@localhost temp]#
36.10 -C 将解压文件放到指定目录下
[root@localhost temp]# ll tmp/002
total 0
[root@localhost temp]# ll
total 16
-rw-r--r--. 1 root root     0 Feb 14 19:12 1.png
-rw-r--r--. 1 root root     0 Feb 14 19:13 2.png
-rw-r--r--. 1 root root     0 Feb 14 19:14 3.png
-rw-r--r--. 1 root root 10240 Feb 14 19:14 all.tar
-rw-r--r--. 1 root root   129 Feb 14 19:17 all.tar.gz
drwxr-xr-x. 4 root root    28 Feb 14 19:19 tmp
[root@localhost temp]# tar -xf all.tar.gz -C tmp/002
[root@localhost temp]# ll tmp/002
total 0
-rw-r--r--. 1 root root 0 Feb 14 19:12 1.png
-rw-r--r--. 1 root root 0 Feb 14 19:13 2.png
-rw-r--r--. 1 root root 0 Feb 14 19:14 3.png
[root@localhost temp]#
38. whereis 命令
显示命令以及相关文件的全路径
参数含义
# -b 定位指定的命令的可执行文件
# -s 定位源码文件
# -m man帮助文件(文档)的路径
示例
[root@localhost /]# whereis locate
locate: /usr/bin/locate /usr/share/man/man1/locate.1.gz
[root@localhost /]#
39. locate 命令
39.1 部署
yum install mlocate -y
39.2 更新
updatedb
39.3 有效参数
# -c 不显示内容只显示行数
# -i 忽略大小写
# -r 支持正则
39.4 特性
39.5 案例
locate bin
40. find 命令
- 通过指定的路径完成文件的查找
- 搜索的速度很慢,适合用于查找非系统文件,就是实时查找
- 设置搜索用户具备读取和执行权限的目录
- 默认是精确查询
40.1 -name 按名称
[root@localhost data]# find ./ -name readme.*
./day04/command/readme.md
./day05/readme.md
40.2 -type 按文件类型
按文件夹进行查找
[root@localhost data]# find ./ -type d
./
./day01
./day02
./day03
./day04
./day04/command
./day04/command/tmp
./day05
./day05/tmp
[root@localhost data]#
按文件查询
[root@localhost data]# find ./ -type f
./day01/for-assign.sh
./day01/for-assign-symbol.sh
./day01/number-roll.sh
./day01/number-roll-new.sh
./day01/1.js
./day01/bad_file
./day02/while-add-number.sh
./day02/while-read-line.sh
./day02/simple_select.sh
./day02/while-read-line-1.sh
./day02/fun001.sh
./day02/fun002.sh
./day02/fun003.sh
./day02/fun004.sh
./day03/func001.sh
./day03/func002.sh
./day03/func003.sh
./day03/func004.sh
./day03/func-called-func.sh
./day04/sig-001.sh
./day04/sig-002.sh
./day04/command/1.png
./day04/command/2.png
./day04/command/3.png
./day04/command/4.png
./day04/command/tmp/1.png
./day04/command/tmp/2.png
./day04/command/tmp/3.png
./day04/command/tmp/4.png
./day04/command/all.tar.gz
./day04/command/readme.md
./day04/read-test.sh
./day04/params-count.sh
./day04/ip-test.sh
./day05/readme.md
[root@localhost data]#
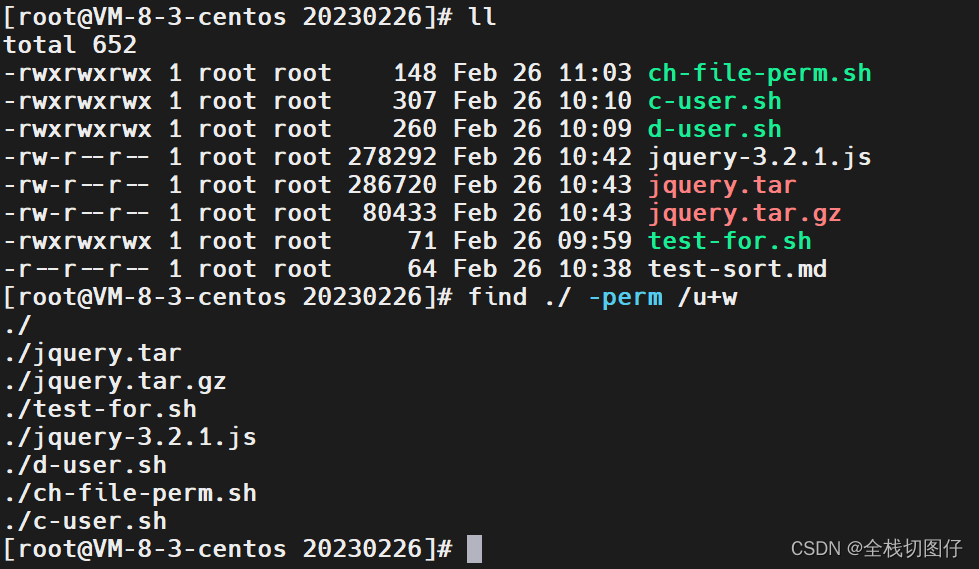
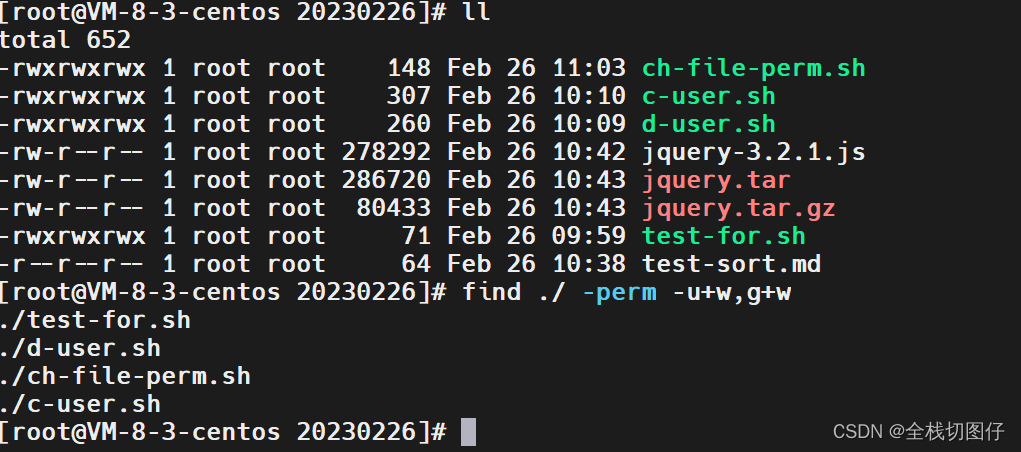
40.3 -perm 按权限查找
[root@localhost data]# find ./ -perm 777
./day04/command/readme.md
./day05/readme.md
[root@localhost data]#
40.3.1 用户至少有写权限
40.3.2 用户 以及群组至少有写权限
40.4 -maxdepth 指定深度
[root@localhost data]# find ./ -maxdepth 3 -perm 777
./day04/command/readme.md
./day05/readme.md
[root@localhost data]#
40.5 -size 按大小
查询大小 > 20k 的文件
[root@localhost day05]# find ./ -size +20k
./readme.md
查询大小<20k 的文件
[root@localhost day05]# find ./ -size -20k
./
./tmp
./tmp/detph-tmp
./tmp/detph-tmp/test-shell.sh
./tmp/detph-tmp/tmp001
./tmp/detph-tmp/tmp001/test-shell001.sh
[root@localhost day05]#
40.6 -empty 空文件 以及目录
[root@localhost data]# find ./ -empty
./day01/1.js
./day01/bad_file
./day04/command/1.png
./day04/command/2.png
./day04/command/3.png
./day04/command/4.png
./day04/command/tmp/1.png
./day04/command/tmp/2.png
./day04/command/tmp/3.png
./day04/command/tmp/4.png
./day05/tmp/detph-tmp/test-shell.sh
./day05/tmp/detph-tmp/tmp001/test-shell001.sh
[root@localhost data]#
40.7 ! -empty 非空文件 以及目录
[root@localhost day05]# find ./ ! -empty
./
./readme.md
./tmp
./tmp/detph-tmp
./tmp/detph-tmp/tmp001
[root@localhost day05]#
40.8 type -d -empty 空目录
[root@localhost data]# find ./ -type d -empty
./day05_1
40.9 -user 属主
[root@localhost day05]# ll
total 36
-rwxrwxrwx. 1 vagrant root 34209 Feb 23 04:50 readme.md
drwxr-xr-x. 3 root    root    23 Feb 23 03:54 tmp
[root@localhost day05]# find ./ -user vagrant
./readme.md
[root@localhost day05]#
40.10 -group 属组
[root@localhost day05]# ll
total 36
-rwxrwxrwx. 1 root vagrant 34209 Feb 23 04:50 readme.md
drwxr-xr-x. 3 root root       23 Feb 23 03:54 tmp
[root@localhost day05]# find ./ -group vagrant
./readme.md
[root@localhost day05]#
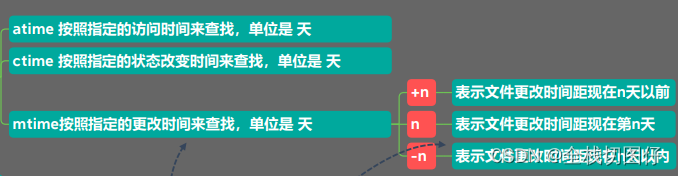
40.11 -atime atime 按照指定的访问时间来查找,单位是 天
40.12 -ctime ctime 按照指定的状态改变时间来查找,单位是 天
40.13 -mtime mtime按照指定的更改时间来查找,单位是 天
- +n 表示文件更改时间距现在n天以前
- n 表示文件更改时间距现在第n天
- -n 表示文件更改时间距现在n天以内

一站式 AI 云服务平台
更多推荐


 3
3 0
0- 0


 已为社区贡献4条内容

所有评论(0)