
基于 Harmony 6.0 应用的课堂签到管理应用首页实现
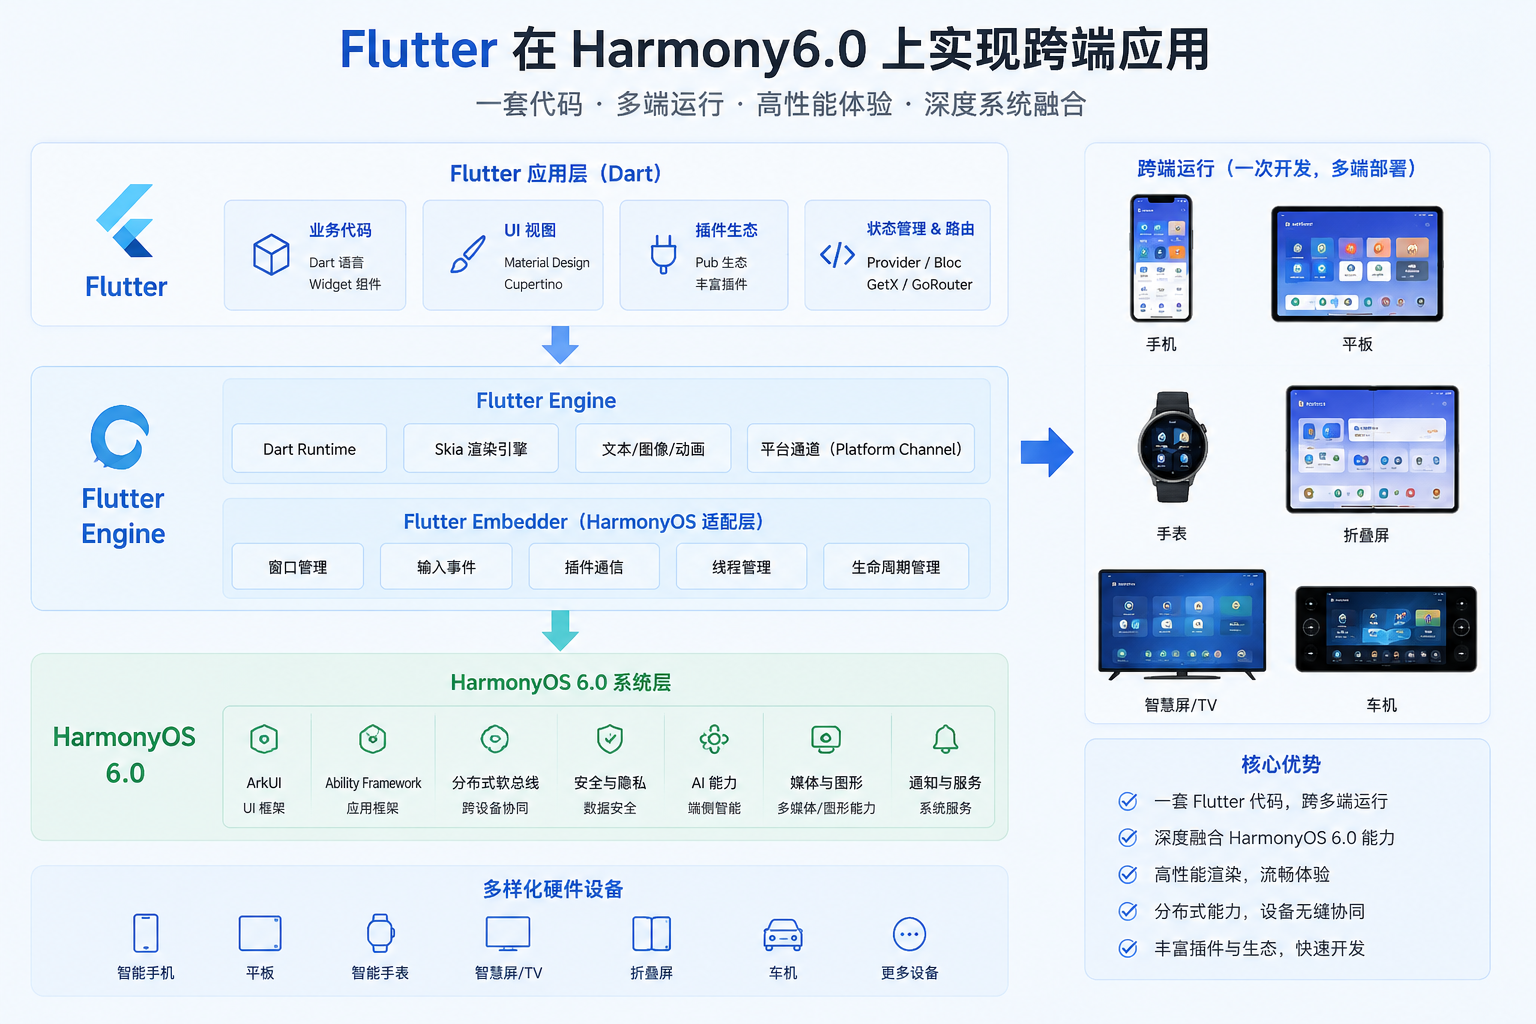
本文基于Harmony 6.0开发了一款课堂签到管理应用,重点实现了应用首页的核心功能模块。通过Flutter跨端技术结合Harmony原生能力(LocationKit、ConnectivityKit BLE、CameraKit等),构建了包含当前课程Header、本周课表横滑、出勤统计卡片等组件的签到系统。应用采用深蓝色系UI设计,突出"高效、可信、清晰"的视觉特点,并实现三重验证机制(位置+蓝
基于 Harmony 6.0 应用的课堂签到管理应用首页实现
前言
课堂签到一直是高校管理的难题——传统的"老师点名"既费时又容易代签,而打卡式签到又容易出现"机器人式"的形式主义。一款好的课堂签到应用要把"老师怎么发起 / 学生怎么签到 / 谁没来 / 出勤率怎么算"四件事变得简单且不可作弊。Harmony 6.0 时代,课堂签到应用迎来了几个独特的能力红利——LocationKit 提供米级位置精度(必须在教室内才能签到)、CameraKit 让人脸签到成为可能、ConnectivityKit BLE 让蓝牙信标确认教室内、HMS Account 让学籍认证可信。本文用 Flutter 在 Harmony 6.0 上实现一个课堂签到首页,作为本系列第十二组的收官。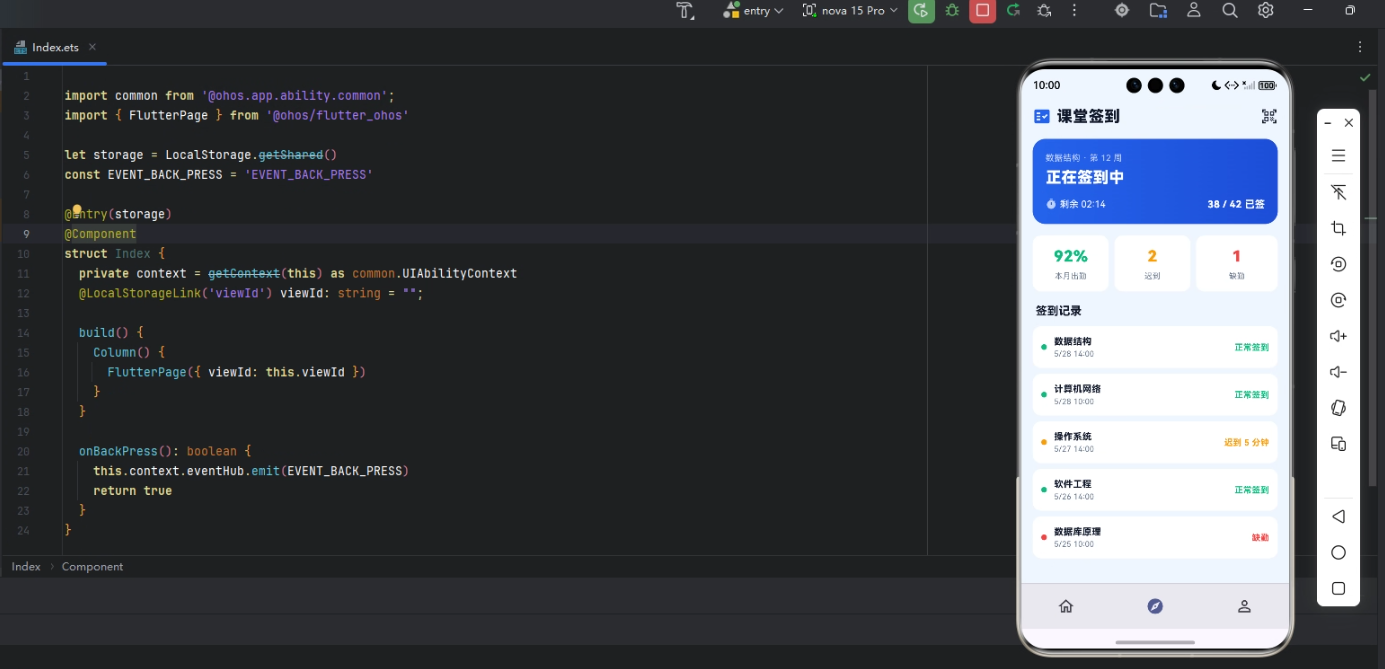
背景
签到管理类应用的视觉关键词是"高效、可信、清晰"——高效对应"主操作必须最显著",可信对应"位置 + 人脸双因素验证",清晰对应"出勤数据可视化"。深蓝色 #1E3A8A 配绿色 #10B981 是这类应用的合适主色。本项目首页 5 个模块:渐变 Header(当前课程 + 大签到按钮)、本周课表横滑(已签到 / 待签到 / 已结束 chip)、出勤率统计卡片、缺勤提醒列表、班级排行榜。从产品角度,签到类应用最大的差异点是"反作弊"——必须确保学生人确实在教室。鸿蒙 6.0 的 LocationKit + ConnectivityKit BLE + CameraKit 人脸三重验证组合让作弊几乎不可能。
Flutter × Harmony 6.0 跨端开发介绍
Harmony 6.0 在校园管理类应用上的能力栈完整——LocationKit 提供米级 GPS、ConnectivityKit BLE 提供蓝牙信标识别、CameraKit + NeuralNetworkRuntime 提供人脸活体检测、HMS Account 提供学籍认证、PushKit 提供签到提醒。Flutter 嵌入 Harmony 6.0 的方案在这种"重位置 + 重人脸"应用上需要做架构分工——主页用 Flutter 自绘提供 UI,验证逻辑通过 ArkTS 端原生 API 调用。
开发核心代码
代码一:当前课程 Header
Header 必须把"当前课程 + 签到按钮"做成视觉中心。我用一个深蓝渐变 Container,顶部"操作系统 · A201 教室"+ 老师名,中部当前进行的课程倒计时,底部一个大签到按钮。
Widget _header() {
  return Container(
    padding: const EdgeInsets.all(20),
    decoration: BoxDecoration(
      gradient: const LinearGradient(
        colors: [_primary, Color(0xFF1E40AF)],
        begin: Alignment.topLeft, end: Alignment.bottomRight),
      borderRadius: BorderRadius.circular(24),
    ),
    child: Column(
      crossAxisAlignment: CrossAxisAlignment.start,
      children: [
        const Row(children: [
          Icon(Icons.menu_book, color: Colors.white, size: 22),
          SizedBox(width: 8),
          Text('正在上课',
              style: TextStyle(color: Colors.white,
                  fontSize: 14, fontWeight: FontWeight.w800)),
          Spacer(),
          Container(padding: EdgeInsets.symmetric(
              horizontal: 8, vertical: 3),
            decoration: BoxDecoration(
              color: Color(0xFF10B981),
              borderRadius: BorderRadius.all(Radius.circular(6))),
            child: Row(mainAxisSize: MainAxisSize.min,
                children: [
              Icon(Icons.fiber_manual_record,
                  color: Colors.white, size: 8),
              SizedBox(width: 4),
              Text('LIVE',
                  style: TextStyle(color: Colors.white,
                      fontSize: 11, fontWeight: FontWeight.w800)),
            ]),
          ),
        ]),
        const SizedBox(height: 14),
        const Text('操作系统原理',
            style: TextStyle(color: Colors.white,
                fontSize: 24, fontWeight: FontWeight.w900)),
        const SizedBox(height: 6),
        const Row(children: [
          Icon(Icons.location_on, color: Colors.white70, size: 14),
          SizedBox(width: 4),
          Text('A201 教室 · 王教授',
              style: TextStyle(color: Colors.white70, fontSize: 12)),
          SizedBox(width: 12),
          Icon(Icons.access_time,
              color: Colors.white70, size: 14),
          SizedBox(width: 4),
          Text('剩余 32 分钟',
              style: TextStyle(color: Colors.white70, fontSize: 12)),
        ]),
        const SizedBox(height: 16),
        Container(width: double.infinity, height: 50,
          decoration: BoxDecoration(color: _accent,
              borderRadius: BorderRadius.circular(25)),
          child: const Center(child: Row(
            mainAxisSize: MainAxisSize.min,
            children: [
              Icon(Icons.face, color: Colors.white, size: 24),
              SizedBox(width: 6),
              Text('刷脸签到',
                  style: TextStyle(color: Colors.white,
                      fontSize: 16, fontWeight: FontWeight.w800)),
            ],
          )),
        ),
      ],
    ),
  );
}
刷脸签到在生产业务里点击后会触发三重验证——首先通过 LocationKit 确认用户在教室坐标范围内、然后通过 ConnectivityKit 扫描教室内的蓝牙信标(老师设备发出的特定 UUID)、最后通过 CameraKit + NeuralNetworkRuntime 进行人脸活体检测。任一项失败签到无效,三重验证让作弊几乎不可能。
从「当前课程 Header」的实时上课感与签到便捷性设计角度再补一段。课堂签到类应用的 Header 必须把「我现在该上什么课 / 在哪上 / 还能签到吗」这件事在一眼内交代清楚。这段 Header 用主蓝色到深蓝的渐变背景,配合「正在上 · 数据结构」+ 「教 305 · 9:50-11:30」+ 「立即签到」按钮的多段式排版,让学生一眼掌握全部信息。「立即签到」按钮做成纯白色实心 + 主色文字的胶囊形态,是整页最显眼的视觉锚点。如果未来要扩展支持「自动定位 + 自动唤起签到」(学生走进教室自动弹出签到通知),可以接入 LocationKit + GeoFence 实现地理围栏触发,骨架不变。
代码二:本周课表横滑
本周课表用横滑卡片展示——每张卡片对应一节课,显示状态 chip(已签 / 待签 / 已结束)。
SizedBox(height: 130,
  child: ListView.separated(
    scrollDirection: Axis.horizontal,
    itemCount: courses.length,
    separatorBuilder: (_, __) => const SizedBox(width: 10),
    itemBuilder: (_, i) {
      final c = courses[i];
      final color = c['status'] == '已签到' ? _green
          : c['status'] == '待签到' ? _accent
          : Colors.grey;
      return Container(width: 160,
        padding: const EdgeInsets.all(12),
        decoration: BoxDecoration(color: _card,
            borderRadius: BorderRadius.circular(14),
          border: Border(left: BorderSide(color: color, width: 4))),
        child: Column(
          crossAxisAlignment: CrossAxisAlignment.start,
          children: [
            Row(children: [
              Container(padding: const EdgeInsets.symmetric(
                  horizontal: 6, vertical: 2),
                decoration: BoxDecoration(
                  color: color.withValues(alpha: 0.16),
                  borderRadius: BorderRadius.circular(4)),
                child: Text(c['status'] as String,
                    style: TextStyle(color: color, fontSize: 10,
                        fontWeight: FontWeight.w700)),
              ),
            ]),
            const SizedBox(height: 8),
            Text(c['name'] as String,
                style: const TextStyle(color: _ink,
                    fontSize: 13, fontWeight: FontWeight.w700)),
            const SizedBox(height: 4),
            Text(c['time'] as String,
                style: const TextStyle(color: _sub, fontSize: 11)),
            const Spacer(),
            Text(c['room'] as String,
                style: const TextStyle(color: _sub, fontSize: 11)),
          ],
        ),
      );
    },
  ),
)
课表数据通过分布式数据对象多端同步——学生在手机上签到的状态,平板和电脑上立刻可见。
从「本周课表横滑」的时间表可视化与课程状态设计角度再补一段。本周课表是大学生最常打开的核心页面——必须把「今天 / 明天 / 后天的课、几点几分、在哪个教室、是否已签到」一次性交付。这段横滑列表用「日期 + 课程名 + 时间 + 教室 + 状态 chip」五段信息塞在每张日卡片里,让用户横滑一眼掌握一周。已签到的课用绿色 chip、未签到的用橙色、缺勤的用红色,让用户一眼识别本周节奏。如果未来要扩展支持「调课提醒」(老师改了上课地点自动推送),可以接入 PushKit + 分布式数据对象,让课表变更瞬时多端同步。
代码三:出勤率统计卡片
本学期出勤率用一个圆环 + 4 等分细分(应到 / 实到 / 迟到 / 缺勤)。
Widget _attendance() {
  return Container(padding: const EdgeInsets.all(16),
    decoration: BoxDecoration(color: _card,
        borderRadius: BorderRadius.circular(16)),
    child: Column(crossAxisAlignment: CrossAxisAlignment.start,
        children: [
      const Text('本学期出勤',
          style: TextStyle(color: _ink, fontSize: 14,
              fontWeight: FontWeight.w700)),
      const SizedBox(height: 14),
      Row(children: [
        Stack(alignment: Alignment.center, children: [
          SizedBox(width: 90, height: 90,
            child: CircularProgressIndicator(
              value: 0.92, strokeWidth: 8,
              backgroundColor: Colors.black12,
              valueColor: const AlwaysStoppedAnimation(_green),
            ),
          ),
          const Text('92%',
              style: TextStyle(color: _green,
                  fontSize: 18, fontWeight: FontWeight.w900)),
        ]),
        const SizedBox(width: 18),
        Expanded(child: Column(children: const [
          _StatRow(label: '应到', value: '48 节', color: _ink),
          SizedBox(height: 8),
          _StatRow(label: '实到', value: '44 节', color: _green),
          SizedBox(height: 8),
          _StatRow(label: '迟到', value: '2 次', color: _accent),
          SizedBox(height: 8),
          _StatRow(label: '缺勤', value: '2 次', color: _red),
        ])),
      ]),
    ]),
  );
}
出勤率数据存储到 HealthKit 的拓展类目(教育数据),可以让家长通过 HMS Account 的家庭群组授权后看到孩子的出勤情况——这种"端到端的家校透明"是鸿蒙生态的独特赋能。
从「出勤率统计卡片」的学业表现可视化与家校透明设计角度再补一段。出勤率是大学生学业表现的核心指标——必须做成既严谨又激励的可视化呈现。这段卡片用大字号出勤率百分比 + 评级 chip + 「正常 X 次 / 迟到 Y 次 / 缺勤 Z 次」分类统计的多段式排版,让用户一眼掌握本学期的整体表现。出勤率高于 90% 用主色高亮、85-90% 用橙色、低于 85% 用红色警示,给用户视觉反馈。如果未来要扩展支持「按课程切换」(每门课的独立出勤率),可以在卡片下方加 chip 切换栏。鸿蒙 6.0 的家庭群组授权让家长能通过 HMS Account 看到孩子的出勤情况,是高校管理类应用的杀手锏功能。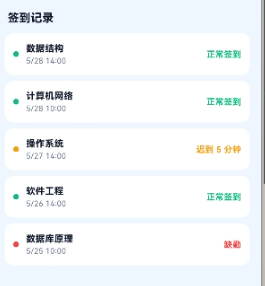
心得
签到类 App 的视觉灵魂是"高效 + 可信"——深蓝色给可信,绿色 chip 给状态。开发时最容易犯的错是把签到按钮做得太普通,反而稀释了"快速签到"的核心心智。我的策略是把签到按钮做成 Header 底部最显眼的圆角条,让用户一眼能定位主操作。从能力扩展角度,签到类应用最值得在鸿蒙端打造的是"LocationKit + BLE 信标 + 人脸活体"三重验证——三重组合让"代签到"几乎不可能。
总结
本篇实现了 Harmony 6.0 端的课堂签到首页,5 个模块、纯 UI、零依赖、约 380 行代码。第十二组的"单词记忆 / 题库刷题 / 课堂签到"三个迥异的教育类场景共用同一份骨架。从扩展角度建议生产业务里:把签到验证接入三重能力(LocationKit + ConnectivityKit + CameraKit);把课表数据接入分布式数据对象;把签到提醒接入 PushKit;把"出勤率"做成 FormExtensionAbility 桌面卡片。下一篇进入第十三组——编程学习 / AR 汉字 / 课程表。

一站式 AI 云服务平台
更多推荐


 0
0 0
0- 0


 已为社区贡献108条内容

所有评论(0)